# Getting Started

This document provides basic knowledge about DocStudio and it's functionality

{% hint style="info" %}
**Looking for API documentation?**

If you want to integrate DocStudio with your system, use the developer documentation. It includes API methods, application tokens, callbacks, integrations, and examples for automation.

[Open DocStudio for Developers](https://developers.docstudio.com/)
{% endhint %}

<figure><img src="/files/VYM5X2amOesHvPAub5UF" alt=""><figcaption></figcaption></figure>

### User Profile

Before you start setting up templates and sending envelopes, [Sign in to DocStudio](#user-profile) and take a minute to review your [Personal Settings Page Overview](/user/user-profile/personal-settings-page-overview).

* Make sure your first name and last name are correct
* Addopt a [How to Add or Edit an e-ink signature](/user/user-profile/how-to-add-or-edit-an-electronic-signature)

Optional:

* Add [How to Add or Edit Initials](/user/user-profile/how-to-add-or-edit-initials)
* [How to Upload a User Icon](/user/user-profile/how-to-upload-a-user-icon)

### Send Your First Envelope

#### Dashboard Quick Send

If you only need to send files for signing and do not want to go through the full envelope creation process, you can simply use **Quick Send** from the **Dashboard** to upload and send files.

<figure><img src="/files/OrbJyNkQoJDQUFd7TaHG" alt=""><figcaption></figcaption></figure>

1. Open the **Dashboard**.
2. Click the <img src="/files/0RQPZm08Im3rXCuxHTgi" alt="" data-size="line"> button.
3. Upload your file(s) in the modal window.
4. Check the uploaded file(s) list and click the <img src="/files/nob8edMUK37Y0jyeHI5J" alt="" data-size="line"> button.
5. Enter the recipient's email.\
   — You can also **Add approver or send a copy**.
6. Click the <img src="/files/7BSNKwG8DZ1rRN00F9zM" alt="" data-size="line"> button.
7. In the top-right corner, click the <img src="/files/q1ys5nRJpSmDQsRcUFhb" alt="" data-size="line"> button.

**Learn more:**

* [Dashboard Page Overview](/user/dashboard/dashboard-page-overview)
* [How to Upload a Document for e-Signature](/user/dashboard/how-to-upload-a-document-for-electronic-signature).

#### Create from a template

For more advanced or reusable workflows, you can create a new template or use an existing one. Templates allow you to configure the document structure, add fields, define recipients, and prepare everything in advance before sending.

1. Open a template card on the dashboard, or a template in the templates list.
2. Click the template card to start an envelope draft.

![](https://docs.docstudio.com/en/latest/_images/createFromTemplates.png)

#### Create by cloning an envelope

1. Open an existing envelope.
2. Click the **Clone** <img src="/files/ua0Xdajn7BVgHxyKv9m4" alt="" data-size="line"> icon.

<figure><img src="/files/HGfL1reSKcGfrmlPnY8o" alt=""><figcaption></figcaption></figure>

{% hint style="warning" %}
You won’t see the **Clone** <img src="/files/ua0Xdajn7BVgHxyKv9m4" alt="" data-size="line"> icon if:

* your mailbox has no access to the source template
* the envelope was created via **Quicksend**
  {% endhint %}

After creation, the envelope opens as a draft.

1. Fill in roles for the envelope flow.
2. Use **I am assignee/approver/signer** to assign yourself to a role.
3. After you fill all required fields, send the envelope to the next participant.

<figure><img src="/files/ubdOuwcmsXalGtm5iEZ9" alt="" width="375"><figcaption></figcaption></figure>

Click the <img src="/files/PJmqArJFtHdggLt6Lh0P" alt="" data-size="line"> button to save the envelope and send it later.

{% hint style="info" %}
**Save draft** option is not available for **Quicksend** envelopes.
{% endhint %}

After the first save, the envelope auto-saves after each change. The indicator next to the <img src="/files/MdZzXbiF1odkr17wkfQR" alt="" data-size="line"> shows the save status. Auto-save saves your changes, but it does not send the envelope. Auto-save also works for envelopes in **Waiting for you** status.

**Learn more:**

* [How to Create and Send an Envelope](/user/envelopes/how-to-create-and-send-an-envelope)

### Sign an Envelope

<figure><img src="/files/C6GELsU7M6OHBVFefBES" alt=""><figcaption></figcaption></figure>

**Learn more**:

* [How to Complete an Incoming Envelope (Existing DocStudio User)](/user/envelope-invitations-and-completion/how-to-complete-an-incoming-envelope-existing-docstudio-user)
* [How to Complete an Incoming Envelope (First-Time Recipient)](/user/envelope-invitations-and-completion/how-to-complete-an-incoming-envelope-first-time-recipient)
* [How to Sign an Envelope (E-Ink Signature)](/user/sign-and-download-envelopes/how-to-sign-an-envelope-electronic-signature)
* [How to Sign an Envelope (Qualified Electronic Signature)](/user/sign-and-download-envelopes/how-to-sign-an-envelope-qualified-electronic-signature)
* [How to Sign Several Envelopes at Once](/user/sign-and-download-envelopes/how-to-sign-several-envelopes-at-once)

### Track Envelope Status

#### Check **Dashboard**

{% columns %}
{% column %}
Open **Dashboard** and look in **Waiting for you** section.

Use this section to quickly find envelopes that need your action.
{% endcolumn %}

{% column %}

<figure><img src="/files/hA0Y83yIvT4htPl7hDso" alt=""><figcaption></figcaption></figure>
{% endcolumn %}
{% endcolumns %}

#### Check **Mailbox**

<figure><img src="/files/fZ9WTz8QytJq7VoBiqV8" alt=""><figcaption></figcaption></figure>

Open **Mailbox** to review the full envelope list. Use the envelope list to monitor current, completed, cancelled, or expired envelopes.

#### Filter by status

{% columns %}
{% column %}
Use default status filters to find envelopes faster:

* **Waiting for you**
* **On approval**
* **Pending**
* **Completed**
* **Cancelled**
* **Expired**

Use these filters to understand the current stage of the envelope and find documents that still require action.
{% endcolumn %}

{% column %}

<figure><img src="/files/vgq1w5gPFWeVyl0txutH" alt=""><figcaption></figcaption></figure>
{% endcolumn %}
{% endcolumns %}

#### If you cannot find the envelope

* Make sure you are in the correct mailbox.
* Switch mailboxes and check again.
* If needed, combine filters and search to narrow the result.

**Learn more:**

* [How to Find Envelopes That Require Action](/user/envelopes/how-to-find-envelopes-that-require-action)
* [How to Filter Envelopes](/user/envelopes/how-to-filter-envelopes)
* [How to Customize the Envelope List](/user/envelopes/how-to-customize-the-envelope-list)
* [Envelope Flow Statuses](/user/envelope-invitations-and-completion/envelope-flow-statuses)

### Download Completed Envelopes

{% hint style="info" %}
You can download signed documents after all participants with the **Signer** role complete their steps.
{% endhint %}

#### Download from the envelope page

1. Make sure the envelope is completed.
2. Open the envelope.
3. Click the **Download** ![](/files/UyzGzZ12GGXYh8DKoL71) icon in the envelope header to download the full envelope archive

**Optional:**

* Click the **Download** ![](/files/UyzGzZ12GGXYh8DKoL71) icon next to a document name to download only that document archive.

{% columns %}
{% column %}
Full envelope archive:

![](/files/rki3lev3S4GCKdUT6Vkq)
{% endcolumn %}

{% column %}
Single document archive:

![](/files/tFCtUZRMh4xdaZIZxqPQ)
{% endcolumn %}
{% endcolumns %}

The archive downloads right after you Click the download icon ![](/files/UyzGzZ12GGXYh8DKoL71).

#### Download multiple envelopes

1. Open your mailbox and select the envelopes you want to download.
2. Click the **More option**s ![](/files/6NooSdwz0ktut3AiV67I) icon.
3. From a dropdown menu click the **Download envelopes** ![](/files/UyzGzZ12GGXYh8DKoL71) icon.
4. Click **Full archive**.

<figure><img src="/files/DP5ItiHiFYGnF9qbbihS" alt=""><figcaption></figcaption></figure>

### Related topics

* [Template Builder](/user/template-builder) — create and manage templates
* [Template Links & Public Envelope Creation](/user/template-links-and-public-envelope-creation) — share templates through public links
* [Envelope Approvals & Delegation](/user/envelope-approvals-and-delegation) — send for approval and delegate actions
* [Envelope Comments](/user/envelope-comments) — discuss envelope content inside the workflow
* [Scenarios](/user/scenarios) — automate multi-step document processes
* [Dictionaries](/user/dictionaries) — manage reusable reference data
* [Integrations & API Access](/admin-panel/integrations-and-api-access) — connect external systems and use API tools


# DocStudio Structure

This document explains the basic DocStudio structure, including accounts, mailboxes, users, templates, and envelopes.

### Overview

<figure><img src="/files/tMpi99P2RXFiDZQ4nfF4" alt=""><figcaption></figcaption></figure>

DocStudio is built around several main concepts:

* **Account** — defines how the user accesses and uses DocStudio.
* **Mailbox** — defines which email address is used for sending envelopes and receiving related notifications.
* **User** — a person who works in DocStudio.
* **Admin** — a user with additional permissions to manage account settings and access.
* **Template** — a reusable setup for creating envelopes faster.
* **Envelope** — a document package sent to recipients for signing, approval, completion, or review.

These concepts work differently in a **Personal Account** and a **Corporate Account.**

Start with [Personal Account](/archive/personal-account) or [Corporate Account](/archive/corporate-account) if you need details for a specific account type.

### Personal Account

<figure><img src="/files/u11HP0STwntgjhXg8APN" alt=""><figcaption></figcaption></figure>

A **Personal Account** is intended for individual use.

In this account type, one user works with their own documents, templates, envelopes, and mailbox. The user manages their own document flow without company-level access management or shared organization resources.

#### How a Personal Account works

In a Personal Account:

* the account belongs to one user
* the user works with their own documents, templates, and envelopes
* envelopes are sent from the user’s personal mailbox
* completed documents and envelope-related notifications are received by the personal mailbox
* there are no organization members managed by an admin
* access to documents and envelopes is controlled by the account owner

#### Mailbox in a Personal Account

In a Personal Account, the mailbox belongs to one user.

It is used to:

* send envelopes
* receive envelope-related notifications
* receive completed documents

The mailbox is not shared with other users.

### Corporate Account

<figure><img src="/files/gYwTRetrp8Wd9urrLOir" alt=""><figcaption></figcaption></figure>

A **Corporate Account** is intended for companies, teams, departments, or organizations.

In this account type, multiple users can work within the same corporate environment. Access to templates, envelopes, mailboxes, and account settings may depend on user roles and permissions.

#### How a Corporate Account works

In a Corporate Account:

* the account belongs to a company or organization
* admins can invite and manage multiple users
* users may have different roles and permissions
* admins can manage users, access, and account settings
* users may work with shared company resources
* envelopes can be sent from corporate mailboxes
* mailbox access depends on permissions

#### Mailbox in a Corporate Account

In a Corporate Account, mailboxes can be used as company or team email identities.

They can be used to:

* send envelopes on behalf of a company, team, or department
* receive envelope-related notifications
* receive completed documents
* separate business communication from a user’s personal mailbox
* allow authorized users to send envelopes from shared mailboxes

A user can use only the mailboxes they have access to.

### Personal Account vs Corporate Account

<figure><img src="/files/QR6lOtVM4XrjqEdU2MwB" alt=""><figcaption></figcaption></figure>

### Key Concepts

#### Account

An **Account** defines how a user accesses DocStudio and what functionality is available.

There are two main account types:

* **Personal Account**
* **Corporate Account**

The account type defines what the user can manage, which mailbox they can use, and whether they work independently or as part of an organization.

See [Personal Account](/archive/personal-account) and [Corporate Account](/archive/corporate-account) for details.

#### Mailbox

A **Mailbox** is an email identity used to send envelopes and receive related notifications.

A mailbox can be used to:

* send envelopes
* receive envelope notifications
* manage document communication between the sender and recipients

See [How to Set a Default Mailbox](/user/mailbox/mailbox-user/how-to-set-a-default-mailbox), [How to Control Mailbox Visibility](/user/mailbox/mailbox-user/how-to-control-mailbox-visibility), and [How to Find a Mailbox ID (UUID)](/user/mailbox/mailbox-user/how-to-find-a-mailbox-id-uuid) for common mailbox actions.

#### User

A user is a person who has access to a DocStudio account.

A user may be able to:

* create envelopes
* send envelopes to recipients
* sign or complete documents
* approve or review documents
* create and use templates
* access specific mailboxes
* manage documents and envelope flows

See [Personal Settings Page Overview](/user/user-profile/personal-settings-page-overview), [How to Change Your Password](/user/user-profile/how-to-change-your-password), and [How to Delete a Profile](/user/user-profile/how-to-delete-a-profile) for user-level actions.

#### Corporate Account Admin

An **Account Admin** is a user with additional management permissions in a Corporate Account.

An admin may be able to:

* invite and manage users
* configure access permissions
* manage corporate mailboxes
* update account or organization settings

Admin functionality is not available in a Personal Account because there are no organization members or shared corporate resources to manage.

See [How to Add a Corporate Account Admin](/admin-panel/users-and-user-roles/how-to-add-a-corporate-account-admin) to learn more.

#### Envelope

An **Envelope** is a package that contains one or more documents sent to recipients for action.

An envelope may include:

* documents
* recipients
* recipient roles
* fields to complete or sign
* message or subject
* signing or approval flow
* sending mailbox
* envelope status

Recipients may be asked to sign, approve, complete, review, or receive documents depending on their assigned role.

See [How to Create and Send an Envelope](/user/envelopes/how-to-create-and-send-an-envelope) for the full workflow.

#### Template

A **Template** is a reusable setup that helps users create envelopes faster.

A template can include predefined:

* documents
* dynamic fields
* recipient roles
* signing or approval flow
* settings used during envelope creation

Templates help standardize document processes and reduce the time needed to prepare envelopes.

See [How to Create and Configure a Template](/user/template-builder/template/how-to-create-and-configure-a-template) for setup details.

### Related pages

* [Getting Started](/)
* [Personal Account](/archive/personal-account)
* [Corporate Account](/archive/corporate-account)


# Authorization & Security

* [How to Register on Platform](/user/authorization-and-security/how-to-register-on-platform)
  * [How to Register a Personal Account](/user/authorization-and-security/how-to-register-on-platform/how-to-register-a-personal-account)
  * [How to Register a Company Account](/user/authorization-and-security/how-to-register-on-platform/how-to-register-a-company-account)
* [How to Sign In to DocStudio](/user/authorization-and-security/how-to-sign-in-to-docstudio)
* [Password Rules](/user/authorization-and-security/password-rules)
* [Application Tokens (API Access)](/user/authorization-and-security/application-tokens-api-access)


# How to Register on Platform

* [How to Register a Personal Account](/user/authorization-and-security/how-to-register-on-platform/how-to-register-a-personal-account)
* [How to Register a Company Account](/user/authorization-and-security/how-to-register-on-platform/how-to-register-a-company-account)


# How to Register a Personal Account

This document explains how to create a personal account in DocStudio.

### Create a personal account

<figure><img src="/files/DEQcNRYnMrBPM8TOfD0d" alt=""><figcaption></figcaption></figure>

{% columns %}
{% column width="50%" %}
Use this flow to create a personal account:

1. Open the [Sign in](https://app.docstudio.com/auth/login) page and click **Create Account**.
2. Fill in the **Email field** and click the <img src="/files/tzvLjR7dtPwyct7ugdHY" alt="" data-size="line"> button.
3. Check your mailbox for the **Email Address Confirmation** letter, copy the code, and paste it into the **Enter Email Code** field.
   {% endcolumn %}

{% column width="50%" %}

<figure><img src="/files/35wTQLoCg4wFe6wOBC6B" alt="" width="279"><figcaption></figcaption></figure>

f
{% endcolumn %}
{% endcolumns %}

{% columns %}
{% column width="41.66666666666667%" %}
4\. Click the <img src="/files/NOdEGoUnyJbWD3RkWQbf" alt="" data-size="line"> button. — Make sure **Personal Account** is selected.
5\. Enter **First name** and **Last name**.
6\. Enter your phone number.
7\. Enter your password in the **Password** field and re-enter it in the **Confirm Password** field.
8\. Click the <img src="/files/bWdIupME3bNxdSuJtTxP" alt="" data-size="line"> button to finish registration.
{% endcolumn %}

{% column width="58.33333333333333%" %}

<figure><img src="/files/KqkUdKvqGDBMzPBllML3" alt="" width="258"><figcaption></figcaption></figure>
{% endcolumn %}
{% endcolumns %}

{% hint style="info" %}
Use a password with at least 8 characters, one uppercase letter, one lowercase letter, and one number. Avoid easy patterns such as `12345` or `qwerty`. See [Password Rules](/user/authorization-and-security/password-rules) for the full rules.
{% endhint %}


# How to Register a Company Account

This document explains how to create a company account in DocStudio.

### Create a company account

<figure><img src="/files/DEQcNRYnMrBPM8TOfD0d" alt=""><figcaption></figcaption></figure>

{% columns %}
{% column %}
Use this flow to create a company account:

1. Open the [Sign in](https://app.docstudio.com/auth/login) page and click **Create Account**.
2. Fill in the **Email field** and click the <img src="/files/tzvLjR7dtPwyct7ugdHY" alt="" data-size="line"> button.
3. Check your mailbox for the **Email Address Confirmation** letter, copy the code, and paste it into the **Enter Email Code** field.
4. Click the <img src="/files/NOdEGoUnyJbWD3RkWQbf" alt="" data-size="line"> button.
   {% endcolumn %}

{% column %}

<figure><img src="/files/35wTQLoCg4wFe6wOBC6B" alt="" width="279"><figcaption></figcaption></figure>
{% endcolumn %}
{% endcolumns %}

{% columns %}
{% column %}
5\. Check the **Company Account** checkbox.
6\. Enter the company name in **Add the name of your business**.
7\. Enter **EIN or TIN**.
8\. Enter **First name** and **Last name**.
9\. Enter your password in the **Password** field and re-enter it in the **Confirm Password** field.
10\. Click the <img src="/files/bWdIupME3bNxdSuJtTxP" alt="" data-size="line"> button to finish registration.
{% endcolumn %}

{% column %}

<figure><img src="/files/jsjVcwDRQO7SkojiuVLj" alt="" width="228"><figcaption></figcaption></figure>
{% endcolumn %}
{% endcolumns %}

{% hint style="info" %}
Use a password with at least 8 characters, one uppercase letter, one lowercase letter, and one number. Avoid easy patterns such as `12345` or `qwerty`. See [Password Rules](/user/authorization-and-security/password-rules) for the full rules.
{% endhint %}


# How to Sign In to DocStudio

This document explains how to sign in to DocStudio using the available authorization methods.

Choose the sign-in method that matches your account setup.

### Choose your sign-in method

Use one of these options:

* **Email and password** — for standard DocStudio sign-in
* **Sign in with Apple** — if your account uses Apple sign-in
* **Choose company** — if your instance shows a company selection block
* **SSO** — if your company sent you an SSO invitation

### Sign in with email and password

{% columns %}
{% column width="58.333333333333336%" %}

1. Open the sign-in page.
2. Enter your email address.
3. Enter your password.
4. Click the <img src="/files/ZWl4Q3TtOpINDWzLXw08" alt="" data-size="line"> button.
   {% endcolumn %}

{% column width="41.666666666666664%" %}

<figure><img src="/files/oCL11VfPuSYhA5Pvmddt" alt=""><figcaption></figcaption></figure>
{% endcolumn %}
{% endcolumns %}

{% hint style="info" %}
Select **Remember me** to save your email address for the next sign-in.
{% endhint %}

#### If you cannot sign in

* Click **Forgot password?** to reset your password.
* Follow the password renewal page if your password has expired.

### Sign in with Apple

<figure><img src="/files/sbWyhIZ2LSzeoDMqUzbn" alt="" width="434"><figcaption></figcaption></figure>

1. Open the sign-in page.
2. Click **Sign in with Apple**.
3. Enter your Apple ID email address.
4. Click the <img src="/files/t6keYfxvyTDFC2skwA9O" alt="" data-size="line"> button.
5. Enter your Apple ID password.
6. Click the <img src="/files/k3Nid1LL3N4UE83hgC8m" alt="" data-size="line"> button.
7. Enter the two-factor authentication code if Apple requests it.
8. Choose whether to trust this browser.
9. Click the <img src="/files/Kyxcx8XGyy5ar60TCOnB" alt="" data-size="line"> button.
10. Select **Share My Email** during the confirmation step.

{% hint style="warning" %}
Share your real email address when you sign in with Apple. If you select **Hide My Email**, DocStudio cannot complete the sign-in flow and will return you to the login page.
{% endhint %}

#### Apple sign-in result

* **New user** — Open [How to Register Personal Account](/user/user-profile/register/how-to-register-a-personal-account) if you need to complete account creation.
* **Existing user** — Continue to your existing DocStudio profile.

### Sign in with company selection

{% columns %}
{% column %}

<figure><img src="/files/VDNHRQP3MvuAivvKuhaC" alt=""><figcaption></figcaption></figure>
{% endcolumn %}

{% column %}

<figure><img src="/files/fYuT2qUg6C1sR1t05daK" alt=""><figcaption></figcaption></figure>
{% endcolumn %}
{% endcolumns %}

1. Open the sign-in page.
2. Check whether the **Choose company** block is available.
3. Select your company.
4. Continue with the company sign-in flow.

{% hint style="info" %}
This option appears only if the instance has company selection configured.
{% endhint %}

### Complete your first sign-in with SSO

Use this flow when your company invited you to sign in through SSO for the first time.

1. Open the **Log in with SSO** email.
2. Follow the link from the email.
3. Create a password for your user profile.
4. Enter the password again in **Confirm Password**.
5. Click the <img src="/files/avVx1EBT8mqPWFsIml0R" alt="" data-size="line"> button.

{% columns %}
{% column %}

<figure><img src="/files/1zZvLzWrHeyPd8dc7nFn" alt=""><figcaption></figcaption></figure>
{% endcolumn %}

{% column %}

<figure><img src="/files/lD0X7iPbS7cTZ1DTeQAm" alt=""><figcaption></figcaption></figure>
{% endcolumn %}
{% endcolumns %}

See [How to Authorize as a Corporate User](/archive/how-to-authorize-as-a-corporate-user) for the same flow in a dedicated guide.


# Password Rules

This document provides an overview of password requirements, reuse limits, and expiration rules for user accounts.

Use this page to check whether your password matches the default DocStudio rules.

### Quick checklist

Use a password that:

* has at least 8 characters
* includes uppercase and lowercase English letters
* includes at least one number
* does not use simple patterns or common words

{% hint style="info" %}
If your password is rejected, your company may use a stricter password policy. In a corporate account, an **Account Admin** is a user who manages account settings, users, and access rules. See [How to Add a Corporate Account Admin](/admin-panel/users-and-user-roles/how-to-add-a-corporate-account-admin) and [How to Configure Password Policy](broken://spaces/oqUiFHjwtCCGSaEDqbXb/pages/G1vOjzpMnYjWoSJo2C8K) to learn more.
{% endhint %}

### Password complexity

* at least 8 characters
* no easy patterns or repeats (for example, `111111`, `aaaaaa`, `12345`, `qwerty`)
* no personal data or common words (for example, names, birth dates, `computer`, `LAN`, `USER`)
* at least one character from each group:
  * uppercase English letter (A–Z)
  * lowercase English letter (a–z)
  * number (0–9)

Special characters may also be required if your company uses a stricter password policy.

### Examples

{% columns %}
{% column %}
Weak passwords:

* `qwerty123`
* `John1988`
* `aaaaaa11`
  {% endcolumn %}

{% column %}
Stronger passwords:

* `BlueRiver7`
* `WinterMap9`
* `NorthStar5`
  {% endcolumn %}
  {% endcolumns %}

### Password reuse rules

* you can’t reuse a password for 12 months (default, configurable)
* you can’t reuse the last 5 passwords (default, configurable)

### Password expiration

* if you don’t change your password for 90 days (default), you must change it before signing in

To change your password, see [How to Change Your Password](/user/user-profile/how-to-change-your-password).


# Application Tokens (API Access)

This document provides an overview of creating and managing application tokens for API access, including token expiration and revocation.

Application tokens let you authorize API requests and third-party integrations without using your password. You create a token in your user profile, set an expiration date, copy the token once, and revoke it when needed.

{% hint style="warning" %}
This feature can be disabled by an instance administrator. In this case, creating new tokens is disabled. All existing tokens stay valid until their expiration date.
{% endhint %}

Use application tokens with the API and third-party integrations.

### Create a token

<figure><img src="/files/i0nBmD7FmUexJMKQzvyn" alt=""><figcaption></figcaption></figure>

1. Open **User profile** → **Application tokens**.
2. Click the <img src="/files/Pu7tNZxd1ALmKfZszRP4" alt="" data-size="line"> button in the bottom-left corner.
3. Enter the **Token name** and select the **Token expiration date**.
4. In the confirmation window, click the **Copy** icon ![](/files/X4R3ogKQfImDFsqiSXMG).

{% hint style="danger" %}
Make sure to copy the token. This is the only time you can see it. You won’t be able to view it again after you close this window.
{% endhint %}

5. Check the token list. Revoke tokens if needed.

{% hint style="info" %}
You will receive an email notification 30 days and 1 day before the token expires.
{% endhint %}


# User Profile

* [Personal Settings Page Overview](/user/user-profile/personal-settings-page-overview)
* [Account Invites Overview](/user/user-profile/account-invites-overview)
* [How to Change Your Password](/user/user-profile/how-to-change-your-password)
* [How to Add or Edit an Electronic Signature](/user/user-profile/how-to-add-or-edit-an-electronic-signature)
* [How to Add or Edit Initials](/user/user-profile/how-to-add-or-edit-initials)
* [Register](/user/user-profile/register)
  * [How to Register a Personal Account](/user/user-profile/register/how-to-register-a-personal-account)
  * [How to Register a Company Account](/user/user-profile/register/how-to-register-a-company-account)
* [How to Upload a User Icon](/user/user-profile/how-to-upload-a-user-icon)
* [How to Delete a Profile](/user/user-profile/how-to-delete-a-profile)


# Personal Settings Page Overview

Update personal settings such as name, language, timezone, and mailbox defaults.

<figure><img src="/files/whSrADoN9vQVrPURTd0V" alt=""><figcaption></figcaption></figure>

### Fields and options

{% columns %}
{% column %}

* First name
* Last name
* Language (UI language)
* Timezone
* Display exact date (switch between exact dates and relative time)
* Region (controls date and number formats)
* User UUID (read-only, available for copy only)
* Enforce Multi-Factor Authentication (MFA) (require MFA for your sign-in)
  {% endcolumn %}

{% column %}

* Email (read-only, available for copy only)
* Auto deposit mailbox (mailbox used for incoming envelopes)
* Signature settings (create or update your e-ink signature)
* Initials settings (create or update your initials)
* Register a personal account
* Register a company account
* Change password
  {% endcolumn %}
  {% endcolumns %}

After any edit, click the <img src="/files/K7JcYSMWfNI70HMjNc3y" alt="" data-size="line"> button.

{% hint style="info" %}
To configure the default language and regional format for recipient emails and the recipient interface, use [How to Configure Account Localization Settings](/admin-panel/account-settings/how-to-configure-account-localization-settings).
{% endhint %}

{% hint style="info" %}
If **Auto deposit mailbox** is disabled, you must manually select a mailbox for each incoming envelope.
{% endhint %}

### Related topics

* [How to Set a Default Mailbox](/user/mailbox/mailbox-user/how-to-set-a-default-mailbox)
* [How to Change Your Password](/user/user-profile/how-to-change-your-password)
* [How to Add or Edit an e-ink signature](/user/user-profile/how-to-add-or-edit-an-electronic-signature)
* [How to Add or Edit Initials](/user/user-profile/how-to-add-or-edit-initials)
* [Account Invites Overview](/user/user-profile/account-invites-overview)


# Account Invites Overview

Review invitations, accept or decline access, and leave mailboxes you joined.

Use **Manage invitations** to review invitations from other users. You can accept or decline pending invitations, or leave mailboxes you already joined.

Use this page when another account invites you to join one or more mailboxes.

<figure><img src="/files/mhNWWfIT93BfFRFmUUJc" alt=""><figcaption></figcaption></figure>

### Pending invitations

<figure><img src="/files/jHYbuUeMYkHNrwYRKZTO" alt=""><figcaption></figcaption></figure>

Each row is one invited **account**.

Columns:

* account (first column)
* invited mailboxes (second column)
* invitation actions (accept or decline)

After you accept an invitation, the mailbox becomes available in your mailbox list. After you decline it, the invitation is removed from the pending list.

### Accepted invitations

{% columns %}
{% column %}
Accepted invitations are grouped by **account**.

Columns:

* account (first column)
* mailbox you joined (second column)
* mailbox action (leave)

If you click **Leave**, DocStudio removes your access to that mailbox. This action does not delete the mailbox or the account.
{% endcolumn %}

{% column %}

<figure><img src="https://ucarecdn.com/c985e195-1bce-4ed2-84a4-20c9c5c3caab/image_-_2025-05-28T121344.961.png" alt=""><figcaption></figcaption></figure>
{% endcolumn %}
{% endcolumns %}

See [Personal Settings Page Overview](/user/user-profile/personal-settings-page-overview) for related user profile settings.


# How to Change Your Password

This document explains how to change your password from your user profile.

### Change your password

Use this flow to update your current password from **User profile**.

<figure><img src="/files/OIBDcRDImb7ffevwPtJx" alt=""><figcaption></figcaption></figure>

{% hint style="info" %}
Check [Password Rules](/user/authorization-and-security/password-rules) before you save the new password.&#x20;
{% endhint %}

1. Open your **User profile**.
2. In **Password settings**, select **Change password**.
3. Enter your current password.
4. Enter a new password.
5. Confirm the new password.
6. Click the <img src="/files/MIf3kGuDP0cGnUuX4l1p" alt="" data-size="line"> button.

Use the new password the next time you sign in.

{% hint style="warning" %}
Enter your current password to change it. You can’t update the password without it.
{% endhint %}


# How to Add or Edit an Electronic Signature

This document explains how to create or replace your electronic signature from your user profile.

### Create or replace your signature

Use an electronic signature when you want to sign documents in DocStudio. You can draw it or type it.

{% columns %}
{% column %}

<figure><img src="/files/vx18A6tysrAcrdtpNCGA" alt=""><figcaption></figcaption></figure>
{% endcolumn %}

{% column %}

<figure><img src="/files/aXj6skU3P6t6n7k6tk7y" alt=""><figcaption></figcaption></figure>
{% endcolumn %}

{% column %}

<figure><img src="/files/WcLukz4WAwU6gh4ysN5i" alt=""><figcaption></figcaption></figure>
{% endcolumn %}
{% endcolumns %}

1. Open your **User profile**.
2. Click **Add signature**. If you already have a signature, click **Replace signature**.
3. Draw your signature in the dialog.
4. Optional: Switch to the **Text** option.
5. Click the <img src="/files/RgL0aTG9n3mbziwmAyeI" alt="" data-size="line"> button.
6. Click the <img src="/files/MIf3kGuDP0cGnUuX4l1p" alt="" data-size="line"> button.

The electronic signature is saved in your user profile.

### Related topics

* [Personal Settings Page Overview](/user/user-profile/personal-settings-page-overview)
* [How to Add or Edit Initials](/user/user-profile/how-to-add-or-edit-initials)


# How to Add or Edit Initials

This document explains how to create or replace your initials from your user profile.

### Create or replace initials

Use initials when a document or template requires an initials field instead of a full signature.

{% columns %}
{% column width="33.33333333333333%" %}

<figure><img src="/files/UpqQAVSWE7XZMmm8aahb" alt=""><figcaption></figcaption></figure>
{% endcolumn %}

{% column width="33.33333333333333%" %}

<figure><img src="/files/Fw1vPR9cf5JxboefMhL2" alt=""><figcaption></figcaption></figure>
{% endcolumn %}

{% column %}

<figure><img src="/files/jn8AcFrMl8nddhsV1lsv" alt=""><figcaption></figcaption></figure>
{% endcolumn %}
{% endcolumns %}

1. Open your **User profile**.
2. Click **Add initials**. If you already have initials, click **Replace initials**.
3. Draw your initials in the dialog.
4. Click the <img src="/files/RgL0aTG9n3mbziwmAyeI" alt="" data-size="line"> button.
5. Click the <img src="/files/MIf3kGuDP0cGnUuX4l1p" alt="" data-size="line"> button.

The initials are saved in your user profile.

### Related topics

* [Personal Settings Page Overview](/user/user-profile/personal-settings-page-overview)
* [How to Add or Edit an Electronic Signature](/user/user-profile/how-to-add-or-edit-an-electronic-signature)


# Register

* [How to Register a Personal Account](/user/user-profile/register/how-to-register-a-personal-account)
* [How to Register a Company Account](/user/user-profile/register/how-to-register-a-company-account)


# How to Register a Personal Account

This document explains how to register a personal account from your user profile.

### Register a personal account

Use this flow when you already have a profile and want to add a separate personal account.

{% columns %}
{% column %}

1. Open your **User profile**.
2. Click the **Register personal account** button.
3. Enter a new account name or keep the default name.
4. Select the **I agree with Terms and conditions and Privacy Policy** checkbox.
5. Click the <img src="/files/p4zhVRjJTjLpO9p48hnU" alt="" data-size="line"> button.

The personal account is added to your profile.
{% endcolumn %}

{% column %}

<figure><img src="/files/B5MCHvEVPjLC7zOJLXO1" alt=""><figcaption></figcaption></figure>
{% endcolumn %}
{% endcolumns %}

{% hint style="info" %}
The button becomes active after you complete the required fields.
{% endhint %}

{% hint style="info" %}
DocStudio uses the language selected during registration as the default **Email notifications language** for your account. This language is used in recipient email messages and in the recipient interface by default.

If DocStudio cannot detect the browser language, it uses English as the fallback language. If the detected browser language is Russian, DocStudio uses Ukrainian instead.
{% endhint %}

### Related topics

* [Personal Settings Page Overview](/user/user-profile/personal-settings-page-overview)
* [How to Register a Personal Account](/user/authorization-and-security/how-to-register-on-platform/how-to-register-a-personal-account)


# How to Register a Company Account

This document explains how to register a company account from your user profile.

### Register a company account

Use this flow when you already have a profile and want to add a separate company account.

{% columns %}
{% column %}

1. Open your **User profile**.
2. Click the **Register company account** button.
3. Enter a new account name or keep the default name.
4. Enter the company ITN and mailbox name.
5. Select the **I agree with Terms and conditions and Privacy Policy** checkbox.
6. Click the <img src="/files/p4zhVRjJTjLpO9p48hnU" alt="" data-size="line"> button.

The company account is added to your profile.
{% endcolumn %}

{% column %}

<figure><img src="/files/q4fvDWMZfAgc1CxkSB0Y" alt=""><figcaption></figcaption></figure>
{% endcolumn %}
{% endcolumns %}

{% hint style="info" %}
The button becomes active after you complete the required fields.
{% endhint %}

{% hint style="info" %}
DocStudio uses the language selected during company account registration as the default **Email notifications language** for the company account. This language is used for account invitations, recipient email messages, and the recipient interface by default.

Corporate users created in this company account inherit the company account localization settings unless they change them later.
{% endhint %}

### Related topics

* [Personal Settings Page Overview](/user/user-profile/personal-settings-page-overview)
* [How to Register a Company Account](/user/authorization-and-security/how-to-register-on-platform/how-to-register-a-company-account)


# How to Upload a User Icon

This document explains how to upload a profile icon or reset it to the default icon.

### Upload an icon

Use a profile icon to make your account easier to recognize in DocStudio.

{% columns %}
{% column %}

1. Click your user initials in the top-right corner.
2. Open your **User profile**.
3. Click the <img src="/files/zQnf3QYLQL6oi5UyYmw2" alt="" data-size="line"> button.
4. Select an image.
5. Optional: Hover the info icon to check allowed formats and sizes.
6. Click the <img src="/files/MIf3kGuDP0cGnUuX4l1p" alt="" data-size="line"> button.
   {% endcolumn %}

{% column %}

<figure><img src="/files/Tg8u7XRD8lsUA90kLy5W" alt="" width="363"><figcaption></figcaption></figure>
{% endcolumn %}
{% endcolumns %}

{% hint style="info" %}
Use an image that matches these requirements:

* resolution from `25 × 25` to `300 × 300`
* formats `.png`, `.jpg`, `.jpeg`, `.svg`
* maximum file size `1 MB`
  {% endhint %}

The new icon is saved in your user profile.

### Reset to default

1. Click **Set Default** to restore the default profile icon.
2. Click the <img src="/files/MIf3kGuDP0cGnUuX4l1p" alt="" data-size="line"> button to save the change.

To manage related settings, see [Personal Settings Page Overview](/user/user-profile/personal-settings-page-overview).


# How to Delete a Profile

This document explains how to delete your profile and how to keep existing accounts and data.

{% hint style="danger" %}
Warning!

This action is irreversible. Deleting your profile cannot be undone. After deletion, you are signed out. Accounts where you are **Account owner** can also be deleted with their data.
{% endhint %}

{% columns %}
{% column width="66.66666666666666%" %}

<figure><img src="/files/OsfFRnNs9OVUNNuJ4r7e" alt=""><figcaption></figcaption></figure>
{% endcolumn %}

{% column width="33.33333333333334%" %}

<figure><img src="/files/X3Wu6P4olvyg8QnJuHfK" alt=""><figcaption></figcaption></figure>
{% endcolumn %}
{% endcolumns %}

### Delete profile and delete accounts

{% hint style="info" %}
Envelopes already in the processing flow are not deleted.
{% endhint %}

1. Click the <img src="/files/wVSEVm9fIsk5x5jyE6Iv" alt="" data-size="line"> button.
2. In the modal, enter your email in uppercase letters.
3. Click the <img src="/files/UwyThXqE8e72DboMyhsy" alt="" data-size="line"> button.

After deletion, you are logged out and redirected to the login page.

{% hint style="info" %}
Before you delete the profile, check which accounts you own. If you want to keep them, assign a new **Account owner** first. See [How to Add a Corporate Account Admin](/admin-panel/users-and-user-roles/how-to-add-a-corporate-account-admin) for a related owner-assignment flow.
{% endhint %}

### Delete profile but keep accounts

1. Assign a new account owner for every account where you are **Account owner**.
2. In **Danger Zone**, click the <img src="/files/wVSEVm9fIsk5x5jyE6Iv" alt="" data-size="line"> button.
3. In the modal, enter your email in uppercase letters.
4. Enable **Keep the account and mailboxes**.
5. Click the <img src="/files/UwyThXqE8e72DboMyhsy" alt="" data-size="line"> button.


# Dashboard

* [How to Upload a Document for Electronic Signature](/user/dashboard/how-to-upload-a-document-for-electronic-signature)
* [View recently used templates](/user/dashboard/view-recently-used-templates)


# Dashboard Page Overview

This document explains how to use Dashboard to upload external files and send them for signing by configuring recipients and roles.

### Envelope Statuses Block

<figure><img src="/files/aeHcmHmtDJCiqdqgGF0j" alt=""><figcaption></figcaption></figure>

This block contains 4 interactive envelope statuses widgets:

* **On Approval** — The number of envelopes awaiting action from the approver(s), who have not yet approved or denied them.
* **Sent** — The number of envelopes that have been fully completed and successfully sent.
* **Completed** — The number of envelopes for which you have completed all actions assigned to your role.
* **Expired** — The number of invitations not accepted before reaching their expiration date.

### Send Document Block

{% columns %}
{% column %}

* The **Choose file** button — [Choose a file](/user/dashboard/how-to-upload-a-document-for-electronic-signature) from your device to sign and send.
* The **Choose template** button — Directs you to the [Template List Page](https://support.docstudio.com/~/revisions/SH8nwBNe1ZDQFYHBkIRy/user/template-builder/template/template-list-page-overview), where you can select an existing template or create a new one for sending and signing envelopes.
* The **Choose scenario** button — Directs to the [Scenarios](/user/scenarios/what-is-a-scenario-overview) page, to create and manage your own scenarios.
  {% endcolumn %}

{% column %}

<figure><img src="/files/VVCmaYGCUieGQy5kHaJb" alt=""><figcaption></figcaption></figure>
{% endcolumn %}
{% endcolumns %}

### Waiting For You Block

{% columns %}
{% column %}
A list of incompleted envelopes that require actions based on your role.

To open the full recently **Waiting for you** list, click the **View all** button.
{% endcolumn %}

{% column %}
![](/files/cCvvEYfMwtE1XJDG74Gg)
{% endcolumn %}
{% endcolumns %}

#### Recently Used Templates Block <a href="#recently-used-templates-block" id="recently-used-templates-block"></a>

{% columns %}
{% column %}

* Templates appear here after you use them at least once.
* Click any template to create an envelope from it.
* The list shows up to 4 templates.
* To open the full **Recently Used Templates** list, click the **View all** button.
  {% endcolumn %}

{% column %}

<figure><img src="/files/qZHmz9QYgHoltWL3UJ1K" alt=""><figcaption></figcaption></figure>
{% endcolumn %}
{% endcolumns %}


# How to Upload a Document for Electronic Signature

This document explains how to upload a document with Quick Send, send it for electronic signature, fill sender fields, and import embedded PDF fields.

### Upload a document with Quick Send

Use **Quick Send** when you want to upload one or more files and send them for signing without creating a full envelope step by step.

<figure><img src="/files/pQBA9BTp8Gw3yKn3Ajfb" alt=""><figcaption></figcaption></figure>

{% hint style="info" %}
You can upload up to 50 files. Each file can be up to 50 MB, and the total upload size per send is limited to 50 MB.
{% endhint %}

1. Open the **Dashboard**.
2. Click the <img src="/files/0RQPZm08Im3rXCuxHTgi" alt="" data-size="line"> button.
3. Upload one or more files in the dialog.
4. Review the uploaded files.
5. Click the <img src="/files/nob8edMUK37Y0jyeHI5J" alt="" data-size="line"> button.
6. Enter the recipient email address.
7. Optional: Click **Add approver or send a copy**.
8. Click the <img src="/files/7BSNKwG8DZ1rRN00F9zM" alt="" data-size="line"> button.
9. Click the <img src="/files/q1ys5nRJpSmDQsRcUFhb" alt="" data-size="line"> button in the top-right corner.

DocStudio sends the envelope and notifies the recipients by email.

{% hint style="info" %}
Quick Send supports these file extensions:

```
.pdf, .doc, .docx, .xls, .xlsx, .xlsm, .xlsb, .xml, .dbf, .txt, .rtf, .csv, .xps, .eml, .msg, .emlx, .rpmsg, .crt, .pem, .der, .cer, .ppt, .pptx, .png, .jpg, .jpeg, .tiff, .tif, .zip, .7z, .rar, .asice
```

{% endhint %}

### Quick Send dialog overview

<figure><img src="/files/Cbgm2E4UU0fhrtrUALhW" alt=""><figcaption></figcaption></figure>

After you upload the files, the **Quick Send** dialog opens.

{% hint style="warning" %}
Do not use these characters in file names: `^`, `,`, `"`, `/`, `:`, `?`, `<`, `>`, `|`
{% endhint %}

Key fields:

* **Subject** — Edit the envelope title. Recipients see it in the inbox and email notifications.
* Add message or recipient experience
  * **Message** — Enter a short note or instructions for the recipients.
  * **Email notification language** — Choose the language of email notifications sent to recipients.
  * **Time zone** — Choose which time zone recipients see in date and time values.
  * **Date and number format** — Choose how dates and numbers are displayed to recipients.
* **Signature format** — Choose the signature format.
* **Signers** — Add users who must sign the envelope.
* **Approvers** — Add users who must review and approve the envelope.
* **Send a copy** — Add users who only receive a copy of the envelope.
* **I want to sign or fill an envelope** — Enable this option to add and fill dynamic fields as **Sender**.
* **Action buttons:**
  * **Send** — Send the envelope.
  * **Back** — Return to the **Upload documents** dialog.
  * **Close** — Exit the **Quick Send** flow.

{% hint style="info" %}
Separate email addresses in **Signers**, **Approvers**, and **Send a copy** with **Enter** or **Space**. To learn more about recipient roles, see [Processing Flow Role Types](/user/envelope-processing-flow-template-configuration/processing-flow-role-types).
{% endhint %}

#### Recent recipient history

DocStudio stores recent recipient addresses in your browser to speed up repeated sending.

Rules for saved history:

* keep the last 5 unique addresses
* combine mailbox addresses and email addresses in one list
* move a reused address to the top
* remove the oldest saved address when the list exceeds 5 items
* show no more than 6 items in total, including **My mailbox**

Email addresses use the **Mail** icon in a circle.

### Fill fields as Sender

Use this option when you want to fill or sign part of the envelope before you send it.

If you enable **I want to sign or fill an envelope**, you can add dynamic fields and fill them as **Sender**.

As **Sender**, you can fill these field types:

{% columns %}
{% column width="25%" %}

* **Text**
* **Number**
* **Currency**
* **Date**
* **Choice**
* **Checkbox**
* **Dropdown**
  {% endcolumn %}

{% column width="25%" %}

* **Dictionary**
* **Lookup**
* **Duplicate**
* **Formula**
* **QR/barcode**
* **Signature**
* **Initials**
  {% endcolumn %}

{% column width="49.999999999999986%" %}

<figure><img src="/files/XKDf7soBSThlCDmM1q57" alt="" width="203"><figcaption></figcaption></figure>
{% endcolumn %}
{% endcolumns %}

{% columns %}
{% column %}

* If there are other recipients, you can choose who fills each field.
* If the sender is the only role, DocStudio assigns all fields to **Sender** by default.
  {% endcolumn %}

{% column %}

<figure><img src="/files/SPK2n9YDa38Guc6EQQXU" alt=""><figcaption></figcaption></figure>
{% endcolumn %}
{% endcolumns %}

Use advanced settings to fine-tune a field.

{% columns %}
{% column width="41.66666666666667%" %}
**Examples**:

* min/max for Number
* date + time for Date
* QR/barcode size
* field name
  {% endcolumn %}

{% column width="58.33333333333333%" %}

{% endcolumn %}
{% endcolumns %}

You can enter data in three ways:

1. Fill data inside field properties.
2. Click a Signature field and draw a signature.
3. Double-click the field.

Double-click works for:

* Text, Number, Currency (edit mode)
* Date and QR/barcode (dialog)
* Choice and Checkbox (toggles the value)

### Import embedded PDF fields

Use this option when the uploaded PDF already contains embedded fields.

If an uploaded PDF has embedded fields, you can convert them to DocStudio dynamic fields. For each document with embedded fields, DocStudio shows an action dialog.

<figure><img src="/files/i5aglhyfuRuupcgvZkB9" alt="" width="563"><figcaption></figcaption></figure>

Available actions depend on the embedded field types:

1. **Keep encrypted, assign fields to**. Keep encryption.
2. **Assign fields to**. Convert embedded fields to DocStudio fields, if possible.
3. **Keep editable fields data**. Keep editable fields as read-only. Remove signatures or encryption. Existing fields are not converted. You can add new fields.
4. **Remove editable fields**. Remove embedded signatures, encryption, and editable fields. You can add new fields.

If the document has more signatures than recipients, **Assign fields to** is not available.

You can assign imported fields to **Recipients**. You can also assign them to **Sender** if you enabled **I want to sign or fill an envelope**.

<figure><img src="/files/o2wYYJuAb5lsHgCqXuAp" alt="" width="563"><figcaption></figcaption></figure>

Conversion map:

{% columns %}
{% column width="41.66666666666667%" %}

* Text → Text field
* Date → Text field
* Checkbox → Checkbox field
* Radio button → Choice field
  {% endcolumn %}

{% column width="58.33333333333333%" %}

* Dropdown menu → Menu field
* Listbox → Menu field
* Picture → not supported (field is ignored)
* Barcode → not supported (field is ignored)
  {% endcolumn %}
  {% endcolumns %}

All imported fields will keep their original **required** or **optional** fields from the PDF.

If you upload several PDFs with fields, you can choose specific actions for each one. Switch between documents on the left side of the window.

### Related topics

* [How to Add an External Document to an Envelope](/user/external-documents-in-the-envelope/how-to-add-an-external-document-to-an-envelope)
* [How to Create and Send an Envelope](/user/envelopes/how-to-create-and-send-an-envelope)


# View recently used templates

This document describes where to find Recently Used Templates on the dashboard and how to use it.

### Dashboard actions

<figure><img src="/files/uUNyvgZU666BzvLIqtiV" alt="" width="563"><figcaption></figcaption></figure>

1. To create a new template, click the **New from blank button**.
2. To open the full recently used templates list, click <img src="/files/osg2y4ejwLE57d3ZEBpa" alt="" data-size="line">.

### Recently used templates list

<figure><img src="/files/rmGv7QVQtnHtAPjvHbkF" alt=""><figcaption></figcaption></figure>

* Templates appear here after you use them at least once.
* Click a template to create an envelope from it.
* The list shows up to 3 templates.


# Mailbox

* [Mailbox (user)](/user/mailbox/mailbox-user)
  * [How to Set a Default Mailbox](/user/mailbox/mailbox-user/how-to-set-a-default-mailbox)
  * [How to Control Mailbox Visibility](/user/mailbox/mailbox-user/how-to-control-mailbox-visibility)
  * [How to Find a Mailbox ID (UUID)](/user/mailbox/mailbox-user/how-to-find-a-mailbox-id-uuid)
  * [How to Add a Contact to a Mailbox](/user/mailbox/mailbox-user/how-to-add-a-contact-to-a-mailbox)
  * [How to generate an Envelope report in Mailbox](/user/mailbox/mailbox-user/how-to-generate-an-envelope-report-in-mailbox)


# Mailbox (user)

* [How to Set a Default Mailbox](/user/mailbox/mailbox-user/how-to-set-a-default-mailbox)
* [How to Control Mailbox Visibility](/user/mailbox/mailbox-user/how-to-control-mailbox-visibility)
* [How to Find a Mailbox ID (UUID)](/user/mailbox/mailbox-user/how-to-find-a-mailbox-id-uuid)
* [How to Add a Contact to a Mailbox](/user/mailbox/mailbox-user/how-to-add-a-contact-to-a-mailbox)
* [How to generate an Envelope report in Mailbox](/user/mailbox/mailbox-user/how-to-generate-an-envelope-report-in-mailbox)


# How to Set a Default Mailbox

This document explains how to set a default mailbox for envelopes sent by email.

Set a default mailbox to control which mailbox DocStudio uses for new envelopes sent by email. This saves time if you work with several mailboxes.

### Set a default mailbox

<figure><img src="/files/7KfgopCR7tZaaxrGDRrM" alt="" width="563"><figcaption></figcaption></figure>

{% hint style="info" %}
If you have only one mailbox, DocStudio uses it automatically as the default mailbox for new envelopes.
{% endhint %}

1. Open **Menu** in the top-right corner.
2. Select **User profile**.
3. Find the **Default mailbox** field.
4. Select the mailbox you want to set as default.
5. Click the <img src="/files/w2iz25iWr6fcCUfWBzoO" alt="" data-size="line"> button.

DocStudio uses this mailbox by default for new envelopes sent by email until you change this setting again.


# How to Control Mailbox Visibility

This document explains how to control mailbox visibility and send envelopes to hidden mailboxes.

Control whether other DocStudio accounts can find your mailbox by name or alias. By default, mailboxes are hidden.&#x20;

An account admin can change this setting at any time.

{% hint style="info" %}
**Corporate Account Admin** — is a user who has access to the company's account, in which a verified and active domain is registered.
{% endhint %}

### Hide or show a mailbox

<figure><img src="/files/tl3K9AtH7e6en6t0W1ud" alt=""><figcaption></figcaption></figure>

1. Open **Menu** in the top-right corner.
2. Click **Admin panel**.
3. Open **Mailboxes**.
4. Find the mailbox you want to update.
5. Click **Settings**.
6. Enable or disable **Hide name/alias from other accounts**.

This setting controls whether other accounts can find the mailbox by name or alias.

### Send an envelope to a hidden mailbox

If you cannot find a mailbox by name, use one of these options:

* recipient email
* mailbox UUID
* saved contact

### Send by email

1. Start creating an envelope.
2. Enter the recipient email address.

<figure><img src="/files/CkSfVgi1P62TI3SOq0uh" alt="" width="375"><figcaption></figcaption></figure>

If the recipient has a default mailbox, routing is automatic. If not, the recipient must accept the envelope.

### Send by mailbox UUID

{% hint style="info" %}
The **mailbox UUID** is a unique identifier for a mailbox in DocStudio. If you need to find a mailbox UUID, see [How to Find a Mailbox ID (UUID)](/user/mailbox/mailbox-user/how-to-find-a-mailbox-id-uuid).
{% endhint %}

Enter the recipient mailbox UUID in the recipient field. You can copy it from previous envelopes. This works even if the mailbox is hidden.

<figure><img src="/files/9ThQLIxHnJvnVW8hbqUm" alt="" width="375"><figcaption></figcaption></figure>

### Add a hidden mailbox to your contacts

Add the mailbox to **Contacts** first. Then reuse it when you create an envelope.

For the full step-by-step flow, see [How to Add a Contact to a Mailbox](/user/mailbox/mailbox-user/how-to-add-a-contact-to-a-mailbox).

<figure><img src="/files/ArKiSq9LJNHKlNrTaAld" alt=""><figcaption></figcaption></figure>


# How to Find a Mailbox ID (UUID)

This document explains where you can find the mailbox UUID.

{% hint style="info" %}
**Mailbox UUID** is the unique identifier of a mailbox in DocStudio.
{% endhint %}

You may need it when you send an envelope to a hidden mailbox, share the exact mailbox identifier with a partner, or copy mailbox details without relying on the mailbox name.

### Copy the UUID for the current mailbox

{% columns %}
{% column %}

1. Open the mailbox you need.
2. Find **Mailbox UUID** under the mailbox name.
3. Click the **Copy** icon ![](/files/X4R3ogKQfImDFsqiSXMG) next to **Mailbox UUID**.

The UUID is copied to your clipboard.
{% endcolumn %}

{% column %}

<figure><img src="/files/2oBY0L9xCNggFzQBkIPw" alt=""><figcaption></figcaption></figure>
{% endcolumn %}
{% endcolumns %}

### Copy UUIDs for other mailboxes

{% columns %}
{% column width="66.66666666666666%" %}
If you have multiple mailboxes, expand the mailbox list and copy the UUID from the mailbox you need.

1. Expand the mailbox list.
2. Copy the UUID for the mailbox you need.

The UUID is copied to your clipboard.
{% endcolumn %}

{% column width="33.33333333333334%" %}

<figure><img src="/files/PjiJ9bV8rwqTAY6qax3Q" alt=""><figcaption></figcaption></figure>
{% endcolumn %}
{% endcolumns %}


# How to Add a Contact to a Mailbox

This document explains how to add, search, and reuse contacts when sending envelopes.

Add recipients to **Contacts** using their **Mailbox UUID**. Then reuse them when you create envelopes.

Saved contacts help you find recipients faster and keep working even if their email is hidden. If you don’t know the UUID, see [How to Find a Mailbox ID (UUID)](/user/mailbox/mailbox-user/how-to-find-a-mailbox-id-uuid).

### Add a contact

<figure><img src="/files/IfA5aek6DDjJo7WJQlbP" alt=""><figcaption></figcaption></figure>

1. Open **Contacts**.
2. Click the **Add contact** icon <img src="/files/9W9AdzTWfKIbbCkiPQE4" alt="" data-size="line">.
3. Enter the **Mailbox UUID**.
4. Edit the contact name if needed.
5. Click the <img src="/files/EGmfGPHK1e4M1roGoZno" alt="" data-size="line"> button.

The contact appears in **Contacts** and becomes available when you send an envelope.

### Edit a contact

{% columns %}
{% column width="50%" %}

1. Click the <img src="/files/OH7aKKUVLSVsA1sswH7l" alt="" data-size="line"> button.
2. Update the contact details.
3. Click the <img src="/files/EGmfGPHK1e4M1roGoZno" alt="" data-size="line"> button.

The contact details are updated.

### Delete a contact

1. Click the <img src="/files/PvlUpwybv2S41HiqWF5B" alt="" data-size="line"> button.
2. In the modal, click the <img src="/files/uogpL7yuRKxjE3SJt9bV" alt="" data-size="line"> button to confirm deletion.

The contact is removed from **Contacts**.
{% endcolumn %}

{% column width="50%" %}

<figure><img src="/files/NCB02ihT2irOwlfTpJ9R" alt="" width="375"><figcaption></figcaption></figure>
{% endcolumn %}
{% endcolumns %}

### Search contacts

1. Start typing a contact name in the search field.
2. Select the contact from the list.

<figure><img src="/files/NoQq84092qSi5zjxQwRo" alt="" width="361"><figcaption></figcaption></figure>

The list filters automatically as you type.

### Use contacts when sending an envelope

After you add a contact, you can reuse it in the recipient picker. This works even if the recipient email is hidden.

1. Start creating an envelope.
2. In the recipient field, start typing the contact name.
3. Select the contact from the list.

<figure><img src="/files/dBs2cVQEtsjXwGMb2grX" alt="" width="375"><figcaption></figcaption></figure>

The contact is added to the recipient field.


# How to Generate an Envelope Report in Mailbox

This document explains how to generate an envelope report in DocStudio.

### Generate a report

<figure><img src="/files/euPCq6BM9yH73A5L1Kn5" alt=""><figcaption></figcaption></figure>

Generate a report for the envelopes you select in **Mailbox**:

1. Open **Mailbox**.
2. Select the envelopes you want to include in the report.
3. Click the **Menu** ![](/files/6NooSdwz0ktut3AiV67I) icon.
4. Click the **Generate report** <img src="/files/UiJ4unoU2HVA8q5Ny6IL" alt="" data-size="line"> icon.
5. Click the <img src="/files/NHDciwaXYLCB0EUgPOLN" alt="" data-size="line"> button.
6. Open the email with the report.
7. Click **Download**.

{% hint style="info" %}
The report is sent to your email. The download starts after you click **Download**.
{% endhint %}


# Envelopes

* [How to Create and Send an Envelope](/user/envelopes/how-to-create-and-send-an-envelope)
* [How to Customize the Envelope List](/user/envelopes/how-to-customize-the-envelope-list)
* [How to Filter Envelopes](/user/envelopes/how-to-filter-envelopes)
* [How to Use and Manage Envelope Labels](/user/envelopes/how-to-use-and-manage-envelope-labels)
* [​How to Find Envelopes That Require Action](/user/envelopes/how-to-find-envelopes-that-require-action)
* [​How to Resend an Envelope Notification](/user/envelopes/how-to-resend-an-envelope-notification)
* [​How to Cancel Multiple Envelopes](/user/envelopes/how-to-cancel-multiple-envelopes)
* [What Is an Envelope Chain?](/user/envelopes/what-is-an-envelope-chain)
* [How to Add or Remove an Envelope from a Chain](/user/envelopes/how-to-add-or-remove-an-envelope-from-a-chain)
* [How to Delete an Envelope](/user/envelopes/how-to-delete-an-envelope)
* [What Is an Envelope ID (UUID)?](/user/envelopes/what-is-an-envelope-id-uuid)
* [How to Use the AI Assistant in Envelopes](/user/envelopes/how-to-use-the-ai-assistant-in-envelopes)
* [Envelope Metadata (API)](/archive/envelope-metadata-api)
* [UTM Codes](/user/envelopes/utm-codes)


# How to Create and Send an Envelope

This document explains the different methods for creating an envelope in DocStudio and the basic steps to prepare an envelope draft for sending.

Start an envelope draft from several areas in DocStudio.

You can use the create button in:

* **Dashboard**
* **Mailbox**
* **Scenarios**
* **Approval**
* **Dictionaries**
* **Contacts**

The <img src="/files/1m1ggkJlPwQ2zqpL8Mae" alt="" data-size="line"> button is in the top-right corner, next to the notification bell.

<figure><img src="/files/tW7wQhkOBY1qyPMOdD6N" alt=""><figcaption></figcaption></figure>

{% hint style="info" %}
Use **Quick Send** to create an envelope from uploaded files. See [How to Upload a Document for e-Signature](/user/dashboard/how-to-upload-a-document-for-electronic-signature).
{% endhint %}

### Start from a template

Use a template when you want to prepare an envelope from a predefined document and flow.

### Create from a template

1. Open a template on **Dashboard** or in the templates list.
2. Select the template to start a draft.

![](https://docs.docstudio.com/en/latest/_images/createFromTemplates.png)

### Create from the template editor

1. Open a template in the editor.
2. Click the **Send** <img src="/files/bVnN5bylfoYOQNxgDt7z" alt="" data-size="line"> icon.

<figure><img src="/files/6IoFHwiZFlQSYJpdWVCP" alt="" width="563"><figcaption></figcaption></figure>

### Create by cloning an envelope

1. Open an existing envelope.
2. Click the **Clone** <img src="/files/ua0Xdajn7BVgHxyKv9m4" alt="" data-size="line"> icon.

<figure><img src="/files/HGfL1reSKcGfrmlPnY8o" alt=""><figcaption></figcaption></figure>

{% hint style="warning" %}
You won’t see the **Clone** <img src="/files/ua0Xdajn7BVgHxyKv9m4" alt="" data-size="line"> icon if:

* your mailbox has no access to the source template
* the envelope was created via **Quicksend**
  {% endhint %}

### Next steps in the draft

DocStudio opens the envelope as a draft after creation.

{% hint style="info" %}
Use recipient roles to define what each participant does:

* **Assignee** — fills in fields and can sign when required
* **Signer** — signs the document
* **Approver** — approves or rejects the next step
* **CC** — receives a copy without editing

See [Processing Flow Role Types](/user/envelope-processing-flow-template-configuration/processing-flow-role-types) for the full role rules.
{% endhint %}

1. Fill in roles for the envelope flow.
2. Use **I am assignee/approver/signer** to assign yourself to a role.
3. Fill in all required fields.
4. Send the envelope to the next participant.

<figure><img src="/files/ubdOuwcmsXalGtm5iEZ9" alt="" width="375"><figcaption></figcaption></figure>

### Recipient experience

When you create or edit an envelope draft, you can configure recipient experience settings for that specific envelope. These settings control how recipients receive notifications and how date, time, and number values appear in the envelope.

You can configure:

* **Email notification language**
* **Time zone**
* **Date and number format**

#### Email notification language

Use **Email notification language** to choose the language of emails sent to new or unregistered recipients, including envelope invitations, reminders, and other envelope-related messages.

If the envelope was created from a template, DocStudio uses the recipient experience settings inherited from that template. If the template uses **Inherit from sender account**, DocStudio uses the sender account language.

You can change the language while the envelope is still a draft.

#### Time zone

Use **Time zone** to control which time zone recipients see in date and time values inside the envelope. You can change this setting while the envelope is still a draft.

#### Date and number format

Use **Date and number format** to control how dates and numbers are displayed to recipients. You can change this setting while the envelope is still a draft.

### Save a draft

Click the <img src="/files/PJmqArJFtHdggLt6Lh0P" alt="" data-size="line"> button to save the envelope and finish it later.

DocStudio keeps the envelope as a draft until you send it.

{% hint style="info" %}
The **Save draft** option is not available for **Quick Send** envelopes.
{% endhint %}

After the first save, DocStudio saves each change automatically. The indicator next to the <img src="/files/MdZzXbiF1odkr17wkfQR" alt="" data-size="line"> shows the save status. Auto-save does not send the envelope. It also works for envelopes in **Waiting for you** status.


# How to Change a Recipient Email After Sending an Envelope

This document explains how to update a recipient email after sending an envelope, when editing is allowed, and what happens after the change.

{% hint style="info" %}
If a recipient’s email address was entered incorrectly, the sender can update it without rejecting and resending the envelope — but only under certain conditions.
{% endhint %}

### Edit a recipient email

You can edit a recipient’s email only if:

* the recipient has not accepted the invitation yet
* the role has not completed its action
* the email was not locked at the template level
* you are the sender of the envelope

Only the sender can edit recipient emails. Other participants in the flow, such as **Signer**, **Approver**, **CC**, and **Assignee**, cannot.

<figure><img src="/files/fwvQ9IztM9cI53WM6YBb" alt=""><figcaption></figcaption></figure>

1. Open the envelope.
2. In **Processing flow**, find the recipient.
3. Click the edit icon next to the recipient email.
4. Enter a new email address or select another mailbox.
5. Save the change.
6. Confirm the update in the confirmation window.

### What happens after the update

After you confirm the change:

* the previous recipient loses access to the envelope
* the updated recipient receives a new invitation email
* roles configured with **Same as** may also update automatically

{% hint style="info" %}
You cannot save the change if:

* empty email values
* invalid email formats

Fix the value and save the change again.
{% endhint %}

### Cases when editing is not available

You cannot edit the recipient email if:

* the invitation has already been accepted
* the recipient already completed their action
* the email was predefined and locked on the template level

If editing is unavailable, the edit icon is hidden or disabled.

### Additional behavior

* If the email is changed to the same value, no update or notification is triggered.
* If the previous recipient tries to open an old invitation link after the update, the link becomes invalid and an error page is displayed.
* To prevent notification spam, recipient email changes are limited to one update per envelope per minute.


# How to Customize the Envelope List

This document explains how to customize the envelope list in Mailbox, including columns, folders, archiving, and Trash actions.

Customize the envelope list in **Mailbox** to control how many records you see, which columns appear, and what actions you can apply from the list.

### Change the number of envelopes per page

Use **Number per Page** in the bottom-right corner to change how many envelopes appear in the list.

<figure><img src="/files/5WsoKgME8R16d7QaQug0" alt=""><figcaption></figcaption></figure>

### Customize columns

Open the <img src="/files/cNw46TOyBUEXq90p2I2I" alt="" data-size="line"> menu to change what you see in the list.

#### Add columns to the list

{% columns %}
{% column %}

1. Open **Customize View**.
2. Start typing a field name.
3. Select a field to add it as a column.

Only fields with **Search** enabled can be added as columns.
{% endcolumn %}

{% column %}
![](https://ucarecdn.com/7579905a-8969-424e-9bab-91fcd7c6242b/image.png)
{% endcolumn %}
{% endcolumns %}

### Filter the list

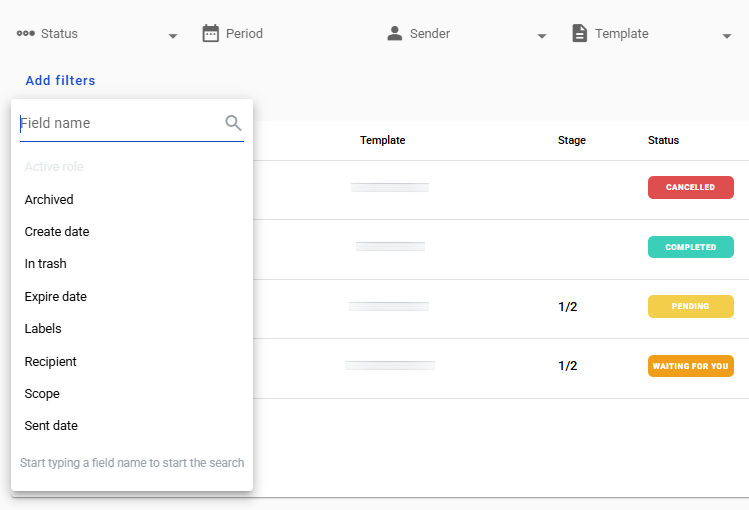
Use **Customize View** to apply filters by status or field.

<img src="https://ucarecdn.com/6c81a696-d9f1-41d4-841b-3f3b0a407714/image_(6).png" alt="" width="563">

For the full filtering flow, see [How to Filter Envelopes](/user/envelopes/how-to-filter-envelopes).

### Navigate folders

{% columns %}
{% column width="58.333333333333336%" %}
Use the folders list on the left side of the page.

{% hint style="info" %}
Your system administrator can enable hiding empty folders. Learn more in [How to Add a Corporate Account Admin](https://app.gitbook.com/o/5SQxQoWgJM8HGKMYA3IO/s/oqUiFHjwtCCGSaEDqbXb/~/edit/~/changes/96/admin-panel/users-and-user-roles/how-to-add-a-corporate-account-admin).
{% endhint %}

{% endcolumn %}

{% column width="41.666666666666664%" %}

<figure><img src="/files/NAk2qdJoPOmnwsZg6XEc" alt=""><figcaption></figcaption></figure>
{% endcolumn %}
{% endcolumns %}

### Archive envelopes

1. Select one or more envelopes.
2. Click the **Archive** ![](/files/iO07fjmxqUzwQrTsJ6gZ) icon.

<figure><img src="/files/wQfpYq4TEmK77Ne3QPA9" alt=""><figcaption></figcaption></figure>

{% hint style="warning" %}
You can archive only envelopes with these statuses:

* Completed
* Overdue
* Cancelled
* Draft
  {% endhint %}

#### Restore archived envelopes

1. Open the **Archived** folder.
2. Select one or more envelopes.
3. Click the **Unarchive envelope** ![](/files/GbDu04maU1hbL4e5dyaR) icon.

<figure><img src="/files/JQ5ZUpX81KPwqnxbDXGY" alt=""><figcaption></figcaption></figure>

### Move envelopes to Trash

1. Select one or more envelopes.
2. Click the **Trash** ![](/files/JZ9Y1OqkbE7DZeZIN0vb) icon.

<figure><img src="/files/rRZv4jhFEDNtISnM1x9z" alt=""><figcaption></figcaption></figure>

{% hint style="warning" %}
You can move to trash only envelopes with these statuses:

* Completed
* Expired
* Cancelled
* Draft
  {% endhint %}

#### Restore envelopes from Trash

1. Open **Trash**.
2. Select one or more envelopes.
3. Click the **Restore envelopes** <img src="/files/j6O4xuEIghA6dU6pm3Zo" alt="" data-size="line"> icon.

<figure><img src="/files/Uaoqi23TFyNQLr74KR4x" alt=""><figcaption></figcaption></figure>

#### Permanent deletion

Envelopes in **Trash** are permanently deleted after **30 days** by default. Your system administrator can change this period.

Permanent deletion happens only after **all** participants move the envelope to **Trash**.

If a participant’s mailbox was deleted before they moved the envelope to **Trash**, the envelope may remain there indefinitely for other participants.


# How to Filter Envelopes

This document explains how to use filters in Mailbox to find envelopes faster.

Use filters in **Mailbox** to find envelopes faster by status, date, sender, template, and searchable template fields. Save the filters you use often to apply them again in one click.

### Use built-in filters

Filter by these standard parameters:

* status
* period
* sender
* template

#### Filter by status

{% columns %}
{% column width="33.33333333333333%" %}

* Waiting for you
* On approval
* Pending
* Completed
* Cancelled
* Expired
  {% endcolumn %}

{% column width="66.66666666666669%" %}
![](https://ucarecdn.com/a39e514f-de92-4c42-8317-f57d81fe91c8/image.png)
{% endcolumn %}
{% endcolumns %}

#### Filter by period and sender

{% columns %}
{% column %}
Filter by the **period** when the envelope was sent or received.

![](https://ucarecdn.com/ab37fd98-48e2-400e-9627-4f07767b1fab/image.png)
{% endcolumn %}

{% column %}
Filter by the **sender’s mailbox**.

![](https://ucarecdn.com/dff16849-0348-4e5d-bbdd-d9e4b5ca51b1/image_\(21\).png)
{% endcolumn %}
{% endcolumns %}

#### Filter by template

Filter by the template used to create the envelope. The **Template** picker shows templates used by envelopes currently visible in your mailbox list.

{% hint style="info" %}
When you search in **Template**, the modal shows up to **25** templates.
{% endhint %}

### Search by subject or envelope UUID

Use the search box to find an envelope by **subject** or **envelope UUID**.

<figure><img src="/files/qnbTWnmUe8svnojtmvyO" alt=""><figcaption></figcaption></figure>

### Save a filter

Saved filters are stored at the mailbox level.

1. Set the filters you need.
2. Click the <img src="/files/AT5NRnpswwA7kmSYflzd" alt="" data-size="line"> button.

{% columns %}
{% column %}
![](https://ucarecdn.com/d59c0390-089e-4f1b-a9c5-66e6c52e40f7/image_\(22\).png)
{% endcolumn %}

{% column %}
![](https://ucarecdn.com/3fda2b77-4774-4c9f-82ae-7722b9e1f4b7/image_\(23\).png)
{% endcolumn %}
{% endcolumns %}

The saved filter becomes available for one-click reuse.

![](https://ucarecdn.com/c674b437-0e17-4224-9bb1-a5f40ecf08b8/image_\(24\).png)

### Add more filters

1. Click **Add filters**.
2. Select a parameter from the list.
3. Check the box next to the filter to apply it.

{% columns %}
{% column %}
![](https://ucarecdn.com/479b961f-c156-4b9d-9990-0e630c64aab5/image_\(26\).png)
{% endcolumn %}

{% column %}
![](https://ucarecdn.com/88a9c0c8-2512-48e0-94c0-ec596dfef01e/image.png)
{% endcolumn %}
{% endcolumns %}

To remove a filter, click the **X** (remove) icon next to it.

### Filter by template fields

If a template field has **Search** enabled, you can use it as a filter in **Mailbox**.

{% columns %}
{% column %}
![](https://ucarecdn.com/2bfd7296-6c57-423a-9b2c-d553745c6b97/image_\(27\).png)
{% endcolumn %}

{% column %}
![](https://ucarecdn.com/dda99de5-4548-4cb8-9643-8e69c919a175/image_\(28\).png)
{% endcolumn %}
{% endcolumns %}

### Customize the list

To hide, reorder, or add columns, see [How to Customize the Envelope List](/user/envelopes/how-to-customize-the-envelope-list).


# How to Use and Manage Envelope Labels

This document explains what labels are in DocStudio and how to use them for envelope organization.

### Create a label in Mailbox

{% columns %}
{% column %}

<figure><img src="/files/LB7ACqXALAo11YJ7fD73" alt=""><figcaption></figcaption></figure>
{% endcolumn %}

{% column %}

<figure><img src="/files/1bSh7wIEp1Do9GbZamyr" alt=""><figcaption></figcaption></figure>
{% endcolumn %}
{% endcolumns %}

Creating a label in **Mailbox** lets you apply it to any envelopes later.

1. Click the **New label** <img src="/files/Mc69JT7HQa7BfsCUt0rY" alt="" data-size="line"> icon.
2. Enter a label name and save.
3. The label appears in the **Labels** section.

### Apply a label to envelopes

{% columns %}
{% column %}

1. Select one or more envelopes.
2. Click **Add labels to the envelope** <img src="/files/mnMgntrQtneH6vGA2l0X" alt="" data-size="line"> and choose labels.
3. Pick one or more labels from the list.
   {% endcolumn %}

{% column %}

<figure><img src="/files/1MWot2O3jupqinmP4tq0" alt=""><figcaption></figcaption></figure>
{% endcolumn %}
{% endcolumns %}

### Create a label for envelopes

<figure><img src="/files/FaLdjQ7IPDXEPN9DlAe9" alt=""><figcaption></figcaption></figure>

1. Select one or more envelopes.
2. Click **Add labels to the envelope** <img src="/files/mnMgntrQtneH6vGA2l0X" alt="" data-size="line"> icon.
3. In the list, click the **New label** <img src="/files/Mc69JT7HQa7BfsCUt0rY" alt="" data-size="line"> icon.
4. Enter the label name and save.

### Use a label to quickly filter envelopes

Click a label to show all envelopes with that label.

<figure><img src="/files/KEjEkp8Ath8YCAwZZYPT" alt=""><figcaption></figcaption></figure>

### Create or apply labels inside an envelope

1. Open an envelope.
2. Click the <img src="/files/NfmXSRrlYf6Pduv2v5b9" alt="" data-size="line"> button, or select an existing label.

<figure><img src="/files/cm3bcouvM0v4N9867oDW" alt=""><figcaption></figcaption></figure>

### Edit or delete a label

You can edit or delete labels by clicking ![](/files/q6aHqSCLsEO0iNJwwqKo) icon. Changes apply everywhere the label is used.

<figure><img src="/files/CRuCoaDO5roqYicwECgf" alt=""><figcaption></figcaption></figure>


# ​How to Find Envelopes That Require Action

This document explains how to find an envelope that is in "Waiting for you" status.

{% hint style="info" %}
Use **Dashboard** or **Mailbox** to find envelopes you need to process.
{% endhint %}

### Check the dashboard

Open **Dashboard** and look for **Waiting for you**.

<figure><img src="/files/LShk1JjyPFoT1ZgF8Rup" alt=""><figcaption></figcaption></figure>

### Check the mailbox

Open **Mailbox** and filter by status **Waiting**.

<figure><img src="/files/jkALU5o4fnqzjqeA3dWr" alt="" width="218"><figcaption></figcaption></figure>

### If you still can’t find it

Make sure you’re in the correct mailbox. Switch mailboxes and check again.


# ​How to Resend an Envelope Notification

This document explains how to resend envelope invitations and incoming envelope notifications in DocStudio.

To resend an envelope invitation (incoming envelope notification), follow these steps:

1. Open **Mailbox**.
2. Select an envelope where you are the sender.
3. Open the envelope.
4. Click the **Notification** icon and confirm.

{% hint style="info" %}
You can resend the notification only once per hour.
{% endhint %}

<figure><img src="/files/NTByY1AmUphZXze9vphu" alt=""><figcaption></figcaption></figure>


# ​How to Cancel Multiple Envelopes

This document explains how to cancel multiple envelopes in DocStudio.

{% hint style="warning" %}
You can cancel envelopes only with these statuses:

* **In processing** (only if you initiated the envelope)
* **Waiting for you**
  {% endhint %}

### Cancel several envelopes

<figure><img src="/files/qDZ4UdruRPhjphnAZvqn" alt=""><figcaption></figcaption></figure>

1. Open **Mailbox**.
2. Select the envelopes you want to cancel.
3. In the table header, click the **Reject envelopes** <img src="/files/FKTd93G0tKIPXnsdytrR" alt="" data-size="line"> icon.\
   — Optional: enter a comment in the dialog.
4. Confirm.

After a successful rejection, all selected envelopes change to **CANCELLED**.

{% hint style="info" %}
If you select envelopes with other statuses, you’ll see an error after you confirm.
{% endhint %}


# What Is an Envelope Chain?

View all envelopes in a chain, see their order, and quickly switch between them.

An **envelope chain** is a group of related envelopes linked together.

Use it when one document flow continues in several envelopes. For example, when the next envelope is created as part of the same business process and you need to see the full sequence in one place.

### View a chain

1. Open an envelope that is part of a chain.
2. In the header, find the **Chain** section. It shows the total number of envelopes.
3. Use the list to navigate between envelopes.

<figure><img src="/files/xzBtDrQRajndLLEC9im4" alt="" width="375"><figcaption></figcaption></figure>

The list is sorted by received date (newest first). The current envelope is highlighted. Click another envelope to open it in a new tab.


# How to Add or Remove an Envelope from a Chain

This document describes the process of managing envelope chains, including how to add individual envelopes to a chain, how to remove them, and how this affects chain order and workflow.

{% hint style="warning" %}
You can add an envelope to a chain only if it isn’t already in another chain.
{% endhint %}

### When to use this

Use chains when several envelopes belong to the same process and you want to keep them connected.

Common cases:

* continue one business process in a new envelope
* group related envelopes for easier tracking
* remove an envelope that was added to the wrong chain

### Add envelopes to a chain

<figure><img src="/files/hO04Ucuk0V5srMAY702r" alt=""><figcaption></figcaption></figure>

1. Select the envelopes you want to chain.
2. Click the **Add envelope to chain** ![](/files/MOO8wSm59ZF2WLfZiDSK) icon.

#### Add to an existing chain (merge)

{% columns %}
{% column %}
Use this when the envelope you need isn’t on the same page.

1. Select an envelope.
2. Click the **Add envelope to chain** ![](/files/oqrYdJGKDjC8L8JKsaO9)icon.
3. In the modal, enter the subject or UUID of the envelope you want to add, then confirm.
   {% endcolumn %}

{% column %}

<figure><img src="/files/f4pHhxFSUENh62knaCvQ" alt="" width="216"><figcaption></figcaption></figure>
{% endcolumn %}
{% endcolumns %}

### Remove envelopes from a chain

You can remove an envelope from a chain only if you added it to that chain.

1. In the envelopes list, select the chained envelope(s).
2. Click the **Remove envelope from chain** <img src="/files/GfIBl0WwNWPPf6ZV57S6" alt="" data-size="line"> icon.


# How to Delete an Envelope

This document explains how to delete one or multiple envelopes and how Trash retention works.

{% hint style="danger" %}
Warning!&#x20;

Deleting an envelope can lead to permanent data loss. After the envelope is permanently removed from **Trash**, you cannot restore it.
{% endhint %}

Delete envelopes from the mailbox list or from an open envelope. Deleted envelopes are moved to **Trash** first.

{% hint style="warning" %}
To delete an envelope, it must have one of these statuses:
{% endhint %}

* Completed
* Expired
* Cancelled
* Draft

### Delete one envelope

{% columns %}
{% column %}

1. Open the mailbox.
2. Click the <img src="/files/pt1tSwxpyR0yeZYFKDhb" alt="" data-size="line"> button in the action panel.
3. In the modal, click the <img src="/files/uogpL7yuRKxjE3SJt9bV" alt="" data-size="line"> button to confirm deletion.
   {% endcolumn %}

{% column %}

<figure><img src="/files/rRZv4jhFEDNtISnM1x9z" alt=""><figcaption></figcaption></figure>
{% endcolumn %}
{% endcolumns %}

### Delete multiple envelopes

1. Open **Mailbox**.
2. Select the envelopes using the checkboxes.
3. Click the trash ![](/files/t52eXQG4jG1v0HRe34XL) icon in the action panel.
4. In the modal, click the <img src="/files/uogpL7yuRKxjE3SJt9bV" alt="" data-size="line"> button to confirm deletion.

### Trash retention and restore

Deleted envelopes are stored in **Trash** for 30 days. You can restore envelopes from **Trash** during this period.

#### Where to find Trash

{% columns %}
{% column %}
Trash is available from the mailbox navigation. Use it to restore envelopes or review what will be deleted automatically.

Envelopes are permanently removed after 30 days only if all participants moved them to **Trash**.
{% endcolumn %}

{% column %}
![](/files/9ocSXYcdE1QcadBVP67f)
{% endcolumn %}
{% endcolumns %}

{% hint style="info" %}
If not all participants moved the envelope to **Trash**, it is not permanently deleted. This can happen if a participant mailbox was deleted before moving the envelope to **Trash**. In this case, the envelope remains in **Trash** indefinitely.
{% endhint %}


# What Is an Envelope ID (UUID)?

This document explains where to find the envelope UUID, template UUID, and template version.

**Envelope UUID** is a unique identifier of an envelope in DocStudio. Use it to search for an envelope or share details with support. In some cases, support may also ask for the template UUID and template version.

### Find UUIDs and version details

<figure><img src="/files/VrrcdhzQbbvtoY3LkxnB" alt=""><figcaption></figcaption></figure>

{% columns %}
{% column %}

1. Open the envelope.
2. Click the down arrow next to the envelope name.
3. Find the values you need:
   * **Envelope UUID**
   * **Template UUID**
   * **Template version**
4. Click the **Copy** ![](/files/X4R3ogKQfImDFsqiSXMG) icon.
   {% endcolumn %}

{% column %}

<figure><img src="/files/vtTTEEmUeMDVEX7Ax0jA" alt=""><figcaption></figcaption></figure>
{% endcolumn %}
{% endcolumns %}


# How to Use the AI Assistant in Envelopes

This document explains how to use the AI Assistant within an envelope, including how to open the assistant, ask questions, and view conversation history.

AI Assistant helps you work with an envelope faster. It summarizes documents and answers questions in the envelope context and uses both document content and envelope metadata.

{% hint style="info" %}
You can ask about envelope status. For example, completed or not completed.
{% endhint %}

### Enable or disable the AI assistant panel

1. Open an envelope.
2. In the top-center, click the **AI assistant** icon.
3. The AI assistant chat panel opens.

When you open it for the first time, you will see:

* a short overview of the envelope documents
* suggested questions

4. To close the panel, click the **AI assistant** icon again.

You can also click the close icon in the top-right corner <a class="button secondary" data-icon="xmark-large"></a>.

{% columns %}
{% column %}

<figure><img src="/files/XEP3GydjG9tMk4P3gfC4" alt="" width="375"><figcaption></figcaption></figure>

{% endcolumn %}

{% column %}

<figure><img src="/files/JDaXhSoPMZN7GAfRpzQS" alt="" width="232"><figcaption></figcaption></figure>
{% endcolumn %}
{% endcolumns %}

{% hint style="warning" %}
The AI assistant icon is visible only if you have required permissions.
{% endhint %}

### Ask questions

Click one of the suggested questions or type your own message and click the **Send** <img src="/files/UzhHNmHB34gGo5t5zp82" alt="" data-size="line"> icon.

{% columns %}
{% column %}

<figure><img src="/files/iaAMp7KjmakN8SX1iGlq" alt="" width="223"><figcaption></figcaption></figure>
{% endcolumn %}

{% column %}

<figure><img src="/files/tD8UREGiJZaqyDjthLE5" alt="" width="223"><figcaption></figcaption></figure>
{% endcolumn %}
{% endcolumns %}

{% hint style="info" %}
The assistant answers only from the documents and data in the current envelope context.
{% endhint %}

### Conversation history

* If you open the assistant again within 24 hours, you will see the conversation history.
* If more than 24 hours passed, the conversation starts over.


# UTM Codes

UTM codes can be attached to the platform link to include certain information about the newly registered user.

Platform supports 3 code types:

1. **utm\_source** — the source of the traffic
2. **utm\_medium** — the medium of the traffic
3. **utm\_campaign** — the campaign of the traffic. It assigns a certain billing plan to the newly created account.

**Link with atached codes should look like this:**

* <https://app.docstudio.com/>?utm\_source={source}\&utm\_medium={medium}\&utm\_campaign={billing\_plan\_UUID}

*{source}*, *{medium}*, and *{billing\_plan\_UUID}* should be replaced with needed values.

{% hint style="info" %}
If there is a default billing plan on the instance, it will be overridden by the value passed in the utm\_campaign code. User should complete the registration on the platform via such link for codes to take effect.
{% endhint %}

**If you want to add these codes to an envelope initiation link, it should look like this:**

* <https://app.docstudio.com/shared-envelope/create>?code=09c8a0ce572c40e196b2f1782b7ebe01\&redirectUrl=\&utm\_source={source}\&utm\_medium={medium}\&utm\_campaign={billing\_plan\_UUID}

**For an envelope initiation iframe, it should look like this:**

```
<iframe width="100%" height="100%" src="https://app.docstudio.com/shared-envelope/create?code=09c8a0ce572c40e196b2f1782b7ebe01&redirectUrl=&utm_source={source}&utm_medium={medium}&utm_campaign={billing_plan_UUID}" frameborder="0"></iframe>
```


# Envelope Invitations & Completion

* [How to Invite an Unregistered Recipient to an Envelope by Email](/user/envelope-invitations-and-completion/how-to-invite-an-unregistered-recipient-to-an-envelope-by-email)
* [Envelope Flow Statuses](/user/envelope-invitations-and-completion/envelope-flow-statuses)
* [How to Accept and Open an Envelope (Registered User)](/user/envelope-invitations-and-completion/how-to-accept-and-open-an-envelope-registered-user)
* [How to Complete an Incoming Envelope (First-Time Recipient)](/user/envelope-invitations-and-completion/how-to-complete-an-incoming-envelope-first-time-recipient)
* [How to Complete an Incoming Envelope (Existing DocStudio User)](/user/envelope-invitations-and-completion/how-to-complete-an-incoming-envelope-existing-docstudio-user)


# How to Invite an Unregistered Recipient to an Envelope by Email

This document explains how to email an invitation to a participant from the envelope draft page.

### Invite a participant by email (from a draft)

1. Open an envelope draft without a predefined processing flow.
2. In the role field, enter the participant’s email address.
3. If the flow has inherited roles, the email is applied to them automatically.
4. Finish configuring the envelope.
5. Click the <img src="/files/6KdnoMaSEAaA9GOH24yz" alt="" data-size="line"> button.
6. In the confirmation dialog, review the warning about sending to an email address.
7. Confirm to send the envelope.

{% hint style="info" %}
When you enter an email address, you don’t need to select a mailbox from the dropdown.
{% endhint %}


# Envelope Flow Statuses

This document explains the envelope states related to invitations in DocStudio.

### When an invitation envelope ends

An envelope sent via an email invitation can end in these cases:

* The participant accepts the invitation and then **completes** or **rejects** the envelope.
* The participant never accepts the invitation, and the envelope becomes **Expired** after the expiration date.
  * This happens only if the template has an expiration date configured.
* The sender or another participant in the flow **rejects** the envelope.

{% hint style="info" %}
**Expired** means the invitation was not accepted before the configured expiration date.
{% endhint %}


# How to Accept and Open an Envelope (Registered User)

This document describes the process for a registered and authenticated user to accept and interact with an envelope, including opening the invitation and completing required actions.

### Accept an envelope as a registered and logged-in user

1. Open the invitation email and follow the link.
2. On the invitation page, choose how to accept the envelope.

You can:

* select an existing mailbox, or
* create a new mailbox

You’ll be taken to that mailbox, and the envelope will open automatically.

### If your email is assigned to multiple roles

If you have more than one role in the same envelope, you’ll see **Apply mailbox to all roles in envelope** (enabled by default).

* Leave it enabled to assign the selected mailbox to all roles.
* Disable it to assign different mailboxes per role.

When disabled, you’ll get a list of roles. For each role, pick a mailbox now or leave it for later.

### Mailbox selection rules

The mailbox list shows only mailboxes you can access and have permission to fill/send envelopes from.

### Creating a new mailbox

When you create a mailbox, the modal asks for:

* **Account**: You’ll see only accounts you can access and manage mailboxes in.
* **Mailbox name**


# How to Complete an Incoming Envelope (First-Time Recipient)

This guide explains how to complete and sign an incoming DocStudio envelope as a first-time (unregistered) recipient.

### Complete an envelope without registration

<figure><img src="/files/beoL4AhtILAE1KMRH9DM" alt=""><figcaption></figcaption></figure>

1. Open the email and click <img src="/files/JDS4BLHa89ks4Xfp2kf2" alt="" data-size="line">.
2. In the opened pop-up, click <img src="/files/YnxuQODO4F6FOtz8mLxB" alt="" data-size="line"> to accept the Terms and Conditions and Privacy Policy.
3. Complete the required actions:
   * Fill in — Complete the fields assigned to you.
   * Sign — Create your e-signature and apply it.
4. When all required actions are completed, click <img src="/files/8ePlYq9WpKcn14FJ7faw" alt="" data-size="line">.
5. In the pop-up window, click <img src="/files/ZceisdriCfPX9XlGSnm8" alt="" data-size="line">.

You have successfully completed your first envelope in **DocStudio!**

### Confirmation email after signing

After you sign the document, DocStudio sends a confirmation email.

{% columns %}
{% column width="58.333333333333336%" %}
The email includes a <img src="/files/tynQvEdqfwiIizugm5FS" alt="" data-size="line"> button. Use it to open the signed document in DocStudio.\
\
Depending on the sender’s template settings, you can also download, or print the final PDF.

{% hint style="info" %}
If the button is not available, use the direct link in the email.
{% endhint %}
{% endcolumn %}

{% column width="41.666666666666664%" %}

<figure><img src="/files/z2iOvECTTp2UYpgvpQJF" alt="" width="374"><figcaption></figcaption></figure>
{% endcolumn %}
{% endcolumns %}

### Password setup email

After you agree to the Terms and Conditions and Privacy Policy, DocStudio creates an account for you. To access your account and envelopes, set a password.

{% columns %}
{% column width="50%" %}
DocStudio sends a separate email with a <img src="/files/ej4LqZMUkV2DWkP9jZxe" alt="" data-size="line"> button.

Open the link to create your password and complete the setup. After that, you can sign in to DocStudio and access your signed documents at any time.

{% hint style="info" %}
If the button is unavailable, use the direct link in the email.
{% endhint %}
{% endcolumn %}

{% column width="50%" %}

<figure><img src="/files/KuzIXqWZs2u2byba2POT" alt="" width="375"><figcaption></figcaption></figure>
{% endcolumn %}
{% endcolumns %}

If you don't need access to DocStudio, you can skip password setup. You will still be able to open and sign envelopes you receive, but you won't be able to create and send envelopes.

If you want to see what the envelope completion flow looks like after password setup, see [How to Complete an Incoming Envelope (Existing DocStudio User)](/user/envelope-invitations-and-completion/how-to-complete-an-incoming-envelope-existing-docstudio-user).

### Common issues

Some issues are caused by an unsupported device, browser, or screen size.

* **Unsupported screen resolution.** DocStudio checks your screen size when you open the link or change the resolution.
  * Desktop: `minWidth = 1440`
  * Tablet: `minWidth = 756`, `maxWidth = 1439`
  * Mobile: `minWidth = 320`, `maxWidth = 755`
* **Wrong device orientation (mobile/tablet).** Rotate your device. Use portrait or landscape as prompted.
* **Unsupported browser/OS version.**\
  Use a modern browser version:
  * Chrome, Edge, Safari, Opera, Opera Mini: 2 latest versions
  * Firefox, Firefox ESR: latest version
  * iOS: 2 latest versions
  * IE 11 is not supported

See [Supported devices, browsers, and screen resolutions](/user/platform-settings-and-troubleshooting/supported-devices-browsers-and-screen-sizes) to learn more.


# How to Complete an Incoming Envelope (Existing DocStudio User)

This guide explains how to complete and sign an incoming DocStudio envelope as a registered (existing) user.

### When you need to sign in

If this isn’t the first envelope you’ve received, but you’ve never signed in or set up a password, you can usually complete envelopes without authorization.

If you previously set a password for your account, you must sign in to complete the envelope.

### Complete an envelope as an existing user

<figure><img src="/files/hi0nVt2DFeKRjPiix9yI" alt=""><figcaption></figcaption></figure>

1. Open the email and click <img src="/files/JDS4BLHa89ks4Xfp2kf2" alt="" data-size="line">.
2. Sign in to your DocStudio account.
3. Complete the required actions based on your role:
   * **Fill in** — Complete the fields assigned to you.
   * **Sign** — Create your e-signature and apply it.
   * **Approve** — Approve or reject the envelope.
   * **Receive a copy** — No action is required.
4. When all required actions are completed, click <img src="/files/8ePlYq9WpKcn14FJ7faw" alt="" data-size="line">.
5. In the pop-up window, click <img src="/files/ZceisdriCfPX9XlGSnm8" alt="" data-size="line">.

You have successfully completed the envelope in **DocStudio!**

### Confirmation email after signing

After you sign the document, DocStudio sends a confirmation email.

{% columns %}
{% column width="58.333333333333336%" %}
The email includes a <img src="/files/tynQvEdqfwiIizugm5FS" alt="" data-size="line"> button. Use it to open the signed document in DocStudio.\
\
Depending on the sender’s template settings, you can also download, or print the final PDF.

{% hint style="info" %}
If the button is not available, use the direct link in the email.
{% endhint %}
{% endcolumn %}

{% column width="41.666666666666664%" %}

<figure><img src="/files/FNz1NXpODx6CkQKHQaCc" alt=""><figcaption></figcaption></figure>
{% endcolumn %}
{% endcolumns %}

### Common issues

Some issues are caused by an unsupported device, browser, or screen size.

* **Unsupported screen resolution.** DocStudio checks your screen size when you open the link or change the resolution.
  * Desktop: `minWidth = 1440`
  * Tablet: `minWidth = 756`, `maxWidth = 1439`
  * Mobile: `minWidth = 320`, `maxWidth = 755`
* **Wrong device orientation (mobile/tablet).** Rotate your device. Use portrait or landscape as prompted.
* **Unsupported browser/OS version.**\
  Use a modern browser version:
  * Chrome, Edge, Safari, Opera, Opera Mini: 2 latest versions
  * Firefox, Firefox ESR: latest version
  * iOS: 2 latest versions
  * IE 11 is not supported

See [Supported devices, browsers, and screen resolutions](/user/platform-settings-and-troubleshooting/supported-devices-browsers-and-screen-sizes) to learn more.


# Sign and Download Envelopes

* [How to Sign Several Envelopes at Once](/user/sign-and-download-envelopes/how-to-sign-several-envelopes-at-once)
* [How to Sign an Envelope (Electronic Signature)](/user/sign-and-download-envelopes/how-to-sign-an-envelope-electronic-signature)
* [How to Sign an Envelope (Qualified Electronic Signature)](/user/sign-and-download-envelopes/how-to-sign-an-envelope-qualified-electronic-signature)
  * [How to Read a Qualified Electronic Signature](/user/sign-and-download-envelopes/how-to-sign-an-envelope-qualified-electronic-signature/how-to-read-a-qualified-electronic-signature)
  * [How to Read an Advanced Electronic Signature](/user/sign-and-download-envelopes/how-to-sign-an-envelope-qualified-electronic-signature/how-to-read-an-advanced-electronic-signature)
  * [How to Read an Electronic Signature Using a Bluetooth Token](/user/sign-and-download-envelopes/how-to-sign-an-envelope-qualified-electronic-signature/how-to-read-an-electronic-signature-using-a-bluetooth-token)
* [How to Download/Print Signed Documents](/user/sign-and-download-envelopes/how-to-download-print-signed-documents)
  * [How to Download a Full Envelope Archive](/user/sign-and-download-envelopes/how-to-download-print-signed-documents/how-to-download-a-full-envelope-archive)
  * [How to Print a Completed Document](/user/sign-and-download-envelopes/how-to-download-print-signed-documents/how-to-print-a-completed-document)
  * [The Signing Document Certificate](/user/sign-and-download-envelopes/how-to-download-print-signed-documents/the-signing-document-certificate)


# How to Sign Several Envelopes at Once

This document explains how to sign several envelopes at once and how the flow differs for AES or QES.

{% hint style="warning" %}
Bulk signing works only for envelopes where your active role only needs to sign. If your role must fill in fields or complete other actions, sign each envelope separately.
{% endhint %}

{% hint style="info" %}
The steps below apply to all signature types except AES and QES.

If the selected key is AES or QES and the stamp is not, this flow still applies. The same applies in the opposite case.

If both the key and the stamp are AES or QES, use the flow in [**How to Sign Several Envelopes at Once Using AES or QES**](#how-to-sign-several-envelopes-at-once-using-aes-or-qes) below.
{% endhint %}

### Sign several envelopes at once

1. Open **Mailbox** in the left sidebar.
2. Select the envelopes you want to sign.
3. Click the key icon.

{% hint style="info" %}
The tooltip for this icon is **Sign envelopes with QES**
{% endhint %}

<figure><img src="/files/Vd30rVtX5HUFYPx11nFy" alt=""><figcaption></figcaption></figure>

After that, the signing modal opens.

{% columns %}
{% column %}
4\. Complete the first two steps the same way as for [signing a single envelope](/user/sign-and-download-envelopes/how-to-sign-an-envelope-qualified-electronic-signature).
5\. On the third step, review the list of envelopes to sign.
6\. Click **the** <img src="/files/OeSmgKRZYLDOV4aLAPdi" alt="" data-size="line"> button and wait for the signing process to finish.

{% hint style="info" %}
You can click any envelope in the list to view its content in a new window
{% endhint %}
{% endcolumn %}

{% column %}

<figure><img src="/files/wmR4AnNUvXHqiGX1OysY" alt=""><figcaption></figcaption></figure>
{% endcolumn %}
{% endcolumns %}

{% columns %}
{% column %}
7\. Review the progress bar while the envelopes are being signed and review the signing results itself.

{% hint style="warning" %}
If an envelope fails to sign, you will see an error icon. Hover over it to view the cause.
{% endhint %}
{% endcolumn %}

{% column %}

<figure><img src="/files/xxY4Spzrhdc6LlvfbvGg" alt=""><figcaption></figcaption></figure>
{% endcolumn %}
{% endcolumns %}

### How to Sign Several Envelopes at Once Using AES or QES

Use the same flow from the previous section up to the signing step.

{% columns %}
{% column %}

1. Read the key and continue to signing.
2. Review the progress bar with information about processed envelopes.
   {% endcolumn %}

{% column %}

<figure><img src="/files/W9TpfwRn06aOG7k69Am2" alt=""><figcaption></figcaption></figure>
{% endcolumn %}
{% endcolumns %}

{% hint style="warning" %}
**Processed envelopes** does not always mean successfully signed envelopes.

It means only that processing is complete. The envelope may be signed successfully or skipped because of an error.
{% endhint %}

{% columns %}
{% column %}
3\. When processing finishes, review the signing results modal.
4\. If needed, download the report with all processed envelopes.
{% endcolumn %}

{% column %}

<figure><img src="/files/L9MnvjGw2ZvhaXp7gNCp" alt=""><figcaption></figcaption></figure>
{% endcolumn %}
{% endcolumns %}

#### Report contents:

The report is an `.xlsx` file which includes:

* Envelope subject
* Envelope UUID
* Envelope link
* Envelope signing status
* Envelope signing error

If the envelope is signed successfully, the error field is empty.


# How to Sign an Envelope (Electronic Signature)

This document explains how to sign one or multiple envelopes with an electronic signature and troubleshoot common signing errors.

{% hint style="info" %}
You can sign one or more envelopes if they contain signature fields.
{% endhint %}

### Electronic signature

1. Create a signature.
   * Draw your signature, or select the **Text** option.
   * You can also reuse your saved electronic signature.
2. Sign all required documents.
3. Check the result notification (success or failure).

### Errors while signing

If signing fails, you’ll see:

* a message in the top-right corner, and
* a tooltip on the red icon next to the failed envelope(s)

{% hint style="warning" %}
Signing can be blocked by these checks:

1. Your active role doesn’t match the assigned role.
2. The envelope has non-signature fields assigned to your active role.
3. The signature field has no coordinates (the signer chooses placement).
4. The signature field is inside an empty dynamic table (row count not defined yet).
   {% endhint %}


# How to Sign an Envelope (Qualified Electronic Signature)

This document explains how to sign documents with QES, sign multiple documents in one flow, download signed files, and check signature validity.

{% hint style="info" %}
To sign a document, the envelope must contain at least one signature field.
{% endhint %}

### How to sign an envelope using QES

{% columns %}
{% column width="50%" %}

1. In the **Required signatures** block:
   * Click the **QES signature** button.
   * Or click the **Pencil** icon, open the target field, and click it.
2. In the modal window, review the signing instructions.
   {% endcolumn %}

{% column width="50%" %}

<figure><img src="https://docs.docstudio.com/en/latest/_images/signatureOneEnvelopeMyTurn.png" alt=""><figcaption></figcaption></figure>

{% endcolumn %}
{% endcolumns %}

{% columns %}
{% column width="41.66666666666667%" %}
3\. Click **the** <img src="/files/1WrLL1qnQ9AUP6Ybmwyg" alt="" data-size="line"> button and select the electronic signature type you want to apply.
4\. Read the certificates from your key.
5\. Click **the** <img src="/files/gPlvMrcysxjOR2pd49Wv" alt="" data-size="line"> button to review the list of documents you are going to sign.
{% endcolumn %}

{% column width="58.33333333333333%" %}

<figure><img src="https://docs.docstudio.com/en/latest/_images/chooseKeyWindow.png" alt=""><figcaption></figcaption></figure>

{% endcolumn %}
{% endcolumns %}

{% hint style="info" %}
If the sender enabled the **Qualified** option for the signature field, you can apply only a qualified electronic signature.
{% endhint %}

{% columns %}
{% column width="41.66666666666667%" %}
The document list includes:

* PDF version in human-readable format
* XML version with structured document data

6. Click **the** <img src="/files/gPlvMrcysxjOR2pd49Wv" alt="" data-size="line"> button again to review the signing result.
   {% endcolumn %}

{% column width="58.33333333333333%" %}

<figure><img src="https://docs.docstudio.com/en/latest/_images/theListOfTheDocuments.png" alt=""><figcaption></figcaption></figure>
{% endcolumn %}
{% endcolumns %}

{% columns %}
{% column %}
7\. After the modal closes, review the signature status in the **Required signatures** block.
8\. Click the signed field to open detailed information about who signed the document and when.
9\. Sign all documents assigned to your role and click **Send** to complete the signing flow.
{% endcolumn %}

{% column %}

<figure><img src="https://docs.docstudio.com/en/latest/_images/successSignedDoc.png" alt=""><figcaption></figcaption></figure>
{% endcolumn %}
{% endcolumns %}

{% columns %}
{% column %}

<figure><img src="https://docs.docstudio.com/en/latest/_images/signatureInProcess.png" alt=""><figcaption></figcaption></figure>
{% endcolumn %}

{% column %}

<figure><img src="https://docs.docstudio.com/en/latest/_images/signedDocument1.png" alt=""><figcaption></figcaption></figure>
{% endcolumn %}
{% endcolumns %}

{% hint style="info" %}
If needed, you can also apply a stamp. Use **I want to choose stamp** on the second signing step.
{% endhint %}

### How to sign all documents in envelope

You can sign all eligible documents in one flow.

1. Follow the signing flow until you reach the documents list.
2. If more than one document is available, select **Sign all documents**.
3. Review the full list of documents available for signing.
4. Continue the signing flow to sign all documents from the list.

<figure><img src="https://docs.docstudio.com/en/latest/_images/signature3-2.png" alt=""><figcaption></figcaption></figure>

{% hint style="warning" %}
Do not forget to click **Send** after the last signing step. Otherwise, the signature will be lost.
{% endhint %}

### How to download signed documents

You can download signed documents only after all participants with the **Signer** role complete their steps.

1. Make sure the envelope is completed.
2. Open the envelope.
3. Click the **Download** button in the header to download the full envelope archive.
4. Or click the **Download** button next to a document name to download that document with its signatures.

After you click the download button, the archive downloads automatically.

### How to check signature validity

To validate the signature:

1. Download the archive with the signed document and signature files.
2. Open [the CZO verification service](https://czo.gov.ua/verify).
3. Select the `.p7s` file and the signed document.
4. Click **Check**.

{% hint style="info" %}
After validation is complete, review the result.
{% endhint %}


# How to Read a Qualified Electronic Signature

This document explains how to install the required software, read a qualified electronic signature key, and review its details before signing.

### Before you start

Use this flow to read a qualified electronic signature key stored on a hardware device:

* Connect the hardware key before you start.
* Wait until the system finishes device search.

### Install required software

1. Download and install the crypto library for [macOS](https://iit.com.ua/download/productfiles/EUSignWebInstall.pkg) or [Windows](https://iit.com.ua/download/productfiles/EUSignWebInstall.exe).
2. Install the [browser extension](https://chrome.google.com/webstore/detail/%D1%96%D1%96%D1%82-%D0%BA%D0%BE%D1%80%D0%B8%D1%81%D1%82%D1%83%D0%B2%D0%B0%D1%87-%D1%86%D1%81%D0%BA-1-%D0%B1%D1%96%D0%B1%D1%96%D0%B1%D0%BB/jffafkigfgmjafhpkoibhfefeaebmccg?utm_source=chrome-app-launcher-info-dialog) to let the browser access the crypto library.
3. Restart your computer.

{% hint style="warning" %}
Before you read the key:

* install the crypto library
* install the browser extension
* update your OS and browser
* restart your computer
  {% endhint %}

### Read the key

1. Wait for device search to finish.
2. Select your hardware key.
3. Enter the key password.
4. Click **Read key**.
5. Review the key details before you sign the document.

{% hint style="info" %}
If the password is valid and the key is available, the system opens the next step and shows the signature details.

If the password is invalid or the key cannot be read, the system shows an error message.
{% endhint %}

1. The first screen shows the detected hardware key.
2. The second screen shows the certificate details after the key is read successfully.

{% columns %}
{% column %}

<figure><img src="/files/lBf64Hlmegwm6H517Qa4" alt="" width="563"><figcaption></figcaption></figure>
{% endcolumn %}

{% column %}

<figure><img src="/files/sBYfNG29abEuImcuibK7" alt="" width="375"><figcaption></figcaption></figure>
{% endcolumn %}
{% endcolumns %}

### Related topics

* [How to Sign an Envelope (Qualified Electronic Signature)](/user/sign-and-download-envelopes/how-to-sign-an-envelope-qualified-electronic-signature)
* [How to Read an Advanced Electronic Signature](/user/sign-and-download-envelopes/how-to-sign-an-envelope-qualified-electronic-signature/how-to-read-an-advanced-electronic-signature)
* [Common Signature Errors and Solutions](/user/sign-and-download-envelopes/how-to-sign-an-envelope-qualified-electronic-signature/common-signature-errors-and-solutions)


# How to Read an Advanced Electronic Signature

This document explains how to read an advanced electronic signature from a key file and review the signature details before signing.

### Read the key

1. Select the key file on your computer or flash drive.
2. In the modal window, review the password field and available key actions.
3. Enter the key password and click **Read key**.
4. Review the information about the key you are going to use for signing.

{% columns %}
{% column %}

<figure><img src="https://docs.docstudio.com/en/latest/_images/afterKeySelected.png" alt=""><figcaption></figcaption></figure>
{% endcolumn %}

{% column %}

<figure><img src="https://docs.docstudio.com/en/latest/_images/readedQes.png" alt=""><figcaption></figcaption></figure>
{% endcolumn %}
{% endcolumns %}

{% hint style="info" %}
If the password and key are valid, the system opens the next step and shows the signature details.

If the password is invalid or the key cannot be read, the system shows an error message.
{% endhint %}


# How to Read an Electronic Signature Using a Bluetooth Token

This document explains how to install Sign client, connect an IIT Bluetooth token, read the key, and confirm signing on a mobile device.

### Before you start

Use this flow to read a qualified electronic signature from an IIT Bluetooth token.

Before you start:

* install **Sign client** on your mobile device
* update your OS and browser
* turn on Bluetooth on your mobile device
* keep the token nearby during setup

### Install and set up Sign client

{% hint style="warning" %}
Update your OS and browser to the latest version before you continue.
{% endhint %}

1. Install **Sign client** for your device:
   * [iOS](https://apps.apple.com/ua/app/iit-sign-client/id1467005893)
   * [Android](https://play.google.com/store/apps/details?id=ua.com.iit.signclient)
2. Open **Sign client**.
3. Register a new user with the Bluetooth token.
4. Click **+**.
5. Select the key type.
6. If you use an **Almaz-1K** Bluetooth token, select **Key media**.
7. Select **Read**.
8. Select **Key media** again.
9. Turn on the Bluetooth token and wait until it appears in the app.
10. Select the token and enter the key password.
11. Finish the setup and copy the key identifier.

### Read the key

<figure><img src="/files/qmH2YDDED5BRNaDKUOil" alt="" width="563"><figcaption></figcaption></figure>

1. Select the **Other electronic signature device** option.
2. Enter the key identifier.
3. Click **Read key**.
4. Confirm the request in **Sign client**.
5. Review the signer details after the key is read successfully.

{% hint style="info" %}
If the token is connected and the key identifier is valid, the system shows the signer details.

If the token is unavailable, the identifier is invalid, or the request is rejected, the system shows an error message.
{% endhint %}

### Confirm signing

1. Click the <img src="/files/Grsyics4SGDxTVXBND8H" alt="" data-size="line"> button to continue.
2. Click the <img src="/files/oocRgz4JVMpVyyBhzIx4" alt="" data-size="line"> button if you need to open the instructions again.
3. Confirm the signing requests in **Sign client**.
4. Repeat the confirmation for each document in the signing flow.

The first screen shows where to enter the key identifier.

The next screens show the signer details and the signing confirmation flow.

{% columns %}
{% column %}

<figure><img src="/files/bkZQC9Q1BPtoenLPUmc0" alt=""><figcaption></figcaption></figure>
{% endcolumn %}

{% column %}

<figure><img src="/files/wVH7VIpxDdCxhaJQYTY9" alt=""><figcaption></figcaption></figure>
{% endcolumn %}
{% endcolumns %}

### Related topics

* [How to Sign an Envelope (Qualified Electronic Signature)](/user/sign-and-download-envelopes/how-to-sign-an-envelope-qualified-electronic-signature)
* [How to Read a Qualified Electronic Signature](/user/sign-and-download-envelopes/how-to-sign-an-envelope-qualified-electronic-signature/how-to-read-a-qualified-electronic-signature)
* [Common Signature Errors and Solutions](/user/sign-and-download-envelopes/how-to-sign-an-envelope-qualified-electronic-signature/common-signature-errors-and-solutions)


# Common Signature Errors and Solutions

Sometimes the user may have problems with the selection of the Qualification Signature. Most often this is due to updates to the signature library, or incorrect configuration of the software package related to reading signatures.

1. If you are trying to select a signature, and you receive an error “There was a problem while interacting with the cryptographic library”, as shown in the figure below, make sure that you have gone through all the steps for installing the library on your PC, which you can find by the [here](https://docs.docstudio.com/en/latest/pages/howToWorkWithPlatform/mainApplication/templateList/templateManagement/documentManagementOnTemplate/fields/qes/envelope/qualifiedElectronicSignature.html#qualifiedelectronicsignature), and try again

[![../../../../../../../../../\_images/crypto-lib-err.jpg](https://docs.docstudio.com/en/latest/_images/crypto-lib-err.jpg)](https://docs.docstudio.com/en/latest/_images/crypto-lib-err.jpg)

2. Periodically, the cryptographic library is updated, so the user may face a situation when his version of the library is outdated, then he will receive the message “The installed version of the library is not supported”. In this case, the user needs to update (install the latest library version) on his PC. Follow this [steps](https://docs.docstudio.com/en/latest/pages/howToWorkWithPlatform/mainApplication/templateList/templateManagement/documentManagementOnTemplate/fields/qes/envelope/qualifiedElectronicSignature.html#qualifiedelectronicsignature) to update / reinstall library

[<img src="https://docs.docstudio.com/en/latest/_images/crypto-lib-err-2.png" alt="../../../../../../../../../_images/crypto-lib-err-2.png" data-size="line">](https://docs.docstudio.com/en/latest/_images/crypto-lib-err-2.png)


# How to Download/Print Signed Documents

* [How to Download a Full Envelope Archive](/user/sign-and-download-envelopes/how-to-download-print-signed-documents/how-to-download-a-full-envelope-archive)
* [How to Print a Completed Document](/user/sign-and-download-envelopes/how-to-download-print-signed-documents/how-to-print-a-completed-document)
* [The Signing Document Certificate](/user/sign-and-download-envelopes/how-to-download-print-signed-documents/the-signing-document-certificate)


# How to Download a Full Envelope Archive

This document explains how to download a full envelope archive, download a single document archive, and see what each archive contains.

{% hint style="info" %}
You can download signed documents after all participants with the **Signer** role complete their steps.
{% endhint %}

### Download a full archive from the envelope page

1. Make sure the envelope is completed.
2. Open the envelope.
3. Click the **Download** ![](/files/UyzGzZ12GGXYh8DKoL71) icon in the envelope header.
4. Wait until the ZIP archive downloads automatically.

### Download a single document archive

1. Make sure the envelope is completed.
2. Open the envelope.
3. Click the **Download** ![](/files/UyzGzZ12GGXYh8DKoL71) icon next to the document name.
4. Wait until the ZIP archive downloads automatically.

{% columns %}
{% column %}
Full envelope archive

![](/files/rki3lev3S4GCKdUT6Vkq)
{% endcolumn %}

{% column %}
Single document archive

![](/files/tFCtUZRMh4xdaZIZxqPQ)
{% endcolumn %}
{% endcolumns %}

### What the archive contains

#### If you download a single document

The ZIP archive contains:

1. The document PDF.
2. The document XML.
3. The signing certificate PDF: `DocumentName.signatures.pdf`.
4. A printable PDF that includes:
   * the visual representation of all signatures
   * the signing certificate in the same file

{% hint style="info" %}
`DocumentName` matches the name of the document you downloaded.
{% endhint %}

#### If you download the full envelope

The ZIP archive contains one folder for each document in the envelope.

Each folder contains:

1. The document PDF.
2. The document XML.
3. The signing certificate PDF.
4. The printable PDF.

The ZIP archive also contains `AuditTrail`.

### Download multiple envelopes

1. Open **Mailbox**.
2. Select the completed envelopes you want to download.
3. Click **More options** ![](/files/6NooSdwz0ktut3AiV67I).
4. Click **Download envelopes** ![](/files/UyzGzZ12GGXYh8DKoL71).
5. Click **Full archive**.
6. Wait until the download starts.

<figure><img src="/files/DP5ItiHiFYGnF9qbbihS" alt=""><figcaption></figcaption></figure>

### Related topics

* [How to Print a Completed Document](/user/sign-and-download-envelopes/how-to-download-print-signed-documents/how-to-print-a-completed-document)


# How to Print a Completed Document

This document explains how to print a completed document from the envelope page or from the printable PDF in the downloaded archive.

{% hint style="info" %}
Print is available only after the document is completed.
{% endhint %}

### Print from the envelope page

{% columns %}
{% column width="50%" %}

1. Open the completed envelope.
2. Find the completed document.
3. Click **Print** <img src="/files/SsrbvP1yoHmcCxBDJDab" alt="" data-size="line"> next to the document.
4. Print the document from the browser print dialog.
   {% endcolumn %}

{% column width="50%" %}

<figure><img src="/files/UxPG6SBtoCROb9dYxeTq" alt="" width="375"><figcaption></figcaption></figure>
{% endcolumn %}
{% endcolumns %}

The **Print** icon appears next to a completed document.

### Related topics

* [How to Download a Full Envelope Archive](/user/sign-and-download-envelopes/how-to-download-print-signed-documents/how-to-download-a-full-envelope-archive)


# The Signing Document Certificate

This document contains an overview of the signing document certificate, including document details, signer information, and QES validation guidance.

The signing document certificate is included in the downloaded document archive. Use it to review document metadata, signer details, and signature validation information.

### Document information

This section contains:

* **Envelope UUID** — unique envelope identifier
* **Envelope subject** — envelope subject
* **Document ID** — unique document identifier
* **Document title** — document name shown in the envelope
* **Document date** — envelope creation date
* **Template UUID** — unique template identifier
* **Template version** — template version identifier
* **File name** — name of the signed file
* **Number of signatures** — number of signers for the document
* **Electronic version of the document** — link to the envelope in DocStudio

The first page of the certificate shows the main document details.

<figure><img src="/files/KeIFqeWebeRyyuQfDccl" alt=""><figcaption></figcaption></figure>

### Signer, signature, and stamp information

This section contains:

* **Owner** — name of the certificate owner
* **Organization** — company name linked to the certificate
* **Position** — signer position in the company
* **DRFO (ITN) / EDRPOU** — identifier of the signer or company
* **Certificate serial number** — certificate number used to confirm the signer identity
* **Date of signing** — date and time of signing
* **File name** — signed file name with extension

{% hint style="info" %}
If the block describes a signature, the certificate shows a key icon.

If the block describes a stamp, the certificate shows a stamp icon.
{% endhint %}

This section shows who signed the document or applied the stamp.

<figure><img src="/files/Sh9QJtcWqy25T7dpjNN8" alt=""><figcaption></figcaption></figure>

### QES validation guidance

The certificate also includes a short explanation of QES and guidance for signature validation.

Use this section when you need to understand what QES means or verify the signature outside DocStudio.

<figure><img src="/files/FhcLZYMPrz6qy0VrZZHc" alt=""><figcaption></figcaption></figure>

### Related topics

* [How to Download a Full Envelope Archive](/user/sign-and-download-envelopes/how-to-download-print-signed-documents/how-to-download-a-full-envelope-archive)
* [How to Sign an Envelope (Qualified Electronic Signature)](/user/sign-and-download-envelopes/how-to-sign-an-envelope-qualified-electronic-signature)


# External Documents in the Envelope

* [How to Add an External Document to an Envelope](/user/external-documents-in-the-envelope/how-to-add-an-external-document-to-an-envelope)


# How to Add an External Document to an Envelope

This document explains how to upload an external document to an envelope and add an electronic signature before sending.

{% hint style="info" %}
Set up the slot first in [How to Add External Documents to a Template](/user/template-builder/template-editor/how-to-add-external-documents-to-a-template).
{% endhint %}

### Upload an external document

<figure><img src="/files/xlYt246OZ4qew4Y8sCVO" alt=""><figcaption></figcaption></figure>

1. Open the envelope.
2. Find the external document upload zone.
3. Click the upload zone and select the file.
4. Wait until the upload finishes.
5. Fill in the remaining required fields.
6. Click <img src="/files/6KdnoMaSEAaA9GOH24yz" alt="" data-size="line">.

{% hint style="info" %}
When the upload finishes, you’ll see the file name or a PDF preview.

You can replace or delete the file before you send the envelope.
{% endhint %}

### Add an electronic signature

{% hint style="info" %}
Use this flow only if the template contains a **Signature field**.\
If the external document includes a **Signature field**, upload only a **.pdf** file.
{% endhint %}

<figure><img src="/files/VMc9Aow7RRrCpLUqpWBq" alt=""><figcaption></figcaption></figure>

{% columns %}
{% column %}

1. Click the signature field on the external document.
2. Place the signature where you need it.
3. Click the <img src="/files/iYN6sKHAmWTg0xvZ7smx" alt="" data-size="line"> button to apply the signature.
4. To change the signature, click the field again.
5. Fill in all required fields.
6. Click the <img src="/files/6KdnoMaSEAaA9GOH24yz" alt="" data-size="line"> button.
   {% endcolumn %}

{% column %}

<figure><img src="/files/jkouhrMC82ciDUnm9cKr" alt=""><figcaption></figcaption></figure>
{% endcolumn %}
{% endcolumns %}

{% hint style="info" %}
After you apply the signature, review its placement on the PDF before you send the envelope.
{% endhint %}

{% hint style="danger" %}
Electronic signatures work only for external documents uploaded as **.pdf** files.

If you add a **Signature field** to an external document in the template, the envelope accepts only **.pdf** uploads for that document.
{% endhint %}

### Related topics

* [How to Add External Documents to a Template](/user/template-builder/template-editor/how-to-add-external-documents-to-a-template)
* [How to Create and Send an Envelope](/user/envelopes/how-to-create-and-send-an-envelope)
* [How to Upload a Document for e-Signature](/user/dashboard/how-to-upload-a-document-for-electronic-signature)


# Envelope Approvals & Delegation

* [Envelope Approvals](/user/envelope-approvals-and-delegation/envelope-approvals)
  * [How to Send an Envelope for Approval](/user/envelope-approvals-and-delegation/envelope-approvals/how-to-send-an-envelope-for-approval)
  * [How to Send Multiple Envelopes for Approval](/user/envelope-approvals-and-delegation/envelope-approvals/how-to-send-multiple-envelopes-for-approval)
  * [How to Manage Envelope Approvals](/user/envelope-approvals-and-delegation/envelope-approvals/how-to-manage-envelope-approvals)
* [Envelope Delegation](/user/envelope-approvals-and-delegation/envelope-delegation)
  * [How to Set Up Automatic Envelope Delegation](/user/envelope-approvals-and-delegation/envelope-delegation/how-to-set-up-automatic-envelope-delegation)
  * [How to Delegate an Envelope Manually](/user/envelope-approvals-and-delegation/envelope-delegation/how-to-delegate-an-envelope-manually)
  * [How to Restrict Envelope Delegation](/user/envelope-approvals-and-delegation/envelope-delegation/how-to-restrict-envelope-delegation)


# Envelope Approvals

* [How to Send an Envelope for Approval](/user/envelope-approvals-and-delegation/envelope-approvals/how-to-send-an-envelope-for-approval)
* [How to Send Multiple Envelopes for Approval](/user/envelope-approvals-and-delegation/envelope-approvals/how-to-send-multiple-envelopes-for-approval)
* [How to Manage Envelope Approvals](/user/envelope-approvals-and-delegation/envelope-approvals/how-to-manage-envelope-approvals)


# How to Send an Envelope for Approval

This document explains how to send an envelope for approval, create an approval route, and review the approval flow in the envelope.

{% hint style="warning" %}
You can send envelopes for approval only with these statuses:

* Draft
* Waiting
  {% endhint %}

### Approver vs Signer

**Approver** and **Signer** are different roles:

* **Approver** — decides whether the envelope can move to the next step
* **Signer** — signs the document

### Send an envelope for approval

<figure><img src="/files/U5Q9AYo7AHXCI56qZlAj" alt=""><figcaption></figcaption></figure>

1. Open a draft envelope or an envelope in **Waiting** status.
2. In the header (top-right), click the **Approval** <img src="/files/LoxMwkDGDJCEnuqQ8QSg" alt="" data-size="line"> icon.
3. In the dialog, select a saved route.
4. Optional: mark the envelope as urgent.
5. Click the <img src="/files/sFJTVbrU62l0cu5oJjic" alt="" data-size="line"> button.

{% hint style="info" %}
You can search routes by name. Use the info icon next to a route to view details.
{% endhint %}

After you send the envelope for approval, it moves to **On approval** status.

### Create an approval route

<figure><img src="/files/BsEaEEOgtc6QSOHlocZ8" alt=""><figcaption></figcaption></figure>

1. In the approval dialog, click the <img src="/files/8uqrzgUOeEOGckq5k7UR" alt="" data-size="line"> button.
2. Enter the route name.
3. In **Approver** and **Mailbox**, select the approver mailbox (search by name or UUID).
4. Click the **Add** <img src="/files/aDoUuieHFOgcYpVmILRg" alt="" data-size="line"> icon. To remove an approver, click the <img src="/files/3HzfBnA7BWsNMrJ6w78O" alt="" data-size="line"> icon.
5. Repeat for each approver.
6. Click the <img src="/files/AT5NRnpswwA7kmSYflzd" alt="" data-size="line"> icon.

Approvers follow the order defined in the route.

{% hint style="warning" %}
You can’t set an approver mailbox that:

* already participates in the envelope processing flow
* is already used in the same approval route
  {% endhint %}

### Set route access

Configure route access after you create the route.

{% columns %}
{% column width="41.66666666666667%" %}
You can share a route with:

* selected mailboxes in your account
* all mailboxes in your account
  {% endcolumn %}

{% column width="58.33333333333333%" %}

<figure><img src="/files/GxT0T3Vmby0Sy275rNEA" alt="" width="300"><figcaption></figcaption></figure>
{% endcolumn %}
{% endcolumns %}

#### Grant access to selected mailboxes

{% columns %}
{% column %}

1. Click the **Edit** <img src="/files/GSfrQsZmaUK4tES6hxZR" alt="" data-size="line"> icon to edit access for **Selected mailboxes**.
2. Enter a mailbox name.
3. Save the changes.
   {% endcolumn %}

{% column %}

<figure><img src="/files/FAbYNVIiJdH3OdNPAF4v" alt=""><figcaption></figcaption></figure>
{% endcolumn %}
{% endcolumns %}

### View the approval flow in an envelope

1. Open an envelope in **On approval** status.
2. Scroll to **Approval flow**.
3. Expand the section.

<figure><img src="/files/kHX69JgdXPsBEub9GwXY" alt=""><figcaption></figcaption></figure>

Use this section to track approver statuses and comments.

### What approvers can do

Approvers can approve or reject the envelope and add a comment.

* If an approver rejects the envelope, the approval flow ends with **Rejected** status.
* If an approver approves the envelope, the flow continues to the next recepient.
* When the flow finishes, the envelope returns to **Waiting** status.

### Limitations

* While an envelope is **On approval**, the user who started the approval can’t continue processing it.
* The UI shows only the latest approval run.
* Previous approval runs are available through the API.

### Related topics

* [Send several envelopes](/user/envelope-approvals-and-delegation/envelope-approvals/how-to-send-multiple-envelopes-for-approval)
* [Manage approvals](/user/envelope-approvals-and-delegation/envelope-approvals/how-to-manage-envelope-approvals)


# How to Send Multiple Envelopes for Approval

This document explains how to send one or more envelopes for approval from Mailbox.

{% hint style="warning" %}
You can send envelopes for approval only with these statuses:

* Draft
* Waiting
  {% endhint %}

Use this flow to send one or more envelopes for approval from **Mailbox**.

<figure><img src="/files/J6UrfvtEdXBMZm5qSihL" alt=""><figcaption></figcaption></figure>

### Send several envelopes for approval

<figure><img src="/files/IlkCatQjvt2BJRwudOEd" alt=""><figcaption></figcaption></figure>

1. Open **Mailbox**.
2. Select one or more envelopes.
3. In the table header, click the **Add envelope for approval** <img src="/files/LoxMwkDGDJCEnuqQ8QSg" alt="" data-size="line"> icon.
4. Select a saved route or create a new one.
5. Optional: mark the envelopes as urgent.
6. Confirm the action.

After you send the envelopes for approval, they move to **On approval** status.

{% hint style="info" %}
The same approval route applies to all selected envelopes. You can create a new route from the same dialog.
{% endhint %}

### Related topics

* [Send one envelope](/user/envelope-approvals-and-delegation/envelope-approvals/how-to-send-an-envelope-for-approval)
* [Manage approvals](/user/envelope-approvals-and-delegation/envelope-approvals/how-to-manage-envelope-approvals)


# How to Manage Envelope Approvals

This document explains how to use the Approval page to review approval history, filter approvals, and approve or reject multiple items.

Use the **Approval** page to review incoming approvals, track approval history, and process several items at once.

### Approval page overview

{% columns %}
{% column %}
**Folders**

Use folders on the left to switch approval views.
{% endcolumn %}

{% column %}

<figure><img src="/files/552e7e2G2qg7fQLnRt9C" alt=""><figcaption></figcaption></figure>
{% endcolumn %}
{% endcolumns %}

{% columns %}
{% column %}
**Filters and search**

Use filters and search at the top of the page.
{% endcolumn %}

{% column %}

<figure><img src="/files/yPgYg1luLztJKaxuavXE" alt=""><figcaption></figcaption></figure>

{% hint style="info" %}
Filters are stored in the page URL.

You can copy the URL to share the same filtered view with another user.
{% endhint %}
{% endcolumn %}
{% endcolumns %}

{% columns %}
{% column %}
**Approval list**

The table shows envelopes based on the selected filters and search query.
{% endcolumn %}

{% column %}

<figure><img src="https://ucarecdn.com/13deed2d-f12f-4a5c-8d67-03766ae47c2b/image_-_2025-05-08T122827.386.png" alt=""><figcaption></figcaption></figure>
{% endcolumn %}
{% endcolumns %}

{% columns %}
{% column %}
**Pagination**

Use pagination at the bottom to switch pages in the approval list.
{% endcolumn %}

{% column %}

<figure><img src="https://ucarecdn.com/5551b13c-24b7-4b41-9438-e54e749eff61/image.png" alt=""><figcaption></figcaption></figure>
{% endcolumn %}
{% endcolumns %}

### Approval history

Click an envelope **Status** to open the approval history tooltip.

You can:

* Use the tooltip to review the full approval chain for the selected envelope.
* Click **Show more** to read approver comments.

<figure><img src="/files/5p6NG9Gm67T6YoK4750c" alt=""><figcaption></figcaption></figure>

### Approve or reject several approvals

<figure><img src="/files/rTYEqPh51lyNCjLVmVna" alt=""><figcaption></figcaption></figure>

1. Open the **to Approve** or **Urgent** tab.
2. Select the approvals you want to process.
3. In the table header, click the **Approve** <img src="/files/nzkD1oGebYa3KrMser8n" alt="" data-size="line"> or **Reject** <img src="/files/tHhD4OfG24mBsTsQeGoR" alt="" data-size="line"> icon.
4. In the modal, add a comment or leave it blank.
5. Confirm the action.

### Related topics

* [Send one envelope](/user/envelope-approvals-and-delegation/envelope-approvals/how-to-send-an-envelope-for-approval)
* [Send several envelopes](/user/envelope-approvals-and-delegation/envelope-approvals/how-to-send-multiple-envelopes-for-approval)


# Envelope Delegation

* [How to Set Up Automatic Envelope Delegation](/user/envelope-approvals-and-delegation/envelope-delegation/how-to-set-up-automatic-envelope-delegation)
* [How to Delegate an Envelope Manually](/user/envelope-approvals-and-delegation/envelope-delegation/how-to-delegate-an-envelope-manually)
* [How to Restrict Envelope Delegation](/user/envelope-approvals-and-delegation/envelope-delegation/how-to-restrict-envelope-delegation)


# How to Set Up Automatic Envelope Delegation

Automatically forward incoming envelopes from your mailbox to a delegate mailbox, and review key limitations.

Use automatic delegation when another mailbox should handle your incoming envelopes for a period of time.

This is useful during vacation, sick leave, or any period when you cannot process envelopes yourself.

### Set up automatic delegation

<figure><img src="/files/1F5nYVzQL2EIKnDUfmXc" alt=""><figcaption></figcaption></figure>

1. Open **User profile** → **Forwarding Tab**.
2. Enter the delegate mailbox by name, UUID, alias, or email.
   * Optional: set **Effective until** to stop forwarding automatically.
3. Enable **Active forwarding**.
4. Click the <img src="/files/K7JcYSMWfNI70HMjNc3y" alt="" data-size="line"> button.

### Notes and limitations

{% hint style="info" %}
The **Forwarding** section appears only for mailboxes with delegation permission.
{% endhint %}

* Envelopes with restricted delegation are not forwarded and still arrive in your mailbox.
* If the selected delegate already has access to the current role, auto-delegation does not apply.

### Related topics

* [Delegate manually](/user/envelope-approvals-and-delegation/envelope-delegation/how-to-delegate-an-envelope-manually)
* [Restrict delegation](/user/envelope-approvals-and-delegation/envelope-delegation/how-to-restrict-envelope-delegation)


# How to Delegate an Envelope Manually

Delegate an envelope to another mailbox so it can complete the step, and learn how to cancel delegation.

### Delegate an envelope

<figure><img src="/files/bMhw3zvXgZypFEZyzYch" alt="" width="563"><figcaption></figcaption></figure>

1. Open an envelope in **Waiting for you** status.
2. Click the **Delegate** <img src="/files/5QR4hCpaGC656ro4ABAk" alt="" data-size="line"> icon in the envelope header.
3. In the dialog, select the delegate mailbox by name, UUID, alias, or email.
4. Click the <img src="/files/sFJTVbrU62l0cu5oJjic" alt="" data-size="line"> button

The envelope is sent to the selected mailbox.

### Cancel delegation

You can cancel delegation if the delegate has not completed their step yet.

1. Open the envelope processing flow window.
2. Find the delegated step.
3. Click the <img src="/files/yPI3ucQN0P28cFYWoouA" alt="" data-size="line"> button.

<figure><img src="/files/TlrJocUKSjknWYq3nvkZ" alt="" width="563"><figcaption></figcaption></figure>

The delegation is canceled and now again in **Waiting for you** status.

### Notes and limitations

* The **Delegate** button appears only for mailboxes with the delegation permission.
* You cannot delegate a role to a mailbox that already participates in that role.

### Related topics

* [Set up automatic delegation](/user/envelope-approvals-and-delegation/envelope-delegation/how-to-set-up-automatic-envelope-delegation)
* [Restrict delegation](/user/envelope-approvals-and-delegation/envelope-delegation/how-to-restrict-envelope-delegation)


# How to Restrict Envelope Delegation

Restrict envelope delegation at the template or envelope level so only recipients in the flow can process it.

### **Restrict delegation at the template level**

{% columns %}
{% column %}

1. Open the template in edit mode.
2. In the **Recepient experience** block , enable **Delegation is denied** toggle.
   {% endcolumn %}

{% column %}

<figure><img src="/files/4dkRdKFr31Nu3OnXyPVl" alt=""><figcaption></figcaption></figure>
{% endcolumn %}
{% endcolumns %}

{% hint style="warning" %}
Template-level restriction applies to all envelopes created from that template. You cannot override it at the envelope level.
{% endhint %}

### **Restrict delegation for one envelope**

Use this option if delegation is not restricted at the template level.

{% columns %}
{% column width="33.33333333333333%" %}

1. Open the envelope draft page.
2. Enable **Delegation is denied** toggle.
   {% endcolumn %}

{% column width="66.66666666666667%" %}

<figure><img src="/files/1yAAXjR42UhZ9VhV2e5H" alt="" width="563"><figcaption></figcaption></figure>
{% endcolumn %}
{% endcolumns %}


# Envelope Comments

* [How to Add and Manage Comments on an Envelope](/user/envelope-comments/how-to-add-and-manage-comments-on-an-envelope)


# How to Add and Manage Comments on an Envelope

This document explains how to add, edit, and manage comments in DocStudio.

Use comments to discuss specific content inside an envelope, control who can see each thread, and keep discussions organized until they are resolved.

### Comments panel

{% columns %}
{% column width="66.66666666666666%" %}

1. Open an envelope.
2. In the header, click the <img src="/files/VFFvsDJ6OHupnzGcci5G" alt="" data-size="line"> icon.

* If the envelope already has an open comment thread, the panel may be open by default.
* To close the panel, click the same icon again.
  {% endcolumn %}

{% column width="33.33333333333334%" %}

<figure><img src="/files/j7G7jtzcg7KG6Y35ZBzD" alt="" width="223"><figcaption></figcaption></figure>
{% endcolumn %}
{% endcolumns %}

### Add a comment

{% hint style="info" %}
You can add comments only to saved drafts or sent envelopes.

The maximum comment length is **5,000** characters.
{% endhint %}

1. Select the content you want to comment on.
   * In tables, you can comment only on the whole table or a single cell.
2. Right-click selected content and click **Comment**.
   * If there is no comment thread yet, open the comments panel and click **Create**.
3. Enter your comment and click the <img src="/files/AT5NRnpswwA7kmSYflzd" alt="" data-size="line"> button.

#### Set comment visibility

1. Click the visibility link in the comment dialog.
2. Select who can see the comment.
3. If you choose **Selected mailboxes**, add mailboxes one by one.
4. Click the <img src="/files/AT5NRnpswwA7kmSYflzd" alt="" data-size="line"> button in the visibility dialog.
5. Click the <img src="/files/AT5NRnpswwA7kmSYflzd" alt="" data-size="line"> button in the comment dialog.

<figure><img src="/files/j29SiAfnfCWCYJy663UK" alt="" width="563"><figcaption></figcaption></figure>

After you save the comment, the selected area is highlighted in the document.

Clear all options to make the comment visible only in your mailbox. Change visibility later from the same link.

### Reply to a comment

{% columns %}
{% column %}

1. On the initial comment, click **Reply**.
2. Enter your reply and click the <img src="/files/AT5NRnpswwA7kmSYflzd" alt="" data-size="line"> button.
3. The reply appears in the thread.
   {% endcolumn %}

{% column %}

<figure><img src="/files/PqIullQDscDkA75kWU9P" alt=""><figcaption></figcaption></figure>
{% endcolumn %}
{% endcolumns %}

### Edit a comment

{% columns %}
{% column %}
You can edit only your own comments.

1. Click **Edit** on the initial comment, or click the icon on a reply.
2. Update the text and click the <img src="/files/AT5NRnpswwA7kmSYflzd" alt="" data-size="line"> button.
   {% endcolumn %}

{% column %}

<figure><img src="/files/MwLRA1Fnb6YjyXa9U497" alt="" width="226"><figcaption></figcaption></figure>
{% endcolumn %}
{% endcolumns %}

### Delete a comment

{% hint style="warning" %}
You can delete only your own comments.
{% endhint %}

{% columns %}
{% column %}

1. Click the **Delete** ![](/files/JZ9Y1OqkbE7DZeZIN0vb) icon.
2. Confirm deletion.

{% hint style="info" %}
If you delete the first comment, all replies in the thread are deleted too.
{% endhint %}
{% endcolumn %}

{% column %}

<figure><img src="/files/JVQ2Y5tXmp6J1hbHUq3P" alt=""><figcaption></figcaption></figure>
{% endcolumn %}
{% endcolumns %}

### Resolve a comment thread

{% columns %}
{% column width="58.333333333333336%" %}
You can resolve only your own comment threads.

Click the **Resolve** ![](/files/KukGIJGi92ReDITRkoWL) icon.

{% hint style="info" %}
After resolving, the thread moves to the resolved section. If it was the last comment attached to a highlighted area, the highlight is removed.
{% endhint %}
{% endcolumn %}

{% column width="41.666666666666664%" %}

<figure><img src="/files/Be1L5gSo348oyqEMShCs" alt=""><figcaption></figcaption></figure>
{% endcolumn %}
{% endcolumns %}

### Reopen a resolved thread

{% columns %}
{% column %}
You can reopen only your comment threads.

1. Open the **Resolved** tab.
2. Click the **Reopen** ![](/files/4LxW5HgdZBqjhpwVjqeb) icon.
   {% endcolumn %}

{% column %}

<figure><img src="/files/UCFzK45TWKjl0ngKWjvq" alt=""><figcaption></figcaption></figure>
{% endcolumn %}
{% endcolumns %}

After reopening, the thread returns to the active section.

{% hint style="info" %}
If it is the first comment attached to an area, the highlight appears again.
{% endhint %}


# Platform​ Notifications

* [How Notifications Work](/user/platform-notifications/how-notifications-work)
* [How to Manage Notification Settings](/user/platform-notifications/how-to-manage-notification-settings)


# How Notifications Work

This document contains an overview of notification triggers, notification behavior, and notification settings in DocStudio.

DocStudio shows notifications for activity in accounts and mailboxes you can access.

### What triggers notifications

{% columns %}
{% column width="58.333333333333336%" %}

* new envelope
* final envelope status
* new account or mailbox invite
* invite accepted or declined
  {% endcolumn %}

{% column width="41.666666666666664%" %}

* envelope step completed
* domain updates
* integration updates
* dictionary updates
  {% endcolumn %}
  {% endcolumns %}

### Open notifications

Use the bell icon in the top-right corner to open notifications.

* <img src="/files/OGereuKr6mR8HXcbCzl3" alt="" data-size="line"> No badge means you have no unread notifications
* <img src="/files/OvTj49sAe6WZqvoSLFyh" alt="" data-size="line"> A numbered badge shows the unread count
* <img src="/files/lBZQb3Pi00nWz3VUhYxY" alt="" data-size="line"> **9+** appears when you have more than nine unread notifications

{% hint style="info" %}
Click the bell icon to open the list. Notifications are sorted by date, newest first.
{% endhint %}

### Notification types

Notifications are grouped by scope.

#### User notifications

User notifications include:

* account or mailbox invites
* domain verified
* domain verification expired

#### Account notifications

Account notifications include:

* invite accepted
* invite declined
* inbox or outbox integration error

#### Mailbox notifications

Mailbox notifications include:

* new envelope
* final envelope status
* dictionary uploaded
* dictionary missing on the platform

{% hint style="info" %}
Each notification includes an icon, a link, a text label, and a timestamp.
{% endhint %}

### How shared notifications behave

All users with access to the same account or mailbox see the same notifications for that item.

When one user opens a notification:

* the system marks it as read
* the notification is hidden for all users who share access
* the user is redirected to the related page

### Where notifications open

The destination depends on the notification type.

* Invite notifications open **User Profile** → **Invites**
* Invite acceptance or decline notifications open the users list in the admin panel
* Envelope notifications open the related envelope
* Dictionary notifications open the related dictionary
* Domain notifications open the domain settings in the admin panel

### Manage notification settings

Manage email and in-app notifications in **User Profile** → **Notifications**.

By default, all notification types are enabled.

Configure settings by:

* category
* delivery channel
* mailbox

To update these settings, see [How to Manage Notification Settings](/user/platform-notifications/how-to-manage-notification-settings).


# How to Manage Notification Settings

This document explains how to manage per-mailbox in-app and email notification settings from your user profile.

<figure><img src="/files/1LLjJgxFbzLNkh9jcGOv" alt=""><figcaption></figcaption></figure>

### Edit notifications

1. Navigate to the user profile and open **Notifications** tab.
2. Configure in-app and email notifications as needed.
3. Click the <img src="/files/6NJK4j2uOmS7DvbBUOzC" alt="" data-size="line"> button.

{% hint style="info" %}

* Notification settings are stored per mailbox. Configure each mailbox you use.
* Each user can configure their own notifications.
* Corporate account admins can configure notifications for users.
  {% endhint %}


# Template Links & Public Envelope Creation

* [How to Create a Public Template Link](/user/template-links-and-public-envelope-creation/how-to-create-a-public-template-link)
* [How Registered Users Can Create an Envelope via a Template Link](/user/template-links-and-public-envelope-creation/how-registered-users-can-create-an-envelope-via-a-template-link)
* [How Unregistered Users Can Create an Envelope via a Template Link](/user/template-links-and-public-envelope-creation/how-unregistered-users-can-create-an-envelope-via-a-template-link)


# How to Create a Public Template Link

This document explains how to create a public template link, copy a shareable link or embed code, add a redirect URL, and revoke or regenerate the link.

### Before you start

Make sure you can edit the template and save changes.

* add a value to **Subject**
* configure recipients for all required roles in **Flow**
* share each dictionary publicly or mark it as official if the template uses dictionaries

### Create a public template link

Use a public template link to let other users create envelopes from this template.

<figure><img src="/files/bcAzRD4zlIFhn0o4HN8B" alt=""><figcaption></figcaption></figure>

1. Open the template in edit mode, then go to the **Template** tab.
2. On the **Template** tab, enter a value in **Subject**.
3. Change **Template access** from **My mailbox** to **Everyone**.
4. Open the **Flow** tab and add recipients for the required roles.
5. Click the <img src="/files/vG66BIgRvKk6Pubc3P96" alt="" data-size="line"> button to save the template.
6. Return to the **Template** tab.
7. Click **Template menu** <img src="/files/6NooSdwz0ktut3AiV67I" alt="" data-size="line">, then click **Get link**.
8. In the modal, choose one option:
   * **Shareable link** — open the public send form in a browser tab
   * **Embed code** — open the same form inside your website in an iframe
9. Copy the link or embed code.

### Add a redirect URL

Add the `redirectUrl` parameter to the public link or to the iframe source. URL-encode the value.

Open the redirect URL in a new tab after the envelope is sent successfully.

### Regenerate or revoke the link

1. Click **Template menu** <img src="/files/6NooSdwz0ktut3AiV67I" alt="" data-size="line">, then click **Get link**.
2. Do one of the following:
   * Click **Generate a new one** to replace the current public link
   * Click the <img src="/files/90YvQfMugrJMAnXrYMZ3" alt="" data-size="line"> button to disable the current link and embed code
3. If you revoke the link, click **Get link** again to create a new one.

{% hint style="warning" %}
Revoked links cannot be restored.
{% endhint %}

### Related topics

* [How Registered Users Can Create an Envelope via a Template Link](/user/template-links-and-public-envelope-creation/how-registered-users-can-create-an-envelope-via-a-template-link)
* [How Unregistered Users Can Create an Envelope via a Template Link](/user/template-links-and-public-envelope-creation/how-unregistered-users-can-create-an-envelope-via-a-template-link)


# How Registered Users Can Create an Envelope via a Template Link

This document explains how a registered user can send an envelope from a public template link or iframe and choose a mailbox if prompted.

### Before you start

* open a valid public template link or iframe
* prepare to sign in if you are not already signed in
* make sure the template contains all required fields and signatures

### Open the public template link

1. Open the public template link or iframe.
2. Fill in all required fields and signatures.
3. Click the <img src="/files/6KdnoMaSEAaA9GOH24yz" alt="" data-size="line"> button.

{% hint style="info" %}
If you are already signed in and have a default mailbox, DocStudio sends the envelope automatically.
{% endhint %}

### Sign in (if prompted)

1. Enter your email address.
2. Sign in to DocStudio.
3. Continue to the send form.

### Choose a mailbox (if prompted)

1. Select the mailbox to send from.
2. Confirm sending.

### Confirm sending

After the envelope is sent, you will see a confirmation page.

Use this result to confirm that DocStudio created the envelope successfully.

![](https://ucarecdn.com/e51ba68e-07f6-4057-8a06-1c40b33a51b9/image.png)

### Related topics

* [How to Create a Public Template Link](/user/template-links-and-public-envelope-creation/how-to-create-a-public-template-link)
* [How Unregistered Users Can Create an Envelope via a Template Link](/user/template-links-and-public-envelope-creation/how-unregistered-users-can-create-an-envelope-via-a-template-link)


# How Unregistered Users Can Create an Envelope via a Template Link

Send an envelope from a public template link or iframe without creating an account, using an email address not registered on the platform.

### Send an envelope

1. Open the shared link or iframe.
2. Fill in all required fields and signatures.
3. Click the <img src="/files/6KdnoMaSEAaA9GOH24yz" alt="" data-size="line"> button.
4. In the modal window, enter your email address.

{% hint style="warning" %}
Use an email address that is not registered on the platform.
{% endhint %}

### Confirm sending

After the envelope is sent, you will see a confirmation page.

![](https://ucarecdn.com/e51ba68e-07f6-4057-8a06-1c40b33a51b9/image.png)


# Platform Settings & Troubleshooting

* [​Supported Devices, Browsers, and Screen Sizes](/user/platform-settings-and-troubleshooting/supported-devices-browsers-and-screen-sizes)
* [How to View External Documents Using Microsoft Office Viewer](/user/platform-settings-and-troubleshooting/how-to-view-external-documents-using-microsoft-office-viewer)
* [​How to Find Your User UUID and Account UUID](/user/platform-settings-and-troubleshooting/how-to-find-your-user-uuid-and-account-uuid)
* [How to Change the Interface Language](/user/platform-settings-and-troubleshooting/how-to-change-the-interface-language)
* [Error Codes](/user/platform-settings-and-troubleshooting/error-codes)


# ​Supported Devices, Browsers, and Screen Sizes

This document lists supported devices, browsers, operating systems, and screen resolutions for DocStudio.

DocStudio can run as a browser-based application on the following devices:

* Desktop
* Tablet
* Mobile

When you initialize or change the screen resolution, the system checks to see if the current screen resolution suits the user's continued smooth operation.

It also checks the operating system and browser versions.

We recommend that you have one of the following screen resolutions and one of the following operating systems and browser versions for the platform to function correctly.

### **Supported screen resolutions**

| <ul><li>Desktop</li></ul> | minWidth = 1440 |                 |
| ------------------------- | --------------- | --------------- |
| <ul><li>Tablet</li></ul>  | minWidth = 756  | maxWidth = 1439 |
| <ul><li>Mobile</li></ul>  | minWidth = 320  | maxWidth = 755  |

{% hint style="info" %}
If your screen resolution isn't supported, you'll see a notification with instructions on what to do.
{% endhint %}

### **Supported browser and OS versions**

We cannot specify a specific version, but we constantly support the latest versions of operating systems and browsers according to the list below:

| Google Chrome   | 2 latest versions |
| --------------- | ----------------- |
| Mozilla Firefox | latest version    |
| Microsoft Edge  | 2 latest versions |
| Safari          | 2 latest versions |
| Opera           | 2 latest versions |
| Opera Mini      | 2 latest versions |
| Firefox ESR     | latest version    |
| iOS             | 2 latest versions |

{% hint style="danger" %}
**Warning!**\
We do not support IE 11 (Internet Explorer)
{% endhint %}

### **User messages**

If you are using a desktop, you will be prompted to:

![](https://ucarecdn.com/0efa3f85-1a78-4766-812e-0849aa4654e2/image.png)

If you are using a mobile or tablet device, they will be prompted to change it orientation to landscape or portrait:

{% columns %}
{% column %}

<figure><img src="/files/jRGdPD8TvBIoXHt81duq" alt=""><figcaption></figcaption></figure>
{% endcolumn %}

{% column %}

<figure><img src="/files/ULsfEKYbIX91hSnftI49" alt=""><figcaption></figcaption></figure>
{% endcolumn %}
{% endcolumns %}


# How to View External Documents Using Microsoft Office Viewer

Enable Microsoft Office Viewer to preview supported external documents in the browser and review supported formats and limitations.

Microsoft Office Viewer lets you preview supported external attachments in DocStudio. When it’s enabled, you can open files directly in the browser. When it’s disabled, files are available for download only.

### Enable Microsoft Office Viewer (admins)

<figure><img src="/files/mYvsgkAr4wTwR5RExIVN" alt=""><figcaption></figcaption></figure>

{% hint style="warning" %}
Only an **Account Owner** can enable Microsoft Office Viewer.

A corporate account admin is a user with the **Account Owner** role in a company account with a verified and active domain. For details, see [How to Add a Corporate Account Admin](/admin-panel/users-and-user-roles/how-to-add-a-corporate-account-admin).
{% endhint %}

1. Open the **Admin panel**.
2. Open **Account settings** tab.
3. Enable the **View external documents with Microsoft Office Viewer** toggle.
4. In the confirmation modal, review the notice and click the <img src="/files/RQH3I2ejh5YL6pBpN2mk" alt="" data-size="line"> button.
5. Click the <img src="/files/ACG5de7RE8J5HuWqUniH" alt="" data-size="line"> button.

For details, see the [Microsoft Services Agreement](https://www.microsoft.com/uk-ua/servicesagreement).

### Supported formats

{% columns %}
{% column %}

* PDF
* XLS
* XLSX
  {% endcolumn %}

{% column %}

* DOC
* DOCX
* PPT
* PPTX
  {% endcolumn %}
  {% endcolumns %}

### Disabled preview

When preview is disabled, supported formats are available for download only.

{% hint style="info" %}
DOC, DOCX, and PDF files are available for viewing and downloading even when Microsoft Office Viewer is disabled.
{% endhint %}

### Notes and limitations

* Preview with Microsoft Office Viewer is not available for unregistered users.
* Unsupported formats are available for download only.
* Password-protected files are not displayed.
* Users with attachment download restrictions cannot access these files.


# ​How to Find Your User UUID and Account UUID

This document explains where you can find and copy your User UUID and Account UUID.

{% hint style="info" %}
**User UUID** identifies your user profile. **Account UUID** identifies your account in DocStudio.
{% endhint %}

Use these identifiers when you need to share exact account or profile details.

### Copy your User UUID

<figure><img src="/files/2DJpb7ZrvAbQZJDzKDtj" alt=""><figcaption></figcaption></figure>

1. Open **Menu** in the top-right corner.
2. Select **User profile**.
3. Find **User UUID** and click the **Copy** ![](/files/X4R3ogKQfImDFsqiSXMG) icon.

The UUID is copied to your clipboard.

### Copy your Account UUID

<figure><img src="/files/82BpIZsqey3JAhejW7cT" alt=""><figcaption></figcaption></figure>

You can copy **Account UUID** only if you have access to **Admin panel**.

1. Open **Menu** in the top-right corner.
2. Select **Admin panel**.
3. Open **Account settings**.
4. Find **Account UUID** and click the **Copy** ![](/files/X4R3ogKQfImDFsqiSXMG) icon.

The UUID is copied to your clipboard.

### Related topics

* [How to Find a Mailbox ID (UUID)](/user/mailbox/mailbox-user/how-to-find-a-mailbox-id-uuid)
* [What Is an Envelope ID (UUID)?](/user/envelopes/what-is-an-envelope-id-uuid)


# How to Change the Interface Language

This document explains how to change the DocStudio UI language from your user profile or directly from an envelope link.

Change the interface language at any time from your profile or from the envelope page.

DocStudio currently supports these UI languages:

* English
* French
* Spanish

### Change the language in your profile

<figure><img src="/files/tMxt0NcAjZktF7AZxtmg" alt=""><figcaption></figcaption></figure>

1. Open **Menu** in the top-right corner.
2. Click **User profile**.
3. Select **Language**.
4. Click the <img src="/files/K7JcYSMWfNI70HMjNc3y" alt="" data-size="line"> button.

The interface switches to the selected language after you save the change.

### Change the language from an envelope link

{% columns %}
{% column %}
Change the language from the envelope page.

1. Open the envelope link.
2. Select the interface language in the top-right corner.
   {% endcolumn %}

{% column %}

<figure><img src="/files/SEwYhRH4p2jpYC074Yix" alt=""><figcaption></figcaption></figure>
{% endcolumn %}
{% endcolumns %}

### Related topics

* [Personal Settings Page Overview](/user/user-profile/personal-settings-page-overview)
* [How to Sign In to DocStudio](/user/authorization-and-security/how-to-sign-in-to-docstudio)


# Error Codes

This document contains the different types of errors along with their descriptions.

1Each error code has a specific error type, which varies depending on the issue.

To search easily, use the keyboard shortcut **Ctrl + F**

<table data-header-hidden data-search="false"><thead><tr><th width="107.88885498046875">Error code</th><th>Error detail</th><th>Error description</th></tr></thead><tbody><tr><td><strong>COMMON</strong></td><td></td><td></td></tr><tr><td>1000</td><td>Undefined exception</td><td>There is undefined and unpredictable exception. If it’s happened, please, make a screenshot of the error and contact support team to clarify and solve the issue.</td></tr><tr><td>1001</td><td>Record not found</td><td>Record with respective request parameter is not found in database. Please check your request, compare with documentation and send again</td></tr><tr><td>1002</td><td>XSLT translation error. {0}</td><td>XSLT translation error. It happens when we cannot transform XML document using XSLT template and get an envelope xml structure. Please pay attention to the error details and a row.</td></tr><tr><td>1003</td><td>Bad image data</td><td>An image in the request couldn’t be processed, use another format and/or properties of an image</td></tr><tr><td>1004</td><td>Empty value for required field ‘{0}’</td><td>You’ve sent an empty value for a required field. Please check your request parameters and send again</td></tr><tr><td>1005</td><td>Too many requests</td><td>You’ve sent to many requests for particular endpoint and user. Please try again in 10 minutes</td></tr><tr><td>1006</td><td>Validation failed. {0}</td><td>You are going to get this error, if any validation rules of the fields failed. Please see the details of the error to find particular field and failed validation rule</td></tr><tr><td>1007</td><td>Document has been modified</td><td>Document has already been modified. Please request updated document and then change it</td></tr><tr><td>1008</td><td>Invalid XML. {0}</td><td>XML structure is not valid, read error description to clarify details</td></tr><tr><td>1009</td><td>Verification code is absent</td><td>Verification code in the request is missing. Please check request data, check documentation and resend</td></tr><tr><td>1010</td><td>Try again later. Files are generating at the moment</td><td>Files are generating at the moment. To generate files one more time please wait until this process if over and then try again</td></tr><tr><td>1011</td><td>Unexpected content-type: {0}</td><td>Content-type of the uploaded document is incorrect or is not allowed. Allowed types are: CSV, XLS</td></tr><tr><td>1012</td><td>Cannot calculate file hash</td><td>Application cannot calculate hash of the file you sent</td></tr><tr><td>1013</td><td>Field ‘{0}’ must be not less than {1} chars long</td><td>Entered quantity of symbols is less than minimal chars length allowed</td></tr><tr><td>1014</td><td>Field ‘{0}’ must be less than {1} chars long</td><td>Entered quantity of symbols is bigger than allowed maximum chars length</td></tr><tr><td>1015</td><td>Field ‘{0}’ must be from {1} to {2} chars long</td><td>Entered quantity of symbols should be within the interval</td></tr><tr><td>1016</td><td>Unsupported locale: {0}</td><td>Locale is not supported by the system</td></tr><tr><td>1017</td><td>{0}</td><td>Password validation occurred. Password should be more complex and contains Latin symbols in lower and upper cases and special symbols</td></tr><tr><td>1018</td><td>Wrong timezone: {0}</td><td>Timezone is not supported by the system</td></tr><tr><td>1019</td><td>File is not ready for download</td><td>File you requested is not ready for download yet. Please wait a minute and try again</td></tr><tr><td>1020</td><td>Not valid filename: {0}</td><td>Filename is not valid</td></tr><tr><td>1021</td><td>File upload error: {0}</td><td>File cannot be uploaded. Please pay attention to the explanation in the error message</td></tr><tr><td>1022</td><td>Request header ‘{0}’ required</td><td>Request header is required in this request. Please check your request, compare with documentation and send again</td></tr><tr><td>1023</td><td>Request query parameter ‘{0}’ required</td><td>Request parameter is required. Please check your request, compare with documentation and send again</td></tr><tr><td>1024</td><td>Request body parameter ‘{0}’ required</td><td>Request body is required in this request. Please check your request, compare with documentation and send again</td></tr><tr><td>1025</td><td>Request path parameter ‘{0}’ required</td><td>Request path parameter is required in this request. Please check your request, compare with documentation and send again</td></tr><tr><td>1026</td><td>Authentication error</td><td>Some authentication error, please check logs</td></tr><tr><td>1027</td><td>Authentication token has been expired or revoked</td><td>Authentication token has been expired or revoked. To solve the issue authorize once again</td></tr><tr><td>1028</td><td>Standard Spring MVC exceptions: {0}</td><td>One of the standard server exceptions has occurred. Please see error message and check the request data for mistakes</td></tr><tr><td>1029</td><td>File ‘{0}’ exceeded max size: {1} > {2}</td><td>File size is bigger than the limit for upload. Please pay attention to max size on the error code and try to upload a file with proper size.</td></tr><tr><td>1030</td><td>File type mismatch for image ‘{0}’</td><td>Image file type is not correspond to allowed file types. Allowed file types: png, jpg, jpeg.</td></tr><tr><td>1031</td><td>Image ‘{0}’ exceeded max size: {1}x{2}</td><td>Image size is bigger than the limit for upload. Please pay attention to max size on the error code and try to upload file with proper size.</td></tr><tr><td>1032</td><td>Attachment {0} not found</td><td>Attachment with entered UUID was not found. Please check UUID</td></tr><tr><td>1033</td><td>Attachment ‘{0}’ is not in {1} format</td><td>Attachment cannot be uploaded because of the wrong file format. Please use one of the allowed formats from the list</td></tr><tr><td>1034</td><td>Image source ‘{0}’ is wrong</td><td>Image tag supports only ‘data:’ and ‘image-uuid:’ prefixes for source attribute</td></tr><tr><td>1035</td><td>Unsupported value for field {0}</td><td>The value is not supported</td></tr><tr><td>1036</td><td>Attachement hashes do not match for ‘{0}’</td><td>Check that hashes are correct for the attachement</td></tr><tr><td>1037</td><td>Password cannot be reused</td><td>Do not use previously used passwords</td></tr><tr><td>1038</td><td>Please accept Terms and Conditions and Privacy Policy</td><td>Please read and accept Terms and Conditions and Privacy Policy.</td></tr><tr><td>1039</td><td>Attachement {0} was uploaded by another mailbox {1}</td><td>This attachement cannot be used in this mailbox</td></tr><tr><td>1040</td><td>There must be 2 dates specified for a range</td><td>Range field value is incorrect. Acceptable range format is date/date, and date must be ISO-8601</td></tr><tr><td>1041</td><td>Requested range out of bounds</td><td>Requested range out of bounds</td></tr><tr><td>1042</td><td>Comment thread {0} is not found</td><td>Comment thread with entered UUID was not found. Please check correctness of the entered data</td></tr><tr><td>1043</td><td>Access to comment thread {0} is not allowed</td><td>Access to the comment thread with entered UUID is forbidden. Please check correctness of the entered data</td></tr><tr><td>1044</td><td>Message with ID {0} in comment thread {1} was not found</td><td>No such message in the comment thread. Please check correctness of the entered data</td></tr><tr><td>1045</td><td>Main thread for document already exists</td><td>Please specify XPath and create a new thread</td></tr><tr><td>1046</td><td>Thread {0} is already resolved or deleted and cannot be changed</td><td>There is no possibility to update the thread</td></tr><tr><td>1047</td><td>Attachment ‘{0}’ exceeded max name length: {1}</td><td>Attachment file name length is bigger than the limit. Please pay attention to max length on the error code and try to upload file with less length</td></tr><tr><td>1048</td><td>Password expired</td><td>Please renew the password</td></tr><tr><td>1049</td><td>To protect your account from hacking, we temporarily blocked the possibility of authorization. Wait {0} minute(s) or click “Forgot password?”</td><td>Please wait a few minutes and try again</td></tr><tr><td>1050</td><td>Only one session is allowed. Please log out from another one</td><td>Additional session is blocked</td></tr><tr><td>1051</td><td>IP address is blocked</td><td>Please contact the platform/account administrator</td></tr><tr><td>1052</td><td>Wrong IP or IP-range format for [{0}]</td><td>Please fix IP format</td></tr><tr><td>1053</td><td>Sub-service is unavailable: {0}</td><td>There is an infrastructure problem. Please try later</td></tr><tr><td>1054</td><td>Sub-service error with message: {0}</td><td>There is an error on sub-service side</td></tr><tr><td>1055</td><td>Payload is too large</td><td>Please decrease the size of the file/request</td></tr><tr><td>1056</td><td>Email is expected for SSO/OAuth2 authorization</td><td>Please change username to email in your Identity Provider</td></tr><tr><td>1057</td><td>Unsupported access level: {0}</td><td>Access level is not supported in this context</td></tr><tr><td>1058</td><td>Shared category can only belong to shared category</td><td>Shared category can only belong to shared category</td></tr><tr><td>1059</td><td>‘uuids’ or ‘searchParams’ have to be specified separately</td><td>Please send ‘uuids’ or ‘searchParams’</td></tr><tr><td>1060</td><td>Image ‘{0}’ is smaller than minimum size: {1}x{2}</td><td>Image size is smaller than limit for upload. Please pay attention to min size on the error code and try to upload file with larger size.</td></tr><tr><td>1061</td><td>The email address or password is incorrect. Try again or click “Forgot password?” to reset it.</td><td>Entered email or password is invalid</td></tr><tr><td>1062</td><td>The email address or password is incorrect. You have 1 attempt left. To avoid temporary blocking, click “Forgot password?”</td><td>Entered email or password is invalid</td></tr><tr><td>1063</td><td>{0}</td><td>Request is rejected by the system</td></tr><tr><td>1064</td><td>Please log in using SSO</td><td>Corporate user cannot register or log in using a password</td></tr><tr><td>1065</td><td>Wrong code format</td><td>Please send a proper code from email</td></tr><tr><td>1066</td><td>File {0} cannot be converted to PDF</td><td>File conversion error</td></tr><tr><td>1067</td><td>The array ‘{0}’ size is too large. No more than {1} items expected</td><td>Please consider the limit</td></tr><tr><td>1068</td><td>Unsupported format {0}</td><td>This format cannot be processed</td></tr><tr><td>1069</td><td>Shared mailboxes must be specified for access level = shared</td><td>Check shared mailboxes are filled</td></tr><tr><td>1070</td><td>Date field ‘{0}’ must be greater than {1}</td><td>Please change the date value</td></tr><tr><td>1071</td><td>File conversion error: {0}</td><td>File conversion error</td></tr><tr><td>1072</td><td>Bad ISO date: {0}</td><td>Format date is incorrect, please use ISO-8601 date formats</td></tr><tr><td>1073</td><td>File ‘{0}’ cannot be uploaded because there are no pages of allowed size {1}</td><td>Please use another file</td></tr><tr><td>1074</td><td>Functionality disabled by configuration</td><td>Functionality disabled by configuration</td></tr><tr><td>1075</td><td>You need to confirm your email address. Please check your mailbox</td><td>User needs to confirm verification email</td></tr><tr><td>1076</td><td>Barcode service request error</td><td>Please check your request, compare with documentation and send again</td></tr><tr><td>1077</td><td>Barcode {0} not supported</td><td>Barcode format is not supported</td></tr><tr><td>1078</td><td>Barcode value ‘{0}’ incorrect</td><td>Value can’t be encoded into barcode</td></tr><tr><td>1079</td><td>Barcode service error</td><td>Barcode service unavailable or responded in unexpected way</td></tr><tr><td>1080</td><td>Accept media type is not supported: {0}</td><td>Accept header contains unsupported media type</td></tr><tr><td>1081</td><td>PDF file has nested fields, please specify ‘action’ parameter with any of: {0}</td><td>Parameter ‘action’ has to be set in order to modify PDF file</td></tr><tr><td>1082</td><td>PDF file is already signed, please specify ‘action’ parameter with any of: {0}</td><td>Parameter ‘action’ has to be set in order to modify PDF file</td></tr><tr><td>1083</td><td>PDF file is encrypted, please specify ‘action’ parameter with any of: {0}</td><td>Parameter ‘action’ has to be set in order to modify PDF file</td></tr><tr><td>1084</td><td>Category access cannot be changed for category {0}</td><td>Access cannot be changed after category was created</td></tr><tr><td>1085</td><td>There are no suitable objects for processing</td><td>Objects cannot be processed</td></tr><tr><td>1086</td><td>Email does not match with entered before</td><td>Invalid email, possible fraud</td></tr><tr><td>1087</td><td>Attachment {0} is not in allowed format</td><td>Allowed format is either doc/docx or xls/xlsx/xlsb/xlsm or ppt/pptx</td></tr><tr><td>1088</td><td>Attachment {0} is not accessible for provider {1}</td><td>Please check correctness of provider name</td></tr><tr><td>1089</td><td>Attachment {0} is already attached to an envelope</td><td>Please use another endpoint with envelopeUuid specified</td></tr><tr><td><strong>USER/PROFILE</strong></td><td></td><td></td></tr><tr><td>10001</td><td>User {0} not found</td><td>User with requested UUID was not found</td></tr><tr><td>10002</td><td>User {0} deleted</td><td>User has been deleted and couldn’t be used</td></tr><tr><td>10003</td><td>Proof message is not valid</td><td>Entered proof message is not valid. A proof message should be the user’s email in upper case (f.e.: “<a href="mailto:EMAIL%40EXAMPLE.COM">EMAIL@EXAMPLE.COM</a>”)</td></tr><tr><td>10004</td><td>Email already in use: {0}</td><td>User with particular email has already been registered</td></tr><tr><td>10005</td><td>User already activated</td><td>User has already been activated. To use the system you have to be authorized</td></tr><tr><td>10006</td><td>Invitation is for another user</td><td>Opened content doesn’t belong to your particular user, log in with other credentials to be able to see the content</td></tr><tr><td>10007</td><td>User notification {0} is not found</td><td>There are no notifications for particular user</td></tr><tr><td>10008</td><td>Email validation code not found or expired</td><td>Email validation code was not found or expired. Check correctness of entered code or resend with a new one.</td></tr><tr><td>10009</td><td>Invitation code not found or expired</td><td>Invitation code was not found or expired. Check correctness of the entered code or ask to resend a new one.</td></tr><tr><td>10010</td><td>Your invitation link has been expired, please register now</td><td>Invitation code has been expired. Try to register and confirm your email the usual way</td></tr><tr><td>10011</td><td>Invitation not found or expired</td><td>Invitation for particular user does not exist or expired</td></tr><tr><td>10012</td><td>Invitation email is empty</td><td>It’s impossible to create invitation, email field is required</td></tr><tr><td>10013</td><td>No account provided for update</td><td>Account option is missed in the request. Please check your request, compare with documentation and send again</td></tr><tr><td>10014</td><td>No permissions provided for update</td><td>Permissions list is missing in the request. Please check your request, compare with documentation and send again</td></tr><tr><td>10015</td><td>Wrong role ‘{0}’ is used</td><td>Role is incorrect for particular request, please check that entered role UUID exists</td></tr><tr><td>10016</td><td>Auto Deposite is disabled</td><td>Do not change autoDepositeMailboxUuid field</td></tr><tr><td>10017</td><td>Color ‘{0}’ has wrong format</td><td>Color in the request in wrong format. Please use color format #FFFFFF</td></tr><tr><td>10018</td><td>User is already blocked</td><td>User has already been blocked</td></tr><tr><td>10020</td><td>Already invited</td><td>This user has already been invited to this entity</td></tr><tr><td>10021</td><td>User cannot delete himself</td><td>Only admin of account can delete corporate user</td></tr><tr><td>10022</td><td>Corporate user cannot create new account</td><td>Corporate user is already assigned to an account and this cannot be changed</td></tr><tr><td>10023</td><td>User {0} is not corporate</td><td>Current action can be applied only on a corporate user</td></tr><tr><td>10024</td><td>User ‘{0}’ already has access to account/mailbox</td><td>This user already has the access to these entities</td></tr><tr><td>10025</td><td>Wrong password</td><td>Old password is wrong. Please check correctness of entered password</td></tr><tr><td>10026</td><td>User is inactive</td><td>User has not confirmed his email yet</td></tr><tr><td>10027</td><td>User {0} is corporate</td><td>Current action can be applied only on non-corporate user</td></tr><tr><td>10028</td><td>ITN code has to be specified for company account</td><td>Please add missing property to the request</td></tr><tr><td>10029</td><td>Incorrect phone number</td><td>Phone number should be in international format</td></tr><tr><td>10030</td><td>This endpoint can only be executed for user with expired password</td><td>Active user should use another endpoint, please check documentation</td></tr><tr><td>10031</td><td>You cannot remove yourself from the mailbox</td><td>User was added to mailbox not via invitation</td></tr><tr><td>10032</td><td>User is blocked</td><td>Ask your system administrator to unblock</td></tr><tr><td>10033</td><td>Verification record expired</td><td>Please repeat operation</td></tr><tr><td>10034</td><td>Auto-deposit mailbox is not set</td><td>Auto-deposit mailbox has to be set for user</td></tr><tr><td><strong>ACCOUNT</strong></td><td></td><td></td></tr><tr><td>20001</td><td>Account {0} not found</td><td>An account with entered UUID is not found. Please check request data</td></tr><tr><td>20002</td><td>Account {0} deleted</td><td>Account with entered UUID has been deleted.</td></tr><tr><td>20004</td><td>Only one mailbox allowed</td><td>This request allows only one mailbox</td></tr><tr><td>20005</td><td>Role has no account</td><td>Account UUID parameter is required in a request. Please enter valid account UUID to create role</td></tr><tr><td>20006</td><td>Role {0} not found</td><td>Role with entered UUID is not found. Please check request data</td></tr><tr><td>20007</td><td>Role with such name already exists</td><td>Role with particular name is exist. Please enter new name or remove the existing role</td></tr><tr><td>20008</td><td>No role permissions data found</td><td>Role permissions data is required in this request. Please check request data, compare it with documentation and send again</td></tr><tr><td>20009</td><td>No role type found</td><td>Role type is incorrect in the request. Supported role types: Account, Mailbox and System. Please check request data, compare it with documentation and send again</td></tr><tr><td>20010</td><td>Unsupported permission set</td><td>Permissions in the request are not correct. Please check request data, compare it with documentation and send again</td></tr><tr><td>20011</td><td>Parent category should not have access level higher than subordinated</td><td>Parent category should not have access level higher than subordinated</td></tr><tr><td>20012</td><td>Account ‘{0}’ has no other owners</td><td>Account with entered UUID does not have other owners. Add at least one more owner ot Account and repeat the action</td></tr><tr><td>20013</td><td>Account domain name not found</td><td>Account domain name is empty in the create domain request body</td></tr><tr><td>20014</td><td>Account domain name size exceeded maximum size 256</td><td>Account domain name exceeded max allowed size (256 characters) in the create domain request body</td></tr><tr><td>20015</td><td>Cannot resolve domain ‘{0}’</td><td>Domain cannot be resolved to IP. Looks like it doesn’t exist</td></tr><tr><td>20016</td><td>Cannot use domain ‘{0}’</td><td>Domain already verified and used by another account or already added to current account</td></tr><tr><td>20017</td><td>Domain ‘{0}’ not found</td><td>Domain not found in database by domainUuid</td></tr><tr><td>20018</td><td>Unknown domain verification method</td><td>Domain verification method was not found in request body during domain verify request</td></tr><tr><td>20019</td><td>Domain already verified</td><td>Domain already verified and verification info cannot be changed</td></tr><tr><td>20020</td><td>Only INACTIVE domains can be activated</td><td>Cannot activate unverified or already activated domain</td></tr><tr><td>20021</td><td>Only ACTIVE domains can be deactivated</td><td>Cannot deactivate unverified or already deactivated domain</td></tr><tr><td>20022</td><td>Domain verification expired</td><td>Domain verification expired. Please use verify method to renew verification</td></tr><tr><td>20023</td><td>Domain verify info not found</td><td>Domain verify info was not found during domain confirmation or domain check</td></tr><tr><td>20024</td><td>Domain ‘{0}’ already verified by another account</td><td>Domain has pass verification, but it was already added and verified by another account.</td></tr><tr><td>20025</td><td>Domain and account do not match</td><td>You’re trying to access domain, which is not belongs to current account</td></tr><tr><td>20026</td><td>The user policy for the account should be stricter than the global one.</td><td>Please check the user global policies /api/v1/settings</td></tr><tr><td>20027</td><td>Domain ‘{0}’ has to be verified and active</td><td>Domain is not active during corporate user creation</td></tr><tr><td>20028</td><td>Invitation permission conflict</td><td>User has already had access to the entity and cannot be invited anymore to this entity</td></tr><tr><td>20029</td><td>Invitations roles or permissions are empty</td><td>Roles or permissions are missing in the request. Please check your request, compare with documentation and send again</td></tr><tr><td>20030</td><td>Account ‘{0}’ has no verified domains</td><td>Account has no verified domains</td></tr><tr><td>20031</td><td>Error during XLSX generation</td><td>Excel file generation error</td></tr><tr><td>20032</td><td>Users not found</td><td>Corporate import Excel file has no sheet with users</td></tr><tr><td>20033</td><td>Duplicated user {0}</td><td>Duplicated user email in corporate users import file</td></tr><tr><td>20034</td><td>Wrong account UUID {0} on account users sheet</td><td>Wrong account UUID found on account users sheet</td></tr><tr><td>20035</td><td>Cell A1 not found on account users sheet</td><td>Cell A1 not found on account users sheet</td></tr><tr><td>20036</td><td>Mailbox {0} not belongs to account or not exists</td><td>Mailbox not belongs to account or not exists</td></tr><tr><td>20037</td><td>Duplicated mailbox {0} sheet found</td><td>Found more than one sheet with same mailbox UUID, while it must be just one</td></tr><tr><td>20038</td><td>Cell A1 not found on mailbox users sheet</td><td>Cell A1 not found on mailbox users sheet</td></tr><tr><td>20039</td><td>User info empty (either first name, last name or email)</td><td>Please fix data in file</td></tr><tr><td>20040</td><td>Listed roles error for user {0}</td><td>Listed role(s) not exists or belongs to another account</td></tr><tr><td>20041</td><td>Listed permissions error for user {0}</td><td>Listed permission(s) not exists</td></tr><tr><td>20042</td><td>Cannot open file as a spreadsheet</td><td>Uploaded file isn’t a valid Excel format</td></tr><tr><td>20043</td><td>Role {0} cannot be deleted because it is assigned to users or invitations</td><td>Role is in use and assigned to users or invitations</td></tr><tr><td>20044</td><td>Total number of chars cannot be greater than the maximum length set</td><td>Please update password policy with correct values</td></tr><tr><td>20045</td><td>User does not belong to the account</td><td>Listed user(s) belongs to another account</td></tr><tr><td>20046</td><td>SSO Identity Provider ‘{0}’ not found</td><td>SSO Identity Provider is absent in database</td></tr><tr><td>20047</td><td>Metadata URL or XML have to be specified separately</td><td>Please enter only URL or XML</td></tr><tr><td>20048</td><td>Metadata loading/parsing error</td><td>Metadata cannot be loaded or parsed without an error. Please check URL or XML</td></tr><tr><td>20049</td><td>IdP and account do not match</td><td>You’re trying to access IdP, which is not belongs to current account</td></tr><tr><td>20050</td><td>SSO configuration mismatch</td><td>Please check SSO configuration for the domain</td></tr><tr><td>20051</td><td>SSO Identity Provider not found for domain ‘{0}’</td><td>SSO Identity Provider not found for the domain. Please set an IdP</td></tr><tr><td>20052</td><td>SSO Identity Provider ‘{0}’ is in use for domain and cannot be deleted</td><td>Please un-assign IdP. SSO Identity Provider is in use for the domain and cannot be deleted</td></tr><tr><td>20054</td><td>Street name must be between 1 and 200 chars long</td><td>Street name should be between 1 and 200 chars long</td></tr><tr><td>20055</td><td>City name must be between 1 and 200 chars long</td><td>City name should be between 1 and 200 chars long</td></tr><tr><td>20056</td><td>Region name must be between 1 and 200 chars long</td><td>Region name should be between 1 and 200 chars long</td></tr><tr><td>20057</td><td>Country name must be between 1 and 100 chars long</td><td>Country name should be between 1 and 100 chars long</td></tr><tr><td>20058</td><td>Zip code must be between 1 and 10 chars long</td><td>Zip code should be between 1 and 10 chars long</td></tr><tr><td>20059</td><td>Formatted address must be between 1 and 300 chars long</td><td>Formatted address should be between 1 and 300 chars long</td></tr><tr><td>20060</td><td>Account billing address not found</td><td>Account billing address not found, please create new one</td></tr><tr><td>20061</td><td>Signing key and certificate are required for EntityID {0}</td><td>Please specify signing fields</td></tr><tr><td>20062</td><td>No valid users found for creating</td><td>Import file is empty</td></tr><tr><td>20063</td><td>This role cannot be deleted while it is in use for auto mailbox creation in the account {0}</td><td>Role is in use as a default role for auto mailbox creation</td></tr><tr><td>20064</td><td>Country ISO code must be 2 characters long</td><td>Country ISO code should be 2 characters long</td></tr><tr><td><strong>MAILBOX</strong></td><td></td><td></td></tr><tr><td>30001</td><td>Mailbox {0} not found</td><td>Entered mailbox could not be found in the system</td></tr><tr><td>30002</td><td>Mailbox {0} deleted</td><td>Mailbox has been deleted. Please use active mailbox.</td></tr><tr><td>30003</td><td>Mailbox name cannot be empty</td><td>Mailbox name should not be empty. It should contain at least 1 symbol</td></tr><tr><td>30004</td><td>Mailbox name length exceeded maximum size</td><td>Mailbox name length couldn’t be more than 256 symbols</td></tr><tr><td>30005</td><td>Mailbox alias cannot be empty</td><td>Mailbox alias name should not be empty. It should contain at least 3 symbols</td></tr><tr><td>30006</td><td>Mailbox alias length exceeded maximum size</td><td>Mailbox alias name length couldn’t be more than 256 symbols</td></tr><tr><td>30007</td><td>Alias not found or attached to another mailbox</td><td>Alias you have tried to delete was not found or attached to another mailbox</td></tr><tr><td>30008</td><td>Contact {0} not found</td><td>Contact with UUID you entered doesn’t exist or was not found</td></tr><tr><td>30009</td><td>Auto delegation is enabled but mailbox is not specified</td><td>Please set the mailbox to which to delegate the envelope</td></tr><tr><td>30010</td><td>Category {0} not found</td><td>Category with UUID you entered doesn’t exist or was not found</td></tr><tr><td>30011</td><td>Invalid parentId value</td><td>ID of parent category is not valid</td></tr><tr><td>30012</td><td>Alias already exists</td><td>Alias with entered name is exist</td></tr><tr><td>30013</td><td>Empty category ID</td><td>Category ID is empty in request. Please enter required parameter</td></tr><tr><td>30014</td><td>Cannot change category access to official</td><td>It’s impossible to change category access to official. Official categories may be created only by the system user.</td></tr><tr><td>30015</td><td>Category already exists</td><td>Category with entered UUID exists</td></tr><tr><td>30016</td><td>Mailbox {0} does not belong to the account</td><td>Mailbox does not belong to this account. Please check your request and ensure that a mailbox you want to invite belongs to the account</td></tr><tr><td>30017</td><td>Mailbox {0} has no other owners</td><td>Mailbox does not have another owner and cannot be left</td></tr><tr><td>30018</td><td>Qualified ID (alias) is required for mailbox {0}</td><td>Please set proper ID for mailbox</td></tr><tr><td>30019</td><td>Mailbox UUID is empty</td><td>Mailbox UUID should not be empty</td></tr><tr><td>30020</td><td>Mailbox UUID is invalid or empty</td><td>Mailbox UUID is invalid or empty. Please send valid request with valid Mailbox UUID</td></tr><tr><td>30021</td><td>Email is forbidden for alias name</td><td>Please do not use emails as an alias name to avoid misunderstandings</td></tr><tr><td>30022</td><td>Alias name ‘{0}’ already exists. Please reach your support</td><td>Qualified alias already used</td></tr><tr><td>30023</td><td>Incorrect qualified identifier ‘{0}’</td><td>Should match [0-9a-zA-Z.]</td></tr><tr><td>30024</td><td>Alias ‘{0}’ listed more than once</td><td>But should be only one time</td></tr><tr><td>30025</td><td>Mailbox UUID of delegate is invalid</td><td>Please do select another mailbox</td></tr><tr><td>30026</td><td>Mailbox is not found by alias ‘{0}’</td><td>Please do select another alias</td></tr><tr><td>30027</td><td>Mailbox group name error</td><td>Group name should be between 1 and 64 symbols length</td></tr><tr><td>30028</td><td>Mailbox group already exists</td><td>Group with this name already exists in account</td></tr><tr><td>30029</td><td>Mailbox group {0} not found</td><td>Group was deleted or never exists</td></tr><tr><td><strong>TEMPLATE</strong></td><td></td><td></td></tr><tr><td>40001</td><td>Document {0} not found</td><td>Document with entered UUID was not found. Please check correctness of the entered UUID</td></tr><tr><td>40002</td><td>Template {0} is archived</td><td>Template with entered UUID is archived. You cannot use archived templates.</td></tr><tr><td>40003</td><td>Template {0} not found</td><td>Template with entered UUID was not found. Please check correctness of the entered UUID</td></tr><tr><td>40004</td><td>Template Data {0} not found</td><td>Template data is not found in storage. Please check your request, compare with documentation and send again</td></tr><tr><td>40005</td><td>Template Data not found for template {0}</td><td>Template data is not found in storage. Please check your request, compare with documentation and send again</td></tr><tr><td>40006</td><td>Template must have access level equal or wider than category access level</td><td>Template access level has to be equal or bigger than category access level</td></tr><tr><td>40007</td><td>Image {0} not found</td><td>Image is not found, please upload the image before updating the template</td></tr><tr><td>40008</td><td>Wrong or unexpected ‘sameAs’ attribute for role {0}</td><td>Please check the correctness of attribute</td></tr><tr><td>40009</td><td>Must have other roles except the sender</td><td>Template has to have at least one another role except sender</td></tr><tr><td>40010</td><td>Must be only 1 sender</td><td>Template should contain only one role with type Sender</td></tr><tr><td>40011</td><td>First role must be Sender</td><td>First role in the template flow should be sender</td></tr><tr><td>40012</td><td>Must be at least 2 roles</td><td>Template has to have at least 2 roles, first required to be dedicated for Sender and another one for Recipient or Signer</td></tr><tr><td>40013</td><td>Role ‘{0}’ has no fields assigned</td><td>Role in the template doesn’t have assigned fields. Please add fields with assigned to this role or make this role a Copy</td></tr><tr><td>40014</td><td>Notification must be earlier than expiration</td><td>If an envelope expires in 3 days, we can’t notify on a 5th day. Please set expire.notifyIn &#x3C; expire.after</td></tr><tr><td>40015</td><td>Signer roles without signature: {0}</td><td>Signer role does not have signature field related to him in the template. Please add one or remove Signer role</td></tr><tr><td>40016</td><td>Following fields assigned on non-existing roles: {0}</td><td>The fields assigned to non-existing roles. Please re-assign fields to existing roles or remove fields</td></tr><tr><td>40017</td><td>Following roles has no fields assigned: {0}</td><td>Role with particular ID doesn’t have assigned fields in the documents. Please add fields, remove roles or make this role a Copy</td></tr><tr><td>40018</td><td>Template validation error in document ‘{0}’ lookup ‘{1}’. Related field ‘{2}’ not found in document fields</td><td>Lookup field doesn’t have related dictionary field in the document. Please add dictionary field to the document or remove lookup field</td></tr><tr><td>40019</td><td>Template validation error in document ‘{0}’ lookup ‘{1}’. Related field cannot be used as lookup source</td><td>Lookup field doesn’t have related source in the dictionary. Please check availability of the dictionary/dictionary record or remove lookup field</td></tr><tr><td>40020</td><td>Duplicated document ids: {0}</td><td>Document IDs are duplicated in the template. Document IDs should be unique inside template</td></tr><tr><td>40021</td><td>Duplicated document names: {0}</td><td>Document name are duplicated within the template. Document names must be unique within the template</td></tr><tr><td>40022</td><td>Field ‘{0}’ has wrong min or max value</td><td>Entered values of the min value is bigger than max value. It’s impossible to set these parameters for field.</td></tr><tr><td>40023</td><td>Field ‘{0}’ has precision value larger than allowed {1}</td><td>Entered precision value for the field is bigger than allowed for particular type of the field</td></tr><tr><td>40024</td><td>Dropdown field ‘{0}’ has to have at least one option</td><td>Define options for the dropdown field</td></tr><tr><td>40025</td><td>Template {0} already deleted</td><td>Template has been deleted and cannot be used to envelope creation</td></tr><tr><td>40026</td><td>Empty template data</td><td>Template data parameter is empty. Please use valid structure of the request</td></tr><tr><td>40027</td><td>Access level has to be Public or Official</td><td>Private template cannot be shared</td></tr><tr><td>40028</td><td>Template {0} is not accessible by sharing code</td><td>Make sure the sharing code is correct</td></tr><tr><td>40029</td><td>At least one non-optional field required in a table ‘{0}’</td><td>At least one table field has to be non-optional and also this field must be assigned to the table owner</td></tr><tr><td>40030</td><td>Dynamic table head not found. Table name: {0}</td><td>Table structure is not correct. Table should contain head.</td></tr><tr><td>40031</td><td>Dynamic table head row not found. Table name: {0}</td><td>Table structure is not correct. Table should contain only one head row.</td></tr><tr><td>40032</td><td>Dynamic table head row columns not found. Table name: {0}</td><td>Table structure is not correct. Table should contain columns in the structure.</td></tr><tr><td>40033</td><td>Dynamic table inside another table is forbidden. Parent table name: {0}</td><td>It’s impossible to have dynamic table inside other dynamic table</td></tr><tr><td>40034</td><td>Dynamic table body not found. Table name: {0}</td><td>Table structure is not correct. Table should contain body.</td></tr><tr><td>40035</td><td>Wrong style attribute: {0}</td><td>Table attribute is forbidden. Allowed attributes for table: margin</td></tr><tr><td>40036</td><td>Field ‘{0}’ assigned to wrong role</td><td>Field assigned to a role which cannot fill data. Restricted roles are Signer and Copy</td></tr><tr><td>40037</td><td>Sharing provider has to be specified for document {0} with type ‘shared’</td><td>Please add attribute info -> shared -> sharingProvider to XML</td></tr><tr><td>40038</td><td>No rows found</td><td>Table should contain at least 1 row</td></tr><tr><td>40039</td><td>Signature assigned to not Signer role {0}</td><td>Signature field is assigned to the role which is different from Signer, please reassign the field or remove it</td></tr><tr><td>40040</td><td>Duplicated signature name in document {0}</td><td>Names of the signature fields are duplicated. A document must have unique names of the fields</td></tr><tr><td>40041</td><td>Missed document info section, document id: {0}</td><td>Structure of the template data isn’t correct. Please add info sections to the document structure</td></tr><tr><td>40042</td><td>Too many signatures per role {0}</td><td>Signature role can have one signature field per one document</td></tr><tr><td>40043</td><td>No signature provider for digital signing</td><td>Please use eInk signature instead</td></tr><tr><td>40044</td><td>Unexpected field type ‘{0}’</td><td>Type of the entered field is not supported. Supported types of fields: text, number, money, datetime, select-dictionary, attachment</td></tr><tr><td>40045</td><td>Unexpected document body content: {0}</td><td>Only one type of field “attachment” is allowed for external document</td></tr><tr><td>40046</td><td>Dynamic table name not found</td><td>Name of the dynamic table is missed</td></tr><tr><td>40047</td><td>Dynamic table roleId not found</td><td>Table field doesn’t have assigned role</td></tr><tr><td>40048</td><td>Some extra field is found in document {0}</td><td>Document has unexpected field in body</td></tr><tr><td>40049</td><td>Signature by role UUID was not found</td><td>Signature field doesn’t have role with respective role UUID. Please add a Signer role or remove a signature field and try again</td></tr><tr><td>40050</td><td>Cannot change template access to official</td><td>Template access level couldn’t be changed to the official access level. Only system user can change access level to the official</td></tr><tr><td>40051</td><td>Template {0} mismatch version {1}</td><td>Template UUID and template version mismatch. Please check correctness of the template version and template content</td></tr><tr><td>40052</td><td>Template role {0} not found</td><td>Template has no role with this UUID</td></tr><tr><td>40053</td><td>Template’s signature ‘{0}’ must have both ITN fields filled</td><td>Please fill both itnDocumentId and itnFieldName or none of them</td></tr><tr><td>40054</td><td>ITN field ‘{0}’ was not found for signature ‘{1}’</td><td>Check that document has proper ITN field assigned for signature</td></tr><tr><td>40055</td><td>ITN field ‘{0}’ has wrong type or place in document</td><td>Check that ITN field is one of (text field, lookup, select-dictionary), not optional, and not in the table</td></tr><tr><td>40056</td><td>No access to template {0}</td><td>Template has no role with UUID</td></tr><tr><td>40057</td><td>Parent of duplicate field {0} was not found</td><td>Duplicate field does not have a parent field in the template</td></tr><tr><td>40058</td><td>Attribute ‘{0}’ cannot be empty for field ‘{1}’</td><td>Fill attribute with a proper value</td></tr><tr><td>40059</td><td>Unsupportable type {0} of parent field for Duplicate {1}</td><td>This kind of type is not allowed for Duplicate parent field</td></tr><tr><td>40060</td><td>Missing role order</td><td>A role has no order set while template flow set to manual ordering</td></tr><tr><td>40061</td><td>All roles have same order</td><td>All roles with same order in template flow</td></tr><tr><td>40062</td><td>Role {0} should be ordered after {1}</td><td>Wrong template flow role order set</td></tr><tr><td>40063</td><td>Error in ‘expire’ block. Only ‘after’ or ‘customAllowed’ has to be set</td><td>Please set fields properly</td></tr><tr><td>40064</td><td>Electronic digital signature (EDS) is not supported</td><td>Please do not use EDS</td></tr><tr><td>40065</td><td>Duplicated field name: {0}</td><td>Duplicated field name</td></tr><tr><td>40066</td><td>Category or one of subcategories is not empty</td><td>There is active template in the category or one of its subcategories</td></tr><tr><td>40067</td><td>Cannot move to this category</td><td>It’s impossible to move a category inside the category you’re about to delete</td></tr><tr><td>40068</td><td>All roles except sender have to be set</td><td>In order to share the template all roles have to be defined in advance</td></tr><tr><td>40069</td><td>Template has roles with same ID: {0}</td><td>Template syntax error. Please check roles IDs and make them unique</td></tr><tr><td>40070</td><td>Cannot share template to yourself</td><td>Creator’s mailbox should not be in sharedTo list</td></tr><tr><td>40071</td><td>Only shared categories can be assigned to shared template</td><td>Only shared categories can be assigned to shared template</td></tr><tr><td>40072</td><td>Field ‘{0}’ cannot be searchable</td><td>Supported types of fields that can be searchable: text, number, money, datetime, select-dictionary, duplicate, lookup</td></tr><tr><td>40073</td><td>Field ‘{0}’ from the formula ‘{1}’ was not found</td><td>Please check all fields in the formula</td></tr><tr><td>40074</td><td>Wrong formula with name ‘{0}’. Check supported operations</td><td>Please check the formula</td></tr><tr><td>40075</td><td>Recursion found in formulas</td><td>Please check the formulas</td></tr><tr><td>40076</td><td>Stamp is not supported</td><td>Please do not use stamps</td></tr><tr><td>40077</td><td>Flow error - reachless document {0} for role {1}</td><td>Deadlock found, flow should be corrected</td></tr><tr><td>40078</td><td>Column with attribute ‘initiallyHidden’ must have an optional field</td><td>Please delete ‘initiallyHidden’ attribute or add an optional field</td></tr><tr><td>40079</td><td>Too many fields in the table {0}. Allowed only {1}</td><td>Please decrease number of fields in row</td></tr><tr><td>40080</td><td>Too many columns in the table {0}. Allowed only {1}</td><td>Please decrease number of columns in table</td></tr><tr><td>40081</td><td>Number of head columns does not match number of body cells</td><td>Table structure is not correct. Table should contain same number of columns in the head and the body.</td></tr><tr><td>40082</td><td>All ‘autonumber’ fields have to be assigned on Sender role</td><td>Please set sender role for all ‘autonumber’ fields</td></tr><tr><td>40083</td><td>Field ‘{0}’ is not supposed to be in the table</td><td>Please move the field out of table</td></tr><tr><td>40084</td><td>Template subject contains wrong field definition: {0}</td><td>Field cannot be in the table or of types: einksign, checkbox</td></tr><tr><td>40085</td><td>Pdf UUID has to be specified for document {0} with type = pdf</td><td>Please add attribute info -> pdf -> uuid to XML</td></tr><tr><td>40086</td><td>Field or table with name ‘{0}’ is not supposed to be in the document ‘{1}’</td><td>Tables and attachements are not supported for PDF templates</td></tr><tr><td>40087</td><td>Attributes ‘x’, ‘y’, ‘page’, ‘width’ and ‘height’ must be specified for the field ‘{0}’</td><td>Please set coordinates in mm and a page number</td></tr><tr><td>40088</td><td>Page number {0} does not exist for field {1} in the document {2}</td><td>Wrong PDF page number</td></tr><tr><td>40089</td><td>Coordinate {0} = {1} is greater then {2} for field {3} in the document {4}</td><td>Wrong X or Y coordinates for PDF field</td></tr><tr><td>40090</td><td>Filter query format error in text: {0}</td><td>Not a JSON format</td></tr><tr><td>40091</td><td>Filter query format empty for field {0}</td><td>Empty filter</td></tr><tr><td>40092</td><td>Filter query document not found {0}</td><td>Filter query document not found</td></tr><tr><td>40093</td><td>Filter query field {0} not found in document {1}</td><td>Filter query field not found</td></tr><tr><td>40094</td><td>Filter query role {0} not found</td><td>Filter query role not found</td></tr><tr><td>40095</td><td>Filter query column {0} not found</td><td>Filter query column not found</td></tr><tr><td>40096</td><td>Filter query depends on field {0} with later order</td><td>Filter query depends on field with later order</td></tr><tr><td>40097</td><td>Attribute ‘viewRoleIds’ set up wrong for attachment ‘{0}’</td><td>Check that all roles exist in the flow and do not have active fields for singleAttachment documents</td></tr><tr><td>40098</td><td>Using comma is prohibited in role id</td><td>Using comma is prohibited in role id</td></tr><tr><td>40099</td><td>Custom value is not supported for dropdown ‘{0}’ with multiSelect enabled</td><td>Please disable one of the attributes</td></tr><tr><td>40100</td><td>All options have to be unique for dropdown ‘{0}’</td><td>Please update the field options</td></tr><tr><td>40101</td><td>Different digital signature types are not allowed in one document</td><td>Please select only one type of signature</td></tr><tr><td>40102</td><td>All radios fields in the group ‘{0}’ must have the same roleId or to be in the same table</td><td>Please update radio fields</td></tr><tr><td>40103</td><td>Sharing provider for document {0} does not match any of supported: {1}</td><td>Check correctness of the sharingProvider value</td></tr><tr><td>40104</td><td>Fields do not match the expected ones in document {0}</td><td>Check correctness of the provided fields</td></tr><tr><td>40106</td><td>Document ‘{0}’ must have a field ‘{1}’ and marked with original attribute</td><td>Please add missing fields</td></tr><tr><td>40107</td><td>Maximum external documents count exceeded: found {0} of {1} maximum</td><td>Maximum external documents count exceeded</td></tr><tr><td>40108</td><td>Unsupported barcode type ‘{0}’</td><td>Choose another barcode type</td></tr><tr><td>40109</td><td>Envelope link barcode must be assigned to sender only</td><td>You need to assign this field to sender only</td></tr><tr><td>40110</td><td>Link can’t be used with barcode ‘{0}’ for field ‘{1}’</td><td>This barcode type not supports links</td></tr><tr><td>40111</td><td>Barcode size less than minimal allowed</td><td>Increase barcode size</td></tr><tr><td>40112</td><td>Attributes ‘x’, ‘y’, ‘page’ and ‘width’ must be specified for the field ‘{0}’</td><td>Please set coordinates in mm and a page number</td></tr><tr><td>40113</td><td>Default value is not supported without allowing a custom value for the field ‘{0}’</td><td>Please remove defaultValue attribute</td></tr><tr><td>40115</td><td>Single attachment document in envelope cannot be optional</td><td>Fix optionality of field</td></tr><tr><td>40116</td><td>Field {0} width is greater than max allowed {1} size in this position</td><td>Please decrease field width</td></tr><tr><td>40117</td><td>Field {0} height is greater than max allowed {1} size in this position</td><td>Please decrease field height</td></tr><tr><td>40119</td><td>Attribute ‘pattern’ is not valid for field ‘{0}’</td><td>Fill attribute with a proper value</td></tr><tr><td><strong>ENVELOPE</strong></td><td></td><td></td></tr><tr><td>50001</td><td>Envelope field ‘{0}’ is empty</td><td>Required field on envelope is empty. To solve this issue please fill field with a valid content</td></tr><tr><td>50002</td><td>Value of ‘{0}’ should be greater than {1}</td><td>Entered value in the field is less than minimal value. Please enter valid value</td></tr><tr><td>50003</td><td>Value of ‘{0}’ should be less than {1}</td><td>Entered value in the field is bigger than maximum value. Please enter valid value</td></tr><tr><td>50004</td><td>Expected value with precision = {0} for field ‘{1}’</td><td>Precision of the entered value should be higher than minimal precision. Please pay attention to the settings of the field</td></tr><tr><td>50005</td><td>Empty signatures list</td><td>Signatures list is empty on the envelope. Please add signatures block before send request</td></tr><tr><td>50006</td><td>Unexpected value ‘{0}’ for field ‘{1}’. Allowed: {2},{3}.</td><td>Entered value does not correspond to one of the allowed values. Please look at properties of the field to clarify allowed values</td></tr><tr><td>50007</td><td>Not all roles has mailboxUuid set properly</td><td>This error happens if some role doesn’t have valid mailbox UUID on the envelope</td></tr><tr><td>50008</td><td>Not all roles has ID set properly</td><td>This error happens if some role doesn’t have valid role ID on the envelope</td></tr><tr><td>50009</td><td>Not valid envelope subject: {0}</td><td>Subject of the envelope is empty or invalid. Subject of the envelope should not have restricted symbols</td></tr><tr><td>50010</td><td>There is mailbox predefined in template for role ‘{0}’ and cannot be changed</td><td>Mailbox UUID is predefined for particular role on the template and cannot be changed</td></tr><tr><td>50011</td><td>Envelope {0} not found</td><td>Envelope with entered UUID was not found. Please check correctness of the entered data</td></tr><tr><td>50012</td><td>Envelope templateUuid or templateVersion is required</td><td>Template UUID or template version UUID is required to this request</td></tr><tr><td>50013</td><td>Generated envelope has different templateUuid</td><td>Generated envelope has different template UUID in the envelope data or in the parameter of the request</td></tr><tr><td>50014</td><td>Generated envelope has different versionUuid</td><td>Generated envelope has different template version UUID in the envelope data or in the parameter of the request</td></tr><tr><td>50015</td><td>Invalid value ‘{0}’ of field ‘{1}’, expected ‘{2}’</td><td>Entered value does not correspond to the date format. Please enter value in date format YYYY-MM-DD</td></tr><tr><td>50016</td><td>Status DRAFT is not supported for callback filter</td><td>Please delete status DRAFT from filter</td></tr><tr><td>50017</td><td>Envelope document {0} not found in XML structure</td><td>Document was not found in XML structure of the envelope</td></tr><tr><td>50018</td><td>Envelope sender not found</td><td>Sender was not found in XML structure of the envelope</td></tr><tr><td>50019</td><td>Compiled document {0} not found in file storage</td><td>Document which has been compiled was not found in the file storage. Try to regenerate document</td></tr><tr><td>50020</td><td>Label {0} not found</td><td>Label with particular UUID was not found</td></tr><tr><td>50021</td><td>Envelope attachment field not found in document {0}</td><td>External document attachment is not found in the document. Please check your request upload document and send again</td></tr><tr><td>50022</td><td>Duplicated field name: {0}</td><td>Name of the fields are duplicated. Please change the name of the field, because duplicated name is forbidden</td></tr><tr><td>50023</td><td>Table should have at least 1 row</td><td>Table should have at least 1 row</td></tr><tr><td>50024</td><td>Signature {0} in document {1} is made using not a stamp key</td><td>It’s impossible to set stamp on the document without using a stamp key. To set stamp please use key with stamp option</td></tr><tr><td>50025</td><td>This is no active Signer role in envelope at the moment</td><td>It’s not a time to sign anything</td></tr><tr><td>50026</td><td>Cumulative envelope attachments size exceeded limit {0}</td><td>Cumulative attachments size uploaded to the envelope is exceeded allowed size limit</td></tr><tr><td>50027</td><td>Duplicated attachment IDs: {0}</td><td>Attachment IDs are duplicated in the document. Attachment IDs should be unique</td></tr><tr><td>50028</td><td>Lookup source not found</td><td>Source of the lookup field was not found. Please check that dictionary or value in the dictionary still available</td></tr><tr><td>50029</td><td>Lookup value does not match</td><td>Value of the lookup field in request does not match to value in the dictionary. Please check your request, compare with dictionary and send again</td></tr><tr><td>50030</td><td>Invalid value ‘{0}’ for number value of field ‘{1}’</td><td>Invalid format of value has been entered to the number field. Number field accepts only numeric values</td></tr><tr><td>50031</td><td>There is no need to sign the document {0}</td><td>There is no signature required from particular mailbox, or it was not the right step of the signing process</td></tr><tr><td>50032</td><td>There is a validation error for signature with type ‘{0}’ and message: {1}</td><td>Please check signature data in the request</td></tr><tr><td>50033</td><td>No XML data for envelope</td><td>Please check envelope XML data in the request</td></tr><tr><td>50034</td><td>Attachment ‘{0}’ file type mismatch</td><td>Attachment file type is not correspond to allowed file types. Allowed file types: pdf, doc, docx, xls, xlsx, xlsm, xml, dbf, txt, rtf, png, jpg, jpeg, zip, eml, msg, emlx, rpmsg. Allowed file types can be minimized according to field settings in template.</td></tr><tr><td>50035</td><td>Mailbox no longer has access to envelope</td><td>The access to the envelope has been revoked</td></tr><tr><td>50036</td><td>Cannot archive/delete envelope which is not in a final status: {0}</td><td>It’s impossible to archive/delete an envelope if it’s not in a final status, such as COMPLETED, CANCELLED or EXPIRED</td></tr><tr><td>50037</td><td>Bad base64 value of field ‘{0}’</td><td>Binary data is invalid, please check that file you’re trying to send properly encoded in BASE64</td></tr><tr><td>50038</td><td>Expected ‘{0}’ image type for field ‘{1}’</td><td>Image type format is incorrect. Please pay attention to the file format in error code and use respective file format to this field.</td></tr><tr><td>50039</td><td>Maximum expected image size is {0} x {1}</td><td>Image size does not fit into maximum width and height limits. Please use image with size less than maximum values.</td></tr><tr><td>50040</td><td>Simple electronic signature is not created</td><td>Image of the SES is not correct, please check that image has at least 15px of the painted area</td></tr><tr><td>50041</td><td>Attachment {0} file not found</td><td>Attachment with entered UUID was not found. Please check correctness of the entered value</td></tr><tr><td>50042</td><td>File {0} was not found for envelope {1}</td><td>File with entered UUID was not found in the entered envelope. Please check correctness of the entered values</td></tr><tr><td>50043</td><td>No envelope UUID in request</td><td>Please check envelope UUID in the request</td></tr><tr><td>50044</td><td>Label already exists</td><td>Label with respective name is exist. Please use existing or create new one with a different name</td></tr><tr><td>50045</td><td>Found role without mailboxUuid defined</td><td>One of the roles doesn’t have mailbox UUID in data of the envelope</td></tr><tr><td>50046</td><td>Signature data not found for signature ‘{0}’ at document ‘{1}’</td><td>Signature field does not have signature data, please check that you fill required signature field with valid data</td></tr><tr><td>50047</td><td>Signers do not match for signature {0}</td><td>PDF and text files are signed by different signers, please sign document by one Signer and send request again</td></tr><tr><td>50048</td><td>Signature data not found for source {0} in document {1}</td><td>Signature is not found in the list of signatures</td></tr><tr><td>50049</td><td>No active role for mailbox {0}</td><td>Mailbox UUID by which you’re trying to send request does not have active role in particular envelope. Please wait for your turn.</td></tr><tr><td>50050</td><td>Wrong envelope status</td><td>Envelope status is wrong for this action and cannot be processed.</td></tr><tr><td>50051</td><td>Attachment is already used</td><td>Attachment with entered UUID was already used in this envelope</td></tr><tr><td>50052</td><td>Certificate not qualified for signature {0} in document {1}</td><td>Required qualified certificate to sign data, but not qualified used</td></tr><tr><td>50053</td><td>Invitation envelope {0} not found</td><td>Envelope for the invitation not found, inconsistent data</td></tr><tr><td>50054</td><td>Accepted envelopes list is empty</td><td>List of UUID for accepting is empty</td></tr><tr><td>50055</td><td>Invitations for envelopes {0} not found</td><td>Some envelope requests have no invitations for this user</td></tr><tr><td>50056</td><td>The attachment in the document {0} is not from the trusted provider</td><td>Please check the correctness of the attachment</td></tr><tr><td>50057</td><td>Role not found for invitation {0}</td><td>Envelope has no role for email</td></tr><tr><td>50058</td><td>Role unavailable for processing {0}</td><td>Envelope has no role for email</td></tr><tr><td>50059</td><td>ITN value not found for signature {0}</td><td>No ITN value found to match during signing</td></tr><tr><td>50060</td><td>Expected ITN does not match the signature {0} in document {1}</td><td>The document was signed with wrong signature, please check ITN</td></tr><tr><td>50061</td><td>Envelope scenario has no available steps</td><td>Envelope scenario has no available steps</td></tr><tr><td>50062</td><td>Cannot continue scenario with uncompleted envelope</td><td>Cannot continue scenario with uncompleted envelope</td></tr><tr><td>50063</td><td>Envelope has no scenario info</td><td>Envelope has no scenario information</td></tr><tr><td>50064</td><td>Parent of duplicate field {0} not found</td><td>Duplicate field does not have a parent field in the envelope</td></tr><tr><td>50065</td><td>Template {0} does not match envelope template {1}</td><td>Make sure the templates match</td></tr><tr><td>50066</td><td>Record UUID must be populated for field ‘{0}’</td><td>Please fill the ‘recordUuid’ attribute with proper value</td></tr><tr><td>50067</td><td>Attachment UUID has to be populated for field ‘{0}’</td><td>Please fill the ‘attachmentUuid’ attribute with proper value</td></tr><tr><td>50068</td><td>Label UUID or name has to be specified</td><td>Please fill the ‘label’ or ‘labelUuid’ request parameter</td></tr><tr><td>50069</td><td>Not enough UUIDs, at least {0} needed</td><td>Request has no enough UUIDs to merge/add into a chain</td></tr><tr><td>50070</td><td>No access to chain</td><td>Mailbox has no access to any envelope within this chain UUID</td></tr><tr><td>50071</td><td>Envelope {0} belongs to another chain</td><td>Envelope belongs to another chain</td></tr><tr><td>50072</td><td>Envelope added to chain by another mailbox</td><td>Current user has no rights to remove envelope from the chain</td></tr><tr><td>50073</td><td>Envelopes belong to different chains</td><td>Envelopes belong to different chains</td></tr><tr><td>50074</td><td>Envelope belongs to automatically created chain</td><td>Envelope belongs to automatically created chain</td></tr><tr><td>50075</td><td>Approvers cannot participate in the envelope processing</td><td>One or more approvers are already in the main flow</td></tr><tr><td>50076</td><td>Approval is not allowed on envelope</td><td>User cannot approve the envelope, it may have already been done</td></tr><tr><td>50077</td><td>Rejection reason is required for approval</td><td>Please add comment for approval</td></tr><tr><td>50078</td><td>Wrong approval status</td><td>Please send proper status, send APPROVED or REJECTED</td></tr><tr><td>50079</td><td>Roles do not match template roles</td><td>Please check sent envelope XML for proper flow</td></tr><tr><td>50080</td><td>Approval {0} not found</td><td>Approval with entered UUID was not found for this envelope</td></tr><tr><td>50081</td><td>Cannot manage or start/cancel an approval</td><td>Current mailbox cannot manage or start/cancel an approval</td></tr><tr><td>50082</td><td>Approval cannot be cancelled</td><td>Approval flow is already completed and cannot be cancelled</td></tr><tr><td>50083</td><td>Mailbox must be unique in the approval</td><td>Please update the approval</td></tr><tr><td>50084</td><td>UUID of approvers have to be specified separately</td><td>Please send flowUuid or approvers</td></tr><tr><td>50085</td><td>Approval {0} is deleted</td><td>Approval with entered UUID is deleted and cannot be used</td></tr><tr><td>50086</td><td>Approver {0} is already in another approval for this envelope</td><td>Approvers cannot participate in several approval processes for one envelope</td></tr><tr><td>50087</td><td>Duplicate value does not match</td><td>Value of the duplicate field in request does not match to value in related field</td></tr><tr><td>50088</td><td>Role {0} is expected to be an e-mail</td><td>Wrong envelope flow participant</td></tr><tr><td>50089</td><td>Envelope cannot be delegated</td><td>Delegation is forbidden for envelope</td></tr><tr><td>50090</td><td>Delegate cannot cancel the delegation</td><td>Only initiator of the delegation can cancel it</td></tr><tr><td>50091</td><td>Delegation not found or Initiator role is completed</td><td>Please check the delegation role</td></tr><tr><td>50092</td><td>Delegation or envelope is already completed</td><td>No further actions allowed</td></tr><tr><td>50093</td><td>Recipient field must be UUID or email</td><td>Please check the ‘recipient’ field format</td></tr><tr><td>50094</td><td>Search by field parameters has wrong format</td><td>Search by field parameters has wrong format</td></tr><tr><td>50095</td><td>Only sender can send notification</td><td>This user cannot send email notifications. Only sender can notify still uncompleted roles</td></tr><tr><td>50096</td><td>No envelopes to notify</td><td>Notifications have already been sent for envelopes</td></tr><tr><td>50097</td><td>Document does not have printable version</td><td>Only PDF, DOC, DOCX can have printable version</td></tr><tr><td>50098</td><td>Only completed envelopes can be shared by email</td><td>Please send only completed envelope UUIDs</td></tr><tr><td>50099</td><td>Only {0} envelopes are allowed for sharing</td><td>Please decrease number of envelopes</td></tr><tr><td>50100</td><td>Some columns cannot be deleted or hidden</td><td>Some columns have to be visible</td></tr><tr><td>50101</td><td>File ‘{0}’ cannot be edited because it already has digital signatures</td><td>Please choose another file</td></tr><tr><td>50102</td><td>File ‘{0}’ is encrypted</td><td>Please choose another file</td></tr><tr><td>50103</td><td>No column ‘{0}’ to sort</td><td>Wrong sortField</td></tr><tr><td>50104</td><td>Sharing envelope files by e-mail is prohibited</td><td>Sharing is disabled for the envelope</td></tr><tr><td>50105</td><td>Envelope callback {0} not found</td><td>Envelope callback not found by id</td></tr><tr><td>50106</td><td>Too many rows in the table {0}. Allowed only {1}</td><td>Please decrease number of rows in table</td></tr><tr><td>50107</td><td>Field values do not match those expected in document {0}</td><td>Check correctness of the provided field values</td></tr><tr><td>50108</td><td>Invalid value ‘{0}’ for checkbox value of field ‘{1}’</td><td>Invalid format of value has been entered to the checkbox field. Checkbox field accepts only 1 or 0</td></tr><tr><td>50109</td><td>Checkbox ‘{0}’ expected to be checked</td><td>Checkbox field in template is required, soi must be checked</td></tr><tr><td>50110</td><td>Envelope document id duplicated: ‘{0}’</td><td>Using of duplicated ids is prohibited</td></tr><tr><td>50111</td><td>Mailbox {0} was not found in your contacts</td><td>Please choose proper mailbox for the role</td></tr><tr><td>50112</td><td>The action is not available for deleted/archived/shared envelope {0}</td><td>Not allowed action</td></tr><tr><td>50113</td><td>Users cannot share an envelope with themselves</td><td>Not allowed action</td></tr><tr><td>50114</td><td>Mailbox {0} is already in the envelope’s processing flow</td><td>Not allowed action</td></tr><tr><td>50115</td><td>Envelope field {0} is still not filled</td><td>Envelope field is still not filled</td></tr><tr><td>50116</td><td>Dropdown ‘{0}’ with enabled attribute ‘multiSelect’ has wrong value</td><td>Please use &#x3C;value> xml element</td></tr><tr><td>50117</td><td>Dropdown ‘{0}’ contains unsupported value</td><td>Please check the field value in the envelope</td></tr><tr><td>50118</td><td>Wrong signature format</td><td>Should be base64-encoded signature image value</td></tr><tr><td>50119</td><td>Active field except signature was found, please fill or sign envelope manually</td><td>Role has active fields except SES and should be filled manually</td></tr><tr><td>50120</td><td>Table with signature is empty, please fill or sign envelope manually</td><td>Found signature in empty table</td></tr><tr><td>50121</td><td>Signing of external PDF impossible automatically, please sign document manually</td><td>The signature must have coordinates</td></tr><tr><td>50122</td><td>Envelope does not match with callback filter</td><td>Use check endpoint to find more details</td></tr><tr><td>50123</td><td>Invalid barcode data for field ‘{0}’</td><td>Barcode data validation failed</td></tr><tr><td>50124</td><td>Wrong used action for role {0} {1}</td><td>Used wrong action or wrong role</td></tr><tr><td>50125</td><td>Value ‘{0}’ doesn’t match pattern ‘{1}’ for field ‘{2}’.</td><td>Pattern match failed</td></tr><tr><td>50126</td><td>Envelope bulk process {0} not found</td><td>Envelope bulk process not found by id</td></tr><tr><td>50127</td><td>No access to bulk process</td><td>User has no access to bulk process</td></tr><tr><td><strong>DICTIONARY</strong></td><td></td><td></td></tr><tr><td>60001</td><td>Dictionary {0} not found</td><td>Dictionary with entered UUID was not found. Please check correctness of the entered data</td></tr><tr><td>60002</td><td>Dictionary name length exceeded limit</td><td>Dictionary name length is higher than maximum allowed. Limit is 128 symbols.</td></tr><tr><td>60003</td><td>Dictionary description length exceeded limit</td><td>Dictionary description length is higher than maximum allowed. Limit is 256 symbols.</td></tr><tr><td>60004</td><td>Dictionary name cannot be empty</td><td>Dictionary name is required and cannot be empty. Please set dictionary name</td></tr><tr><td>60005</td><td>Dictionary column not found</td><td>Dictionary column with entered UUID was not found in this dictionary</td></tr><tr><td>60006</td><td>Empty column UUID</td><td>Column UUID is required parameter for this request. Please enter column UUID to create valid request</td></tr><tr><td>60007</td><td>Dictionary column value not found</td><td>Dictionary column value with UUID in request is not found in the database. Please check correctness of your request</td></tr><tr><td>60008</td><td>Dictionary record {0} not found</td><td>Dictionary record with entered UUID was not found in this dictionary</td></tr><tr><td>60009</td><td>Dictionary {0} archived</td><td>Dictionary with entered UUID has been archived</td></tr><tr><td>60010</td><td>Column value does not match</td><td>Value in the dictionary column and in the data of request you send does not match. Please check value in the dictionary.</td></tr><tr><td>60011</td><td>Empty custom value not allowed</td><td>Custom value cannot be empty for dictionary field. Please choose and send value from the dictionary or send your custom value.</td></tr><tr><td>60012</td><td>Column UUID is not set</td><td>Dictionary field on the template doesn’t have column UUID of the dictionary. Please update template and clarify column UUID for dictionary field or remove dictionary field</td></tr><tr><td>60013</td><td>Dictionary UUID is not set</td><td>Dictionary field on the template doesn’t have dictionary UUID. Please update template and clarify dictionary UUID for dictionary field or remove dictionary field</td></tr><tr><td>60014</td><td>Dictionary must be locked for processing</td><td>Dictionary is locked for the updating. It cannot be updated at this time. Dictionary updating can take some time.</td></tr><tr><td>60015</td><td>Expected {0} values in each row, but got {1}</td><td>Quantity of the columns and rows are different in the document you’ve tried to upload, please check your file for validity.</td></tr><tr><td>60016</td><td>Dictionary record should contain column values</td><td>Dictionary record doesn’t contain column value in request. Please check your request, compare with documentation and send again</td></tr><tr><td>60017</td><td>Cannot change dictionary access to official</td><td>Dictionary access level cannot be changed to the official access level. Only system user can change access level to official</td></tr><tr><td>60018</td><td>This file format is not supported</td><td>Entered file format is not supported yes. Supported file formats: CSV, XLS</td></tr><tr><td>60019</td><td>Dictionary is locked</td><td>Dictionary is locked for updating. Updating can take some time. During updating process dictionary cannot be changed</td></tr><tr><td>60020</td><td>Column name cannot be empty</td><td>Column name is required and cannot be empty. Please set column name</td></tr><tr><td>60021</td><td>Column name length exceeded limit</td><td>Column name length is higher than maximum allowed. Limit is 64 symbols.</td></tr><tr><td>60022</td><td>Column order should be >= 0</td><td>Column order cannot be less or equal 0. Please enter positive value of the order</td></tr><tr><td>60023</td><td>Column value length exceeded limit</td><td>Record value length is higher than maximum allowed. Limit is 256 symbols.</td></tr><tr><td>60024</td><td>Empty dictionary UUID</td><td>Required dictionary UUID parameter if empty in request. Please enter valid dictionary UUID</td></tr><tr><td>60025</td><td>Empty column name is not supported</td><td>Each column must have a name</td></tr><tr><td>60026</td><td>Cannot delete last column</td><td>Dictionary should have at least one column. Last column cannot be deleted from the dictionary.</td></tr><tr><td>60027</td><td>No access to dictionary</td><td>No access to dictionary</td></tr><tr><td>60028</td><td>Filter operation unknown</td><td>Filter operation unknown</td></tr><tr><td>60029</td><td>Filter value is null</td><td>Filter operation unknown</td></tr><tr><td>60030</td><td>Export task do not match</td><td>Dictionary export task don’t match</td></tr><tr><td>60031</td><td>Dictionary column width must be greater or equal to 140</td><td>Dictionary column width must be greater or equal to 140</td></tr><tr><td>60032</td><td>Dictionary column search filter error</td><td>Field is missed or empty</td></tr><tr><td>60033</td><td>Dictionary {0} deleted</td><td>Dictionary has been deleted and cannot be used in the template. Please use an actual dictionary.</td></tr><tr><td><strong>INTEGRATION</strong></td><td></td><td></td></tr><tr><td>80001</td><td>Integration rule {0} deleted</td><td>Integration rule with entered UUID has been deleted</td></tr><tr><td>80002</td><td>Integration rule {0} not found</td><td>Integration rule with entered UUID has was found or not exists</td></tr><tr><td>80003</td><td>Integration not found for mailbox {0}</td><td>Integration configuration was not found for entered mailbox UUID</td></tr><tr><td>80004</td><td>Naming pattern contains a field definition which does not exist in the template: {0}</td><td>Please check the field definition</td></tr><tr><td>80005</td><td>templateUuid does not match versionUuid</td><td>Template UUID does not match template version UUID. Please compare template and version UUIDs</td></tr><tr><td>80006</td><td>Protocol {0} not supported</td><td>Entered protocol has not supported yet. Supported protocols: FTPS, SFTP, AS2, SOAP</td></tr><tr><td>80007</td><td>Matching pattern source is required</td><td>Matching pattern source is required in this request</td></tr><tr><td>80008</td><td>Template UUID is required</td><td>Template UUID is required in this request</td></tr><tr><td>80009</td><td>Version UUID is required</td><td>Template version UUID is required in this request</td></tr><tr><td>80010</td><td>Conversion rule is required</td><td>Conversion rule is required in this request</td></tr><tr><td>80011</td><td>Naming pattern rule is required</td><td>Naming pattern rule is required in this request</td></tr><tr><td>80012</td><td>Source is required</td><td>Source is required in this request</td></tr><tr><td>80013</td><td>Filename generation error: {0}</td><td>Please resolve the reason for the error</td></tr><tr><td>80014</td><td>Naming pattern contains a field definition which cannot be used: {0}</td><td>Field cannot be in the table or of types: einksign, checkbox</td></tr><tr><td>80015</td><td>Attribute naming pattern should be in format ATTRIBUTE == REGEX</td><td>Please fix the attribute naming pattern</td></tr><tr><td><strong>PERMISSIONS</strong></td><td></td><td></td></tr><tr><td>90002</td><td>You do not have enough privilege for account {0}</td><td>User does not have enough permissions to do this action. Please ask your system administrator to give permissions</td></tr><tr><td>90003</td><td>You do not have enough privilege for mailbox {0}</td><td>User does not have enough permissions to do this action. Please ask your system administrator to give permissions</td></tr><tr><td>90004</td><td>Guest user has no access to any mailbox</td><td>User does not have access to any mailbox. Please add access to any mailbox or login by user who has accesses</td></tr><tr><td>90005</td><td>Cannot do with system account</td><td>User does not have enough privileges to modify system data</td></tr><tr><td>90006</td><td>Cannot do with system mailbox</td><td>User does not have enough privileges to modify system data</td></tr><tr><td>90007</td><td>Mailbox has no access to label</td><td>Mailbox does not have access to the label</td></tr><tr><td>90008</td><td>No access to dictionary {0}</td><td>Dictionary is inaccessible for you. Ask dictionary owner to update access level</td></tr><tr><td>90009</td><td>No access to template {0}</td><td>Template is inaccessible for you. Ask template owner to update access level</td></tr><tr><td>90010</td><td>No access to parent category</td><td>Parent category is inaccessible for you. Ask category owner to update access level</td></tr><tr><td>90011</td><td>No access to category</td><td>Category is inaccessible for you. Ask category owner to update access level</td></tr><tr><td>90012</td><td>No access to notification</td><td>Notification is inaccessible for you</td></tr><tr><td>90013</td><td>No access to mailbox {0}</td><td>User does not have access to this mailbox. Ask your system administrator to give permissions</td></tr><tr><td>90014</td><td>No access to mailbox {0}. Missed permissions: {1}</td><td>User does not have access particular functionality of this mailbox. Ask your system administrator to give permissions. Missed permissions you can find in the error message</td></tr><tr><td>90015</td><td>No access to envelope {0}</td><td>User does not have access to this envelope. Only users who included to the processing flow can watch envelopes</td></tr><tr><td>90017</td><td>Envelope role forbidden to change data</td><td>Envelope role cannot change data in the envelope. If you want to change data in the envelope set respective role on the template</td></tr><tr><td>90018</td><td>No access to account {0}</td><td>User does not have access to this account. Ask your system administrator to give permissions</td></tr><tr><td>90019</td><td>Mailbox header does not match to mailbox UUID</td><td>Please check that entity belongs to current mailbox</td></tr><tr><td>90022</td><td>No access to import task</td><td>User does not have access to the import task</td></tr><tr><td>90026</td><td>No access to attachment</td><td>Attachment is inaccessible for you</td></tr><tr><td>90030</td><td>Cannot revoke last owner</td><td>You cannot revoke last owner of the entity</td></tr><tr><td>90031</td><td>Not a scenario owner</td><td>User is not a scenario owner</td></tr><tr><td>90032</td><td>No access to scenario</td><td>No read access to scenario</td></tr><tr><td>90033</td><td>Only the author is allowed to change the comment</td><td>No write access to comment message</td></tr><tr><td>90034</td><td>No access for callback {0}</td><td>Current mailbox has no access to this callback</td></tr><tr><td>90035</td><td>Not a token owner</td><td>Current user has no access to application token</td></tr><tr><td>90036</td><td>No access to role {0}</td><td>Role belongs to another account</td></tr><tr><td><strong>SCENARIOS</strong></td><td></td><td></td></tr><tr><td>100001</td><td>Scenario name cannot be empty</td><td>Scenario name cannot be empty or NULL</td></tr><tr><td>100002</td><td>Scenario description cannot be empty</td><td>Scenario description cannot be empty or NULL</td></tr><tr><td>100003</td><td>Scenario access level cannot be empty</td><td>Scenario access level cannot be empty or NULL. Access can be fourth types: mailbox, account, pub and official</td></tr><tr><td>100004</td><td>ID cannot be empty</td><td>Scenario step ID cannot be empty or NULL</td></tr><tr><td>100005</td><td>Scenario step name cannot be empty</td><td>Scenario step name cannot be empty or NULL</td></tr><tr><td>100006</td><td>Scenario step XSLT map cannot be empty</td><td>Scenario step XSLT map cannot be empty or NULL</td></tr><tr><td>100007</td><td>Steps is required</td><td>Scenario should have at least 1 step</td></tr><tr><td>100008</td><td>Scenario step template UUID cannot be empty</td><td>Scenario template uuid should not be empty</td></tr><tr><td>100009</td><td>Scenario step template version cannot be empty</td><td>Scenario template version should not be empty</td></tr><tr><td>100010</td><td>Save failed</td><td>Scenario save failed</td></tr><tr><td>100011</td><td>Scenario {0} not found</td><td>Scenario not found</td></tr><tr><td>100012</td><td>Scenario {0} deleted</td><td>Scenario deleted</td></tr><tr><td>100013</td><td>Cannot create or update scenario access to official</td><td>Scenario access level cannot be changed to the official access level. Only system user can change access level to official</td></tr><tr><td>100014</td><td>Step {0} not available at this stage</td><td>Step not available at this stage</td></tr><tr><td>100015</td><td>First step cannot have source template</td><td>First step cannot have source template</td></tr><tr><td>100016</td><td>Step destination cannot be empty</td><td>First step cannot have source template</td></tr><tr><td>100017</td><td>Step {0} source cannot be empty</td><td>Step source cannot be empty</td></tr><tr><td>100018</td><td>Step {0} destination does not match</td><td>Step destination do not match with result</td></tr><tr><td>100019</td><td>Duplicated step ID {0}</td><td>Duplicated step id</td></tr><tr><td>100020</td><td>Step {0} source does not match with any previous destination</td><td>Please check the order of steps</td></tr><tr><td>100021</td><td>Scenario name length cannot be more than 256</td><td>Scenario name cannot be more than 256</td></tr><tr><td>100022</td><td>Scenario description length cannot be more than 256</td><td>Scenario description cannot be more than 256</td></tr><tr><td>100023</td><td>Scenario step ID length cannot be more than 256</td><td>Scenario step id length cannot be more than 256</td></tr><tr><td>100024</td><td>Scenario step name length cannot be more than 256</td><td>Scenario step name length cannot be more than 256</td></tr><tr><td>100025</td><td>Scenario condition cannot be applied</td><td>Scenario condition is wrong, please check XSLT mapping</td></tr><tr><td>100026</td><td>Cannot share scenario to yourself</td><td>Creator’s mailbox should not be in sharedTo list</td></tr><tr><td>100027</td><td>Scenario’s template does not match envelope template</td><td>Check template versions</td></tr><tr><td><strong>EXTERNAL LINKS</strong></td><td></td><td></td></tr><tr><td>110001</td><td>Link name cannot be empty</td><td>Link name is required and cannot be empty. Please set link name</td></tr><tr><td>110002</td><td>Link name length exceeded maximum size</td><td>Link name size is higher than maximum allowed. Limit is 255 symbols.</td></tr><tr><td>110003</td><td>Link url cannot be empty</td><td>Link url cannot be empty</td></tr><tr><td>110004</td><td>Link order should be positive or zero</td><td>Link order should be positive or zero</td></tr><tr><td>110005</td><td>Link access level cannot be public</td><td>Link access level cannot be public</td></tr><tr><td>110006</td><td>Mailbox UUID required when link access level is mailbox</td><td>Mailbox UUID required when link access level is mailbox</td></tr><tr><td>110007</td><td>Link {0} not found</td><td>Link not found by UUID</td></tr><tr><td>110008</td><td>Link {0} for another account</td><td>Link does not belong to this account.</td></tr><tr><td>110009</td><td>Link has invalid URL</td><td>Link has invalid URL. Please fix</td></tr><tr><td>110010</td><td>Cannot use official link access</td><td>Cannot use official link access</td></tr><tr><td><strong>BILLING</strong></td><td></td><td></td></tr><tr><td>120001</td><td>Plan {0} was not found in billing system</td><td>Tariff not found for the account</td></tr><tr><td>120002</td><td>Cannot change billing plan so often</td><td>You cannot change billing plan so often. Please try next day</td></tr><tr><td>120003</td><td>You have reached the limit, consider upgrading your plan</td><td>You have reached the limit, consider upgrading your plan</td></tr><tr><td>120004</td><td>You have reached the limit ({0}), consider upgrading your plan</td><td>You have reached the limit, consider upgrading your plan</td></tr><tr><td>120005</td><td>The action is not available in your billing plan. You may want to consider upgrading</td><td>You have reached the limit, consider upgrading your plan</td></tr><tr><td>120006</td><td>This billing plan cannot be selected. Limit ‘{0}’ is exceeded. The count is {1} in your account but must be no more than {2}</td><td>Select another tariff or modify your account</td></tr><tr><td>120007</td><td>Account billing address is not valid: {0}</td><td>Please correct the billing address</td></tr></tbody></table>


# Template Builder

* [Template](/user/template-builder/template)
  * [Template List Page Overview](https://app.gitbook.com/o/5SQxQoWgJM8HGKMYA3IO/s/oqUiFHjwtCCGSaEDqbXb/~/edit/~/changes/105/user/template-builder/template/template-list-page-overview)
  * [How to Create and Configure a Template](/user/template-builder/template/how-to-create-and-configure-a-template)
  * [How to Manage Template Settings](/user/template-builder/template/how-to-manage-template-settings)
  * [How to Set Up Automatic Subject Formatting](/user/template-builder/template/how-to-set-up-automatic-subject-formatting)
  * [How to Configure Files Included in the Envelope Archive](/user/template-builder/template/how-to-configure-files-included-in-the-envelope-archive)
* [Template Access & Permissions](/user/template-builder/template-access-and-permissions)
  * [Template Access Types](/user/template-builder/template-access-and-permissions/template-access-types)
  * [How to Manage Template Access](/user/template-builder/template-access-and-permissions/how-to-manage-template-access)
* [Template Editor](/user/template-builder/template-editor)
  * [​Template Editor Interface Overview](/user/template-builder/template-editor/template-editor-interface-overview)
  * [​How to Create a Structured Template](/user/template-builder/template-editor/how-to-create-a-structured-template)
  * [​How to Add and Manage Links in a Template](/user/template-builder/template-editor/how-to-add-and-manage-links-in-a-template)
  * [​How to Add or Edit Images in a Template](/user/template-builder/template-editor/how-to-add-or-edit-images-in-a-template)
  * [​How to Add and Manage Static Tables](/user/template-builder/template-editor/how-to-add-and-manage-static-tables)
  * [Table Context Menu Overview](/user/template-builder/template-editor/how-to-add-and-manage-static-tables/table-context-menu-overview)
  * [How to Add External Documents to a Template​](/user/template-builder/template-editor/how-to-add-external-documents-to-a-template)
  * [How to Add PDF Documents in a Template](/user/template-builder/template-editor/how-to-add-pdf-documents-in-a-template)
* [Template Dynamic Fields](/user/template-builder/template-dynamic-fields)
  * [Template Dynamic Fields Overview](/user/template-builder/template-dynamic-fields/template-dynamic-fields-overview)
  * [Field masks (RegEx)](/user/template-builder/template-dynamic-fields/field-masks-regex)
  * [Text Field](/user/template-builder/template-dynamic-fields/text-field)
  * [Number Field](/user/template-builder/template-dynamic-fields/number-field)
  * [Currency Field](/user/template-builder/template-dynamic-fields/currency-field)
  * [Date Field](/user/template-builder/template-dynamic-fields/date-field)
  * [Choice Field](/user/template-builder/template-dynamic-fields/choice-field)
  * [Checkbox Field](/user/template-builder/template-dynamic-fields/checkbox-field)
  * [Dropdown Field](/user/template-builder/template-dynamic-fields/dropdown-field)
  * [Dictionary Field](/user/template-builder/template-dynamic-fields/dictionary-field)
  * [Lookup Field](/user/template-builder/template-dynamic-fields/lookup-field)
  * [File upload Field](/user/template-builder/template-dynamic-fields/file-upload-field)
  * [Dynamic Table Field](/user/template-builder/template-dynamic-fields/dynamic-table-field)
  * [Duplicate Field](/user/template-builder/template-dynamic-fields/duplicate-field)
  * [Formula Field](/user/template-builder/template-dynamic-fields/formula-field)
  * [Autonumber Field](/user/template-builder/template-dynamic-fields/autonumber-field)
  * [QR/barcode Field](/user/template-builder/template-dynamic-fields/qr-barcode-field)
  * [Signature Field](/user/template-builder/template-dynamic-fields/signature-field)


# Template

* [Template List Page Overview](https://app.gitbook.com/o/5SQxQoWgJM8HGKMYA3IO/s/oqUiFHjwtCCGSaEDqbXb/~/edit/~/changes/105/user/template-builder/template/template-list-page-overview)
* [How to Create and Configure a Template](/user/template-builder/template/how-to-create-and-configure-a-template)
* [How to Manage Template Settings](/user/template-builder/template/how-to-manage-template-settings)
* [How to Set Up Automatic Subject Formatting](/user/template-builder/template/how-to-set-up-automatic-subject-formatting)
* [How to Configure Files Included in the Envelope Archive](/user/template-builder/template/how-to-configure-files-included-in-the-envelope-archive)


# Template List Page Overview

This document contains an overview of the Templates page, including categories, previews, search, and view options.

### What is a template list page

The template list page is the library of templates created by mailboxes.

The **My Templates** category of the current mailbox opens by default. The page displays all existing templates, as well as folders (if any exist within this category).

<figure><img src="/files/MbFXqg06zKj6fpWNjJan" alt=""><figcaption></figcaption></figure>

{% columns %}
{% column %}
In addition, there are five other categories accessible via the menu on the left side of the page.

Each category allows you to create folders and subfolders, which are displayed in an expandable tree structure.
{% endcolumn %}

{% column %}

<figure><img src="/files/8Atfbz9ZlL0OqeTUIyMm" alt=""><figcaption></figcaption></figure>
{% endcolumn %}
{% endcolumns %}

1. Open **Favorites** to view templates marked as favorites using the star icon or the action menu.
2. Open **Account templates** to view templates with the **Account** access level.
3. Open **Official templates** to view templates with the **Official** access level.
4. Open **Shared with you** to view templates explicitly shared with the current mailbox.
5. Use **Community templates** to find templates with **Public** access via search.

{% hint style="info" %}
Rename, delete, or move folders to any existing folder, or to a newly created folder.
{% endhint %}

### How template looks like

A template is the rectangle tile on the template list page, with the template name, access level, and creation date below the tile.

Each template has a preview for better user experience when searching or choosing a template to use. Use the star <img src="/files/9MDWNeTYyzrvqccMJR7r" alt="" data-size="line"> icon to add or remove a template from the **Favorites** category.

There are three types of template preview available:

{% columns %}
{% column %}

1. **Default image of the template**

If a template contains only external documents, the system can’t use them as a preview, so in this case the preview of the template will be the default template icon.
{% endcolumn %}

{% column %}

<figure><img src="/files/cjZp4RJBRalZtoEc8RSu" alt=""><figcaption></figcaption></figure>
{% endcolumn %}
{% endcolumns %}

{% columns %}
{% column %}
2\. **First page of the document**

A template that contains at least one structured document or a PDF file will display a preview.<br>

The system uses the first page of the first structured document or the attached PDF in the template as the preview.
{% endcolumn %}

{% column %}

<figure><img src="/files/6PgUq5jbJpvlS9vfENZo" alt=""><figcaption></figcaption></figure>
{% endcolumn %}
{% endcolumns %}

{% columns %}
{% column %}
3\. **Custom image of the template**.

Upload a custom image for the template preview.

See [Template Cover](/user/template-builder/template/how-to-manage-template-settings#template-cover) to learn more.
{% endcolumn %}

{% column %}

<figure><img src="/files/Hzkukj2SiXhjOFUYK74o" alt=""><figcaption></figcaption></figure>
{% endcolumn %}
{% endcolumns %}

{% columns %}
{% column %}
Each template has its own menu that allows the following actions:

* Edit the template
* Copy the template UUID
* Add to favorites / Remove from favorites
* Clone the template
* Move the template to another category/folder
* Rename the template
* Delete the template
* Get a direct link to the template (under specific template settings)
  {% endcolumn %}

{% column %}

<figure><img src="/files/RUGOCe5i0xG9jScx0HHz" alt=""><figcaption></figcaption></figure>
{% endcolumn %}
{% endcolumns %}

### How to find a template

Search templates by **name** or **UUID**. If you’re looking for a specific template you created in your mailbox, use the search within the **My templates** category.

<figure><img src="/files/U7G8enDWwKXHw4FJLm36" alt=""><figcaption></figcaption></figure>

{% hint style="info" %}
Apply this approach to all other categories as well.
{% endhint %}

Navigate to the **Community templates** category to find templates with the **Public** access level.

<figure><img src="/files/jMjUjuF5Gbt0V3ujM3O7" alt=""><figcaption></figcaption></figure>

{% hint style="info" %}
Depending on the template’s access settings, it may be found by name, by UUID, or only by UUID. You can read more about template access settings [here](https://docs.docstudio.com/en/master/pages/howToWorkWithPlatform/mainApplication/templateList/templateAccess/templateAccess.html#templateaccesslevel).
{% endhint %}

### Templates view options

Use one of these view options on the Templates page:

1. **Grid view** (default on desktop and tablet devices).
2. **List view** (default on mobile devices).

To switch between views, click the **Grid** <img src="/files/mU92ujqfjZqQmcDQ7PPT" alt="" data-size="line"> or **List** <img src="/files/4raVivy94btstt1i8xYf" alt="" data-size="line"> toggle button. Once you change the view mode, your preference overrides the default setting and applies across all devices.

{% hint style="info" %}
The icon changes automatically depending on the current view.
{% endhint %}

Both views provide identical functionality and allows you to manage folders and templates.

#### Main elements of the Grid view

<figure><img src="/files/jFxFLRs5DVNgtjcVGFPG" alt=""><figcaption></figcaption></figure>

**Folders block** — Represents a folder item in the **Templates page**. Folders are displayed first in the list.

1. **Folder icon** — Indicates that the item is a folder.
2. **Folder name** — The name of the folder.
3. **Folder properties** — Provides actions available for the folder.

**Template block** — Represents an individual template item.

4. **Template properties** — Contains available actions.
5. **Template preview** — Opens the **Envelope Creation page**.
6. **Add to favorites icon** — Toggles whether the template is added to or removed from **Favorites**.
7. **Template name** — Displays the name of the template.
8. **Template creation date** — Shows the date when the template was created.
9. **Template access level icon** — Indicates the access level of the template.

#### How to move template in folder

1. Click the **Template menu** ![](/files/Xh4hxCyHVzeWazfEL8Dz) icon.
2. Select option **Move**.
3. In the opened modal select folder and click the <img src="/files/l8Ws7cWz3uiKS70esL1N" alt="" data-size="line"> button.

{% columns %}
{% column %}

<figure><img src="/files/GciqmTB2dXbeuV5e97Jw" alt=""><figcaption></figcaption></figure>
{% endcolumn %}

{% column %}

<figure><img src="/files/y4KEoNyYpwbuR7ngXaN6" alt=""><figcaption></figcaption></figure>
{% endcolumn %}
{% endcolumns %}

{% hint style="info" %}
Once you move a template into a folder, it will no longer appear on the main templates screen. Instead, it will only be available within the folder you moved it to.
{% endhint %}

#### Main elements of the List view

<figure><img src="/files/GH3f10UvVqKbdF2enAse" alt=""><figcaption></figcaption></figure>

**Folders block** — Represents a folder item in the **Templates list**. Folders are displayed first.

1. **Folder icon** — Indicates that the item is a folder.
2. **Folder name** — The name of the folder.
3. **Folder description** — Shows the folder’s description, if provided.
4. **Folder creation date** — Shows the date when the folder was created.
5. **Folder access level** — Indicates the access level of the folder.
6. **Folder properties** — Provides actions available for the folder.

**Template block** — Represents a template item in the **Templates list**.

1. **Template icon —** Indicates that the item is a template.
2. **Template name —** Displays the name of the template.
3. **Template description —** Shows the template’s description, if provided.
4. **Template creation date —** Shows the date when the template was created.
5. **Template access level icon —** Indicates the access level of the template.
6. **Template edit icon** — Opens the **Template Edit** form.
7. **Add to favorites icon** — Adds or removes the template from **Favorites**.
8. **Template properties —** Contains available actions.


# How to Create and Configure a Template

This document explains how to create and configure a template in DocStudio.

### Create a template

1. In the left sidebar, open **Templates**.
2. Click the <img src="/files/2llIPKcd3sPlYr1bz7dQ" alt="" data-size="line"> button.

The template editor opens.

![](https://ucarecdn.com/3821b26b-fc59-4d26-bf5f-aeeb775612c5/image_\(54\).png)

### Structured document

**Structured document** is the **default** document type for structured, data-driven templates. It lets you insert dynamic fields (text, number, date, choice, dictionary, lookup, etc.), build tables, apply formulas, and add signature elements.

<figure><img src="/files/aD2Cky5d9bjJHDJElQjO" alt="" width="563"><figcaption></figcaption></figure>

### Add external or PDF documents

{% columns %}
{% column %}
You can add external documents or PDFs to the template.

1. Click the <img src="/files/1fuvJeNxmM4UEvUWUAMq" alt="" data-size="line"> button.
2. Choose the document format:\
   — External\
   — PDF document
   {% endcolumn %}

{% column %}

<figure><img src="/files/W0bhi1AXHZNnz5EXf640" alt=""><figcaption></figcaption></figure>
{% endcolumn %}
{% endcolumns %}

{% columns %}
{% column %}
You can configure:

* role (who uploads the file)
* file name (placeholder shown before upload)
* tooltip (optional helper text)
* optionality (required vs optional)
* allowed file type group
* advanced settings (access settings for the file)

{% hint style="info" %}
To learn more, read [External Documents in Templates](/user/template-builder/template-editor/how-to-add-external-documents-to-a-template) or [PDF documents](/user/template-builder/template-editor/how-to-add-pdf-documents-in-a-template).
{% endhint %}
{% endcolumn %}

{% column %}

<figure><img src="/files/EYF4G9fgIRobUMYWWJWj" alt="" width="235"><figcaption></figcaption></figure>
{% endcolumn %}
{% endcolumns %}

### Fields tab

Use **Dynamic Fields** to add fields to a structured document.

See [Template Dynamic Fields](/user/template-builder/template-dynamic-fields/template-dynamic-fields-overview) for the full list, including:

{% columns %}
{% column width="41.66666666666667%" %}

* [Text field](/user/template-builder/template-dynamic-fields/text-field)
* [Number field](/user/template-builder/template-dynamic-fields/number-field)
* [Currency field](/user/template-builder/template-dynamic-fields/currency-field)
* [Choice field](/user/template-builder/template-dynamic-fields/choice-field)
* [Checkbox field](/user/template-builder/template-dynamic-fields/checkbox-field)
* [Dropdown field](/user/template-builder/template-dynamic-fields/dropdown-field)
* [Dictionary field](/user/template-builder/template-dynamic-fields/dictionary-field)
* [Lookup field](/user/template-builder/template-dynamic-fields/lookup-field)
  {% endcolumn %}

{% column width="58.33333333333333%" %}

* [File field](/user/template-builder/template-dynamic-fields/file-upload-field)
* [Table field](/user/template-builder/template-dynamic-fields/dynamic-table-field)
* [Duplicate field](/user/template-builder/template-dynamic-fields/duplicate-field)
* [Formula field](/user/template-builder/template-dynamic-fields/formula-field)
* [Autonumber field](/user/template-builder/template-dynamic-fields/autonumber-field)
* [QR/barcode field](/user/template-builder/template-dynamic-fields/qr-barcode-field)
* [Signature field](/user/template-builder/template-dynamic-fields/signature-field)
  {% endcolumn %}
  {% endcolumns %}

### Template settings

{% columns %}
{% column %}
Template settings are available right after creation.

Use the **Template** and **Flow** tabs.
{% endcolumn %}

{% column %}

<figure><img src="/files/kvsGsc1A7eQlSfIxUS95" alt=""><figcaption></figcaption></figure>
{% endcolumn %}
{% endcolumns %}

#### Template tab

Use **Template** for the main details and settings.

<figure><img src="/files/D4IPdTl1c3dsM6CLebD5" alt=""><figcaption></figcaption></figure>

Required fields are marked with a red asterisk (`*`). **Name** and **Description** are mandatory. By default, the template is created in **My Templates**, and access is restricted to the mailbox level. Use the **Edit** ![](/files/GSfrQsZmaUK4tES6hxZR) icon to change the template’s location and access level.

#### Set the template location

In the modal, create or select a folder.

<figure><img src="/files/syS9nMx4F0xONQobFL1F" alt=""><figcaption></figcaption></figure>

#### Set the template access level

{% hint style="info" %}
All templates are accessible at the mailbox level by default.
{% endhint %}

There are three access levels. Each one has a checkbox on the left and a pencil icon on the right:

{% columns %}
{% column width="50%" %}

1. **Selected mailboxes**\
   The template is accessible only to specific mailboxes that you choose.
2. **My account**\
   The template becomes available to all mailboxes within your account.
3. **Everyone**\
   The template is accessible to anyone who has the direct link or the UUID.
   {% endcolumn %}

{% column width="50%" %}

<figure><img src="/files/O5CmvAgLxlXRzEMatjlc" alt=""><figcaption></figcaption></figure>

{% hint style="info" %}
**Share with community**\
When enabled, the template can be shared with the community.
{% endhint %}
{% endcolumn %}
{% endcolumns %}

Once you add the template to **Favourites**, it appears in **Templates → Shared with You**.

{% hint style="info" %}
Please note that files with public access settings can be published on the Internet.
{% endhint %}

#### Envelope properties

{% columns %}
{% column width="58.333333333333336%" %}

* Subject\
  — Set up the subject format
* Message\
  — Envelope message. Visible to users in the inbox.
  {% endcolumn %}

{% column width="41.666666666666664%" %}

<figure><img src="/files/3hzIiGKAbLXqtQXJnHux" alt=""><figcaption></figcaption></figure>
{% endcolumn %}
{% endcolumns %}

#### Recepient experience

{% columns %}
{% column %}
**Delegation is denied** — prevents recipients from delegating their assigned action to another user.

**Do not send files by email** — prevents DocStudio from sending envelope files by email.

**Restrict envelope archive downloading until envelope completion** — prevents users from downloading the envelope archive before the envelope is completed.

**Show metadata** — displays envelope metadata to recipients if metadata exists for the envelope.

Set expiration — set the envelope validity period.

* Non-expiring envelope: The envelope has no deadline and remains active until signed.
* **Sender will set expiration:** The sender manually sets the expiration date.
* **Set expiration:** The template creator sets the expiration period.
  {% endcolumn %}

{% column %}

<figure><img src="/files/ew2uRtDPjgwR0N6NUt7f" alt=""><figcaption></figcaption></figure>
{% endcolumn %}
{% endcolumns %}

### Flow tab

The **Flow** tab contains participant roles.

{% columns %}
{% column %}
Role types:

* **Sender:**\
  — Creates an envelope from the template and sends it.
* **Assignee:**\
  — The main recipient responsible for completing the required action (e.g., signing or filling in fields).
* **Approver:**\
  — Reviews the document and either approves or rejects it before the process continues.
* **CC (Carbon Copy):**\
  — Receives a copy of the envelope for informational purposes only. No action is required.
  {% endcolumn %}

{% column %}

<figure><img src="/files/yROorEBG1qJlSjdfAzAY" alt=""><figcaption></figcaption></figure>
{% endcolumn %}
{% endcolumns %}

To add a role, click the **Add participant** button.

{% columns %}
{% column %}
Fill in the role form:

* **Role name** — Enter a custom role name.
* **Let sender set** — Specify a mailbox, an email, or another role as a recipient. Leave it empty if the sender should choose later.
* **Role type** — Choose the role type.
  {% endcolumn %}

{% column %}

<figure><img src="/files/me7C9Gp6u7SOFrTc1q1g" alt=""><figcaption></figcaption></figure>
{% endcolumn %}
{% endcolumns %}

{% hint style="info" %}
You can leave **Mailbox** empty. The sender selects the recipient when sending.

Use **Mailbox UUID** to pre-assign a specific mailbox.
{% endhint %}

### Finalise the template

{% columns %}
{% column %}
When you finish the setup:

1. Click the <img src="/files/swUyPgkMENxuDZyusiHl" alt="" data-size="line"> button to save the template without sending.
2. Click the <img src="/files/Vnr3wLrs5UCyXSAkclvN" alt="" data-size="line"> button to create and send an envelope.

When you click **Send**, the template is saved automatically.
{% endcolumn %}

{% column %}

<figure><img src="/files/K6u2kLJ4kpANHGwDDZep" alt=""><figcaption></figcaption></figure>

{% hint style="info" %}
You can send an envelope only when all required fields are filled in.
{% endhint %}
{% endcolumn %}
{% endcolumns %}


# How to set up Recipient Experience in a Template

This document explains how to configure recipient experience settings in a template, including email notification language, time zone, and date and number format.

Recipient experience settings define how recipients receive and view envelopes created from a template. Configure these settings in the template to keep the same default experience across every envelope created from it.

### What you can configure

In the **Recipient experience** section, you can configure:

* **Email notification language**
* **Time zone**
* **Date and number format**

### Email notification language

The **Email notification language** setting controls the language of emails sent to new or unregistered recipients, including envelope invitations, reminders, and other envelope-related messages. This setting affects email notifications only.

By default, templates use **Inherit from sender account**. This means that DocStudio uses the email notification language from the sender account. You can also select a specific language for the template. In that case, envelopes created from this template use that language by default.

### Time zone

The **Time zone** setting controls which time zone recipients see in date and time values inside the envelope. Use it to keep deadlines, timestamps, and other recipient-facing values consistent in every envelope created from this template.

### Date and number format

The **Date and number format** setting controls how dates and numbers are displayed to recipients. Use it to set a consistent format for values such as dates, decimals, and separators in every envelope created from this template.

### Configure recipient experience in a template

{% columns %}
{% column %}

1. Open the template in edit mode.
2. Open the **Template** tab.
3. Find the **Recipient experience** section.
4. Click the edit icon.
5. Configure the required settings:
   * **Email notification language**
   * **Time zone**
   * **Date and number format**
6. Save the changes.
   {% endcolumn %}

{% column %}

<figure><img src="/files/GwTyVURzMe9RQksGSGx6" alt=""><figcaption></figcaption></figure>
{% endcolumn %}
{% endcolumns %}

{% hint style="info" %}
If **Inherit from sender account** is selected, DocStudio uses the sender account settings when an envelope is created from this template.
{% endhint %}

### What happens after the envelope is created

When an envelope is created from the template, DocStudio applies the recipient experience settings from the template. The sender can still change these settings while the envelope remains in draft.

After the envelope is sent, recipient experience settings can no longer be changed.


# How to Manage Template Settings

This document explains the available template settings and how they affect envelope behavior.

### Template properties

{% columns %}
{% column %}

* version info
* template path
* template name and description
* template access
* envelope properties
* advanced subject properties
  {% endcolumn %}

{% column %}

* envelope expiry day
* envelope delegation
* envelope sending and sharing
* template cover
* configure envelope archive files
  {% endcolumn %}
  {% endcolumns %}

### Version info

{% columns %}
{% column %}
Version info appears after the template is saved. It includes:

* template UUID
* current version UUID
* owner mailbox
  {% endcolumn %}

{% column %}

<figure><img src="/files/oyoFYLrV3oRHIOixN9TJ" alt=""><figcaption></figcaption></figure>
{% endcolumn %}
{% endcolumns %}

The template version updates when you change the document content or flow settings. A new version is created only after the first envelope is created from the updated template.

### Template path

{% columns %}
{% column %}
Template path defines where the template is stored across your mailboxes.
{% endcolumn %}

{% column %}

<figure><img src="/files/rFoWdFFzTrIbPYtMCOGV" alt=""><figcaption></figcaption></figure>
{% endcolumn %}
{% endcolumns %}

### Template name and description

{% columns %}
{% column width="66.66666666666666%" %}
Template name and description are required to save a template.
{% endcolumn %}

{% column width="33.33333333333334%" %}

<figure><img src="/files/DD6RxwA0NyRa3zkSJr49" alt=""><figcaption></figcaption></figure>
{% endcolumn %}
{% endcolumns %}

### Template access

{% columns %}
{% column %}
Template access defines who can see and use the template.
{% endcolumn %}

{% column %}

<figure><img src="/files/6k1DLBw8bQ1TMJGpce48" alt=""><figcaption></figcaption></figure>
{% endcolumn %}
{% endcolumns %}

### Envelope properties

{% columns %}
{% column width="58.333333333333336%" %}
Envelope properties define defaults for envelopes created from the template:

* subject
* message

If set on the template, these values can’t be changed on the envelope later.
{% endcolumn %}

{% column width="41.666666666666664%" %}

<figure><img src="/files/f0mJtML5uAsWM8MijxZT" alt=""><figcaption></figcaption></figure>
{% endcolumn %}
{% endcolumns %}

{% hint style="info" %}
Open the advanced subject settings from the properties button ![](/files/hms2qzRc68baEmJM7nkj) in the **Subject** field. You can build a dynamic subject using values from dynamic fields.
{% endhint %}

### Recepient experience

{% columns %}
{% column %}
**Delegation is denied** — prevents recipients from delegating their assigned action to another user.

**Do not send files by email** — prevents DocStudio from sending envelope files by email.

**Restrict envelope archive downloading until envelope completion** — prevents users from downloading the envelope archive before the envelope is completed.

**Show metadata** — displays envelope metadata to recipients if metadata exists for the envelope.

Set expiration — set the envelope validity period.

* Non-expiring envelope: The envelope has no deadline and remains active until signed.
* **Sender will set expiration:** The sender manually sets the expiration date.
* **Set expiration:** The template creator sets the expiration period.
  {% endcolumn %}

{% column %}

<figure><img src="/files/ew2uRtDPjgwR0N6NUt7f" alt=""><figcaption></figcaption></figure>
{% endcolumn %}
{% endcolumns %}

### Template cover

{% columns %}
{% column width="58.333333333333336%" %}
Template cover is the preview image shown in mailboxes that have access to the template. You can use a custom image or generate a preview from the first page.
{% endcolumn %}

{% column width="41.666666666666664%" %}

<figure><img src="/files/3mcGPqEOEH4l6EPQcbFe" alt=""><figcaption></figcaption></figure>
{% endcolumn %}
{% endcolumns %}

### Configure envelope archive files

{% columns %}
{% column %}
Configure the envelope archive downloaded after the envelope is completed.
{% endcolumn %}

{% column %}

<figure><img src="/files/j0IAVyIqOc8xC1IigUs0" alt=""><figcaption></figcaption></figure>
{% endcolumn %}
{% endcolumns %}


# How to Set Up Automatic Subject Formatting

This document describes how to set up subject autoformat rules in a template.

### Open subject format settings

{% columns %}
{% column width="41.66666666666667%" %}

1. Open a template field.
2. Click the **Set up subject forma**t ![](/files/eKz60LlGttgOI0jpmvSu) icon.
   {% endcolumn %}

{% column width="58.33333333333333%" %}
![](/files/teYymZ7YmYGn2mv17W8q)
{% endcolumn %}
{% endcolumns %}

### Configure subject autoformat

{% columns %}
{% column %}

1. Enter the prefix text (minimum 3 characters).
2. Remove fields using the trash icon in the added fields list.
3. Use the search box to narrow the list.
4. Add fields by clicking their names in the available fields list.
5. Check the preview.
   * Field values are separated by a comma and a space.
6. Click the <img src="/files/GxvF6W4xxrxlS0QjQ3Yw" alt="" data-size="line"> button in the form footer.
7. To remove autoformat, click the <img src="/files/6BYDZ0lNPWIMMDpdjmEd" alt="" data-size="line"> button in the form footer.

Save the template after you remove the autoformat.
{% endcolumn %}

{% column %}

<figure><img src="/files/KWn977yoUHVobcSXX01o" alt=""><figcaption></figcaption></figure>
{% endcolumn %}
{% endcolumns %}


# How to Configure Files Included in the Envelope Archive

This document explains how to configure an additional ZIP archive for a template version, and how to add, edit, or delete the configuration.

### How to add the envelope archive files configuration

{% columns %}
{% column %}

1. Open the template for editing.
2. In the right-side menu, open **Template**.
3. At the end of the template properties, click the **Configure envelope archive files**.
4. If the template has unsaved data, save the template first.
5. In the form, enter the configuration title (required).
6. Select the document structure you want to add to the archive.
7. Click the <img src="/files/vG66BIgRvKk6Pubc3P96" alt="" data-size="line"> button.
   {% endcolumn %}

{% column %}

<figure><img src="/files/xY4U6UKJQ2riVcjKEg4n" alt="" width="248"><figcaption></figcaption></figure>
{% endcolumn %}
{% endcolumns %}

### How to edit the envelope archive files configuration

1. Open the configuration form again.
2. Make the changes you want.
3. Click the <img src="/files/vG66BIgRvKk6Pubc3P96" alt="" data-size="line"> button.

### How to delete the envelope archive files configuration

1. Open the configuration form again.
2. Click the <img src="/files/OCt5JDi7TTNx8jY1Nlbs" alt="" data-size="line"> button.
3. The configuration is deleted for this template version.


# Template Access & Permissions

* [Template Access Types](/user/template-builder/template-access-and-permissions/template-access-types)
* [How to Manage Template Access](/user/template-builder/template-access-and-permissions/how-to-manage-template-access)


# Template Access Types

This document explains template access levels.

### Access types

There are four access types:

1. Access to your mailbox only.
2. Access for selected mailboxes (**Selected mailboxes**).
3. Access for all mailboxes in your account (**My account**).
4. Access for everyone on the platform (**Everyone**).

{% hint style="info" %}
Templates with **Everyone** access can be used by users who are not registered on the platform.
{% endhint %}

#### Prerequisites

* Only public dictionaries are used (or no dictionaries are used).
* The **Subject** field is filled.
* All flow participants (except the sender) have mailbox addresses set in the flow configuration.


---

[Next Page](/llms-full.txt/1)