> For the complete documentation index, see [llms.txt](https://support.docstudio.com/llms.txt). Markdown versions of documentation pages are available by appending `.md` to page URLs; this page is available as [Markdown](https://support.docstudio.com/user/dashboard/how-to-upload-a-document-for-electronic-signature.md).
# How to Upload a Document for Electronic Signature
This document explains how to upload a document with Quick send, send it for electronic signature, fill sender fields, and import embedded PDF fields.
### Upload a document with Quick send
Use **Quick send** when you want to upload one or more files and send them for signing without creating a full envelope step by step.
{% hint style="info" %}
You can upload up to 50 files. Each file can be up to 50 MB, and the total upload size per send is limited to 50 MB.
{% endhint %}
1. Open the **Dashboard**.
2. Click the button.
3. Upload one or more files in the dialog.
4. Review the uploaded files.
5. Click the button.
6. Enter the recipient email address.
7. Optional: Click **Add approver or send a copy**.
8. Click the button.
9. Click the button in the top-right corner.
DocStudio sends the envelope and notifies the recipients by email.
{% hint style="info" %}
Quick send supports these file extensions:
```
.pdf, .doc, .docx, .xls, .xlsx, .xlsm, .xlsb, .xml, .dbf, .txt, .rtf, .csv, .xps, .eml, .msg, .emlx, .rpmsg, .crt, .pem, .der, .cer, .ppt, .pptx, .png, .jpg, .jpeg, .tiff, .tif, .zip, .7z, .rar, .asice
```
{% endhint %}
### Quick send dialog overview
After you upload the files, the **Quick send** dialog opens.
{% hint style="warning" %}
Do not use these characters in file names: `^`, `,`, `"`, `/`, `:`, `?`, `<`, `>`, `|`
{% endhint %}
Key fields:
* **Subject** — Edit the envelope title. Recipients see it in the inbox and email notifications.
* Add message or recipient experience
* **Message** — Enter a short note or instructions for the recipients.
* **Email notification language** — Choose the language of email notifications sent to recipients.
* **Time zone** — Choose which time zone recipients see in date and time values.
* **Date and number format** — Choose how dates and numbers are displayed to recipients.
* **Signature format** — Choose the signature format.
* **Signers** — Add users who must sign the envelope.
* **Approvers** — Add users who must review and approve the envelope.
* **Send a copy** — Add users who only receive a copy of the envelope.
* **I want to sign or fill an envelope** — Enable this option to add and fill dynamic fields as **Sender**.
* **Action buttons:**
* **Send** — Send the envelope.
* **Back** — Return to the **Upload documents** dialog.
* **Close** — Exit the **Quick send** flow.
{% hint style="info" %}
Separate email addresses in **Signers**, **Approvers**, and **Send a copy** with **Enter** or **Space**. To learn more about recipient roles, see [Processing Flow Role Types](/user/envelope-processing-flow-template-configuration/processing-flow-role-types.md).
{% endhint %}
#### Recent recipient history
DocStudio stores recent recipient addresses in your browser to speed up repeated sending.
Rules for saved history:
* keep the last 5 unique addresses
* combine mailbox addresses and email addresses in one list
* move a reused address to the top
* remove the oldest saved address when the list exceeds 5 items
* show no more than 6 items in total, including **My mailbox**
Email addresses use the **Mail** icon in a circle.
### Fill fields as Sender
Use this option when you want to fill or sign part of the envelope before you send it.
If you enable **I want to sign or fill an envelope**, you can add dynamic fields and fill them as **Sender**.
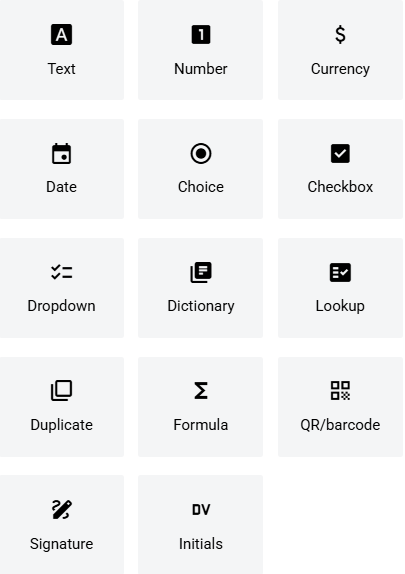
As **Sender**, you can fill these field types:
{% columns %}
{% column width="25%" %}
* **Text**
* **Number**
* **Currency**
* **Date**
* **Choice**
* **Checkbox**
* **Dropdown**
{% endcolumn %}
{% column width="25%" %}
* **Dictionary**
* **Lookup**
* **Duplicate**
* **Formula**
* **QR/barcode**
* **Signature**
* **Initials**
{% endcolumn %}
{% column width="49.999999999999986%" %}
{% endcolumn %}
{% endcolumns %}
{% columns %}
{% column %}
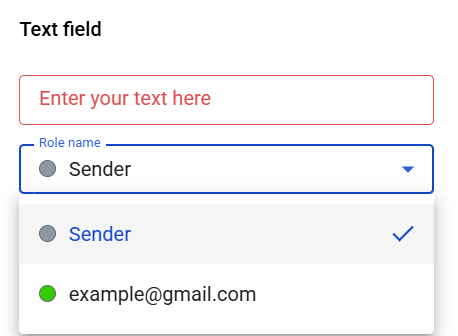
* If there are other recipients, you can choose who fills each field.
* If the sender is the only role, DocStudio assigns all fields to **Sender** by default.
{% endcolumn %}
{% column %}
{% endcolumn %}
{% endcolumns %}
Use advanced settings to fine-tune a field.
{% columns %}
{% column width="41.66666666666667%" %}
**Examples**:
* min/max for Number
* date + time for Date
* QR/barcode size
* field name
{% endcolumn %}
{% column width="58.33333333333333%" %}
{% endcolumn %}
{% endcolumns %}
You can enter data in three ways:
1. Fill data inside field properties.
2. Click a Signature field and draw a signature.
3. Double-click the field.
Double-click works for:
* Text, Number, Currency (edit mode)
* Date and QR/barcode (dialog)
* Choice and Checkbox (toggles the value)
### Import embedded PDF fields
Use this option when the uploaded PDF already contains embedded fields.
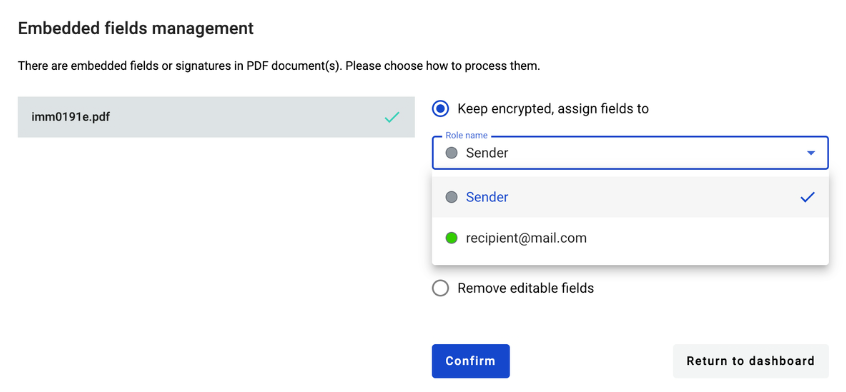
If an uploaded PDF has embedded fields, you can convert them to DocStudio dynamic fields. For each document with embedded fields, DocStudio shows an action dialog.
Available actions depend on the embedded field types:
1. **Keep encrypted, assign fields to**. Keep encryption.
2. **Assign fields to**. Convert embedded fields to DocStudio fields, if possible.
3. **Keep editable fields data**. Keep editable fields as read-only. Remove signatures or encryption. Existing fields are not converted. You can add new fields.
4. **Remove editable fields**. Remove embedded signatures, encryption, and editable fields. You can add new fields.
If the document has more signatures than recipients, **Assign fields to** is not available.
You can assign imported fields to **Recipients**. You can also assign them to **Sender** if you enabled **I want to sign or fill an envelope**.
Conversion map:
{% columns %}
{% column width="41.66666666666667%" %}
* Text → Text field
* Date → Text field
* Checkbox → Checkbox field
* Radio button → Choice field
{% endcolumn %}
{% column width="58.33333333333333%" %}
* Dropdown menu → Menu field
* Listbox → Menu field
* Picture → not supported (field is ignored)
* Barcode → not supported (field is ignored)
{% endcolumn %}
{% endcolumns %}
All imported fields will keep their original **required** or **optional** fields from the PDF.
If you upload several PDFs with fields, you can choose specific actions for each one. Switch between documents on the left side of the window.
### Related topics
* [How to Add an External Document to an Envelope](/user/external-documents-in-the-envelope/how-to-add-an-external-document-to-an-envelope.md)
* [How to Create and Send an Envelope](/user/envelopes/how-to-create-and-send-an-envelope.md)

 button.
3. Upload one or more files in the dialog.
4. Review the uploaded files.
5. Click the
button.
3. Upload one or more files in the dialog.
4. Review the uploaded files.
5. Click the  button.
6. Enter the recipient email address.
7. Optional: Click **Add approver or send a copy**.
8. Click the
button.
6. Enter the recipient email address.
7. Optional: Click **Add approver or send a copy**.
8. Click the  button.
9. Click the
button.
9. Click the  button in the top-right corner.
DocStudio sends the envelope and notifies the recipients by email.
{% hint style="info" %}
Quick send supports these file extensions:
```
.pdf, .doc, .docx, .xls, .xlsx, .xlsm, .xlsb, .xml, .dbf, .txt, .rtf, .csv, .xps, .eml, .msg, .emlx, .rpmsg, .crt, .pem, .der, .cer, .ppt, .pptx, .png, .jpg, .jpeg, .tiff, .tif, .zip, .7z, .rar, .asice
```
{% endhint %}
### Quick send dialog overview
button in the top-right corner.
DocStudio sends the envelope and notifies the recipients by email.
{% hint style="info" %}
Quick send supports these file extensions:
```
.pdf, .doc, .docx, .xls, .xlsx, .xlsm, .xlsb, .xml, .dbf, .txt, .rtf, .csv, .xps, .eml, .msg, .emlx, .rpmsg, .crt, .pem, .der, .cer, .ppt, .pptx, .png, .jpg, .jpeg, .tiff, .tif, .zip, .7z, .rar, .asice
```
{% endhint %}
### Quick send dialog overview