> For the complete documentation index, see [llms.txt](https://support.docstudio.com/llms.txt). Markdown versions of documentation pages are available by appending `.md` to page URLs; this page is available as [Markdown](https://support.docstudio.com/user/envelopes/how-to-customize-the-envelope-list.md).
# How to Customize the Envelope List
This document explains how to customize the envelope list in Mailbox, including columns, folders, archiving, and Trash actions.
Customize the envelope list in **Mailbox** to control how many records you see, which columns appear, and what actions you can apply from the list.
### Change the number of envelopes per page
Use **Number per Page** in the bottom-right corner to change how many envelopes appear in the list.
### Customize columns
Open the menu to change what you see in the list.
#### Add columns to the list
{% columns %}
{% column %}
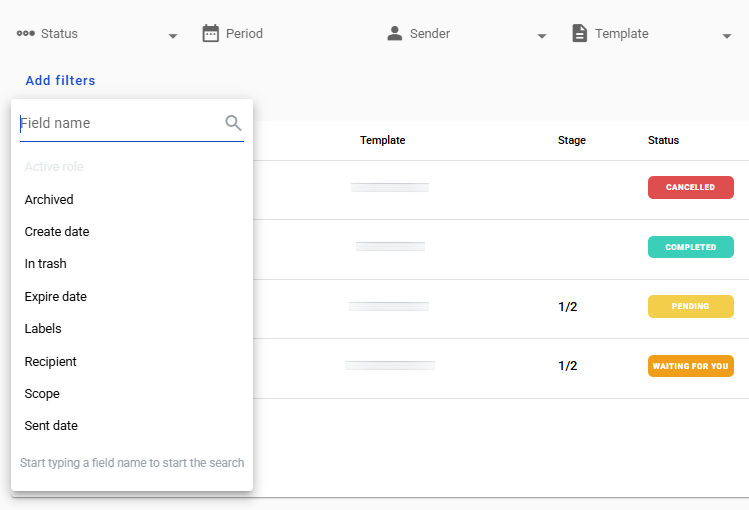
1. Open **Customize View**.
2. Start typing a field name.
3. Select a field to add it as a column.
Only fields with **Search** enabled can be added as columns.
{% endcolumn %}
{% column %}
{% endcolumn %}
{% endcolumns %}
### Filter the list
Use **Customize View** to apply filters by status or field.
For the full filtering flow, see [How to Filter Envelopes](/user/envelopes/how-to-filter-envelopes.md).
### Navigate folders
{% columns %}
{% column width="58.333333333333336%" %}
Use the folders list on the left side of the page.
{% hint style="info" %}
Your system administrator can enable hiding empty folders. Learn more in [How to Add a Corporate Account Admin](/admin-panel/users-and-user-roles/how-to-add-a-corporate-account-admin.md).
{% endhint %}
{% endcolumn %}
{% column width="41.666666666666664%" %}
{% endcolumn %}
{% endcolumns %}
### Archive envelopes
1. Select one or more envelopes.
2. Click the **Archive**  icon.
{% hint style="warning" %}
You can archive only envelopes with these statuses:
* Completed
* Overdue
* Cancelled
* Draft
{% endhint %}
#### Restore archived envelopes
1. Open the **Archived** folder.
2. Select one or more envelopes.
3. Click the **Unarchive envelope**  icon.
### Move envelopes to Trash
1. Select one or more envelopes.
2. Click the **Trash**  icon.
{% hint style="warning" %}
You can move to trash only envelopes with these statuses:
* Completed
* Expired
* Cancelled
* Draft
{% endhint %}
#### Restore envelopes from Trash
1. Open **Trash**.
2. Select one or more envelopes.
3. Click the **Restore envelopes** icon.
#### Permanent deletion
* Envelopes in **Trash** are permanently deleted after **30 days** by default. Your system administrator can change this period.
* Permanent deletion happens only after **all** participants move the envelope to **Trash**.
* If a participant’s mailbox was deleted before they moved the envelope to **Trash**, the envelope may remain there indefinitely for other participants.

 menu to change what you see in the list.
#### Add columns to the list
{% columns %}
{% column %}
1. Open **Customize View**.
2. Start typing a field name.
3. Select a field to add it as a column.
Only fields with **Search** enabled can be added as columns.
{% endcolumn %}
{% column %}
menu to change what you see in the list.
#### Add columns to the list
{% columns %}
{% column %}
1. Open **Customize View**.
2. Start typing a field name.
3. Select a field to add it as a column.
Only fields with **Search** enabled can be added as columns.
{% endcolumn %}
{% column %}

.png) For the full filtering flow, see [How to Filter Envelopes](/user/envelopes/how-to-filter-envelopes.md).
### Navigate folders
{% columns %}
{% column width="58.333333333333336%" %}
Use the folders list on the left side of the page.
{% hint style="info" %}
Your system administrator can enable hiding empty folders. Learn more in [How to Add a Corporate Account Admin](/admin-panel/users-and-user-roles/how-to-add-a-corporate-account-admin.md).
{% endhint %}
{% endcolumn %}
{% column width="41.666666666666664%" %}
For the full filtering flow, see [How to Filter Envelopes](/user/envelopes/how-to-filter-envelopes.md).
### Navigate folders
{% columns %}
{% column width="58.333333333333336%" %}
Use the folders list on the left side of the page.
{% hint style="info" %}
Your system administrator can enable hiding empty folders. Learn more in [How to Add a Corporate Account Admin](/admin-panel/users-and-user-roles/how-to-add-a-corporate-account-admin.md).
{% endhint %}
{% endcolumn %}
{% column width="41.666666666666664%" %}


 icon.
icon.
